background image

22

Garrett Metal Detectors

ATX


23

PINPOINTING TECHNIQUES

Accurate pinpointing of a target enables you to recover it quickly while also 
digging the smallest hole possible� Several pinpointing techniques will be 
offered below; use what works best for you�

  To utilize the Pinpoint button:

  •  Place the searchcoil on or near the ground, to the side of the target's 


  suspected 

location� 

  •  Press and hold the PINPOINT button 

(see illustration on p. 23)

 and  

    wait for the single beep� 

  •  Continue holding the PINPOINT button and sweep the searchcoil over 


    the target area while maintaining the same fixed height above the 


  ground� 

  •  Sweep the coil side-to-side and front-to-back in a crosshair pattern to 


    locate the peak signal, as indicated by the strongest audio and  
    maximum number of LEDs�

  •  The center of the target should be directly beneath the center of the 


  searchcoil�

  To locate a target 

without 

the PINPOINT button, sweep the coil side-

to-side and front-to-back in a cross-hair pattern over the target area while 
listening for the peak signal� In Motion Mode, it is important to keep the 
searchcoil in motion (i�e� wiggling back and forth) to pinpoint the peak signal 
area�
  In Non-Motion Mode, static pinpointing is possible without the use of 
the PINPOINT button� Simply utilize the same front-to-back and side-to-side 
scans over the target area until your coil is over the peak signal, as indicated 
by the strongest audio and maximum number of LEDs�


Note: 

For best pinpointing results, maintain a constant coil height above  

  the ground and ensure the detector is properly ground balanced� It  
  is recommended to practice pinpointing in a test plot�

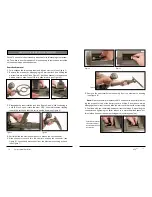
Three red LEDs to the far 
right indicates maximum 
target signal strength.

Press and hold the 
PINPOINT button to 
locate the peak signal.

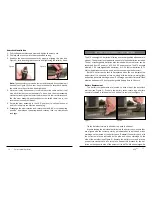
Sweep the searchcoil side-to-side and front-to-back to locate the peak signal 
at the center of the coil.

Indicates 

pinpointing 

center of the 

10"x12" DD 

searchcoil�

Содержание ATX

Страница 1: ...ghly Refined Pulse Induction Technology Owner s Manual 2013 Garrett Electronics Inc PN 1534000 A1 1013 1881 W State Street Garland Texas 75042 Tel 1 972 494 6151 Email sales garrett com Fax 1 972 494 1881 ...

Страница 2: ...ional detectors The optional 20 Deepseeker searchcoil is ideal for use in searching for caches and other deeply buried large objects In order to take full advantage of the special features and functions of the ATX you are urged to carefully read this instruction manual in its entirety TABLE OF CONTENTS CONTROLS QUICK START GUIDE 2 ATX COMPONENTS 4 LIST OF PARTS 5 EQUIPMENT SETUP 6 POWER ON BATTERY...

Страница 3: ...D 13 Set to OFF for max detection unless changing ground conditions require frequent Ground Balancing p 35 J G Ground Balance Hold Hold button while repeatedly bouncing searchcoil to quickly balance out ground minerals p 44 J H Non Motion Motion Mode Motion Mode indicated by LEDs quickly scanning back and forth is normally preferred because it is more stable quiet Non Motion Mode indicated by stat...

Страница 4: ...nge No tools are required to assemble the ATX Eight 8 AA batteries are includ ed with the detector The box for your detector contains the following parts If any part is missing please contact your local dealer LIST OF PARTS ATX COMPONENTS Search Coil with Adjustable Tilt Adjustable Arm Cuff with Strap Control Panel LED Display Battery Pack one on each side Telescoping Stem and Nuts Handle Electron...

Страница 5: ...ld allow you to stand upright no stoop ing forward and swing the coil in front of you without stretching or bending Adjusting the armrest To move the armrest forward or backward open the armrest locking lever slide the armrest to the desired position and lock the lever Armrest locking lever shown in open position Armrest locking lever shown in locked position EQUIPMENT SETUP Adjusting searchcoil t...

Страница 6: ...s and better judge a target s size shape and depth In addition to enhancing faint target signals the ATX s proportional audio also allows the operator to hear faint background noise By their nature high performance pulse detectors are often noisier than VLF type detectors therefore some minor audio noise chatter is normal An experienced operator will learn how to distinguish random background nois...

Страница 7: ...Ds Press and release SHIFT button again to exit Secondary adjustments Note The Red Shift LED must be visible to switch detection modes Motion Mode is the default setting It is usually preferred because it is more stable and quiet but requires the searchcoil to be in motion to Primary and Secondary Controls The ATX has two levels of controls primary and secondary All primary controls Sensitivity Th...

Страница 8: ... again to exit Secondary adjustments Note The Red Shift LED must be visible to adjust discrimination Non Motion Mode can provide additional detection depth and allows the searchcoil to scan very slowly even stationary over targets Non Motion Mode is better at isolating targets as target signals do not produce the audio echo which is heard in Motion Mode Non Motion Mode may be less stable and noisi...

Страница 9: ... faint signal i e Volume is a limiter and not a gain control thereby ensur ing maximum detection of faint signals The ATX has twenty five 25 levels of Volume adjustment The default setting is 10 To adjust audio Volume Press and release the SHIFT button to access Secondary controls Use the VOL and buttons to adjust the Volume to your preferred level see illustration on next page Press and release S...

Страница 10: ...zed the ground is Lightly mineralized ground will initially produce weak audio while heavily mineralized ground will initially produce strong audio Ground Track When switched on Ground Track provides slow continuous tracking to ground mineralization The ATX has four Ground Track settings OFF SLOW MEDIUM and FAST with OFF being the factory default setting To change the Ground Track setting Press an...

Страница 11: ...on to reset the audio signal back to zero Press and hold the PINPOINT button to utilize pinpointing Press and release the FREQ SCAN while holding searchcoil stationary away from any metal Iron Check Use this feature to audibly identify iron targets Iron Check only works with the DD searchcoil and will not work with mono coils If the IRON CK button is pressed while using a mono coil a repeating dua...

Страница 12: ...lized areas Iron Check accuracy may be affected Therefore use flat level swings to improve accuracy Factory Reset All changes made to the ATX settings are saved when the unit is switched OFF To return all settings back to Factory values press and hold the RETUNE PINPOINT button while switching unit ON SEARCHCOIL BASICS Use proper sweep of searchcoil Keep your searchcoil at a constant height less t...

Страница 13: ... a target without the PINPOINT button sweep the coil side to side and front to back in a cross hair pattern over the target area while listening for the peak signal In Motion Mode it is important to keep the searchcoil in motion i e wiggling back and forth to pinpoint the peak signal area In Non Motion Mode static pinpointing is possible without the use of the PINPOINT button Simply utilize the sa...

Страница 14: ...ductors will produce a Low High tone Discriminationtest Afterconductingthetonepolaritytestabove increase Discrimination Notice how the poor conductors become reduced and disappear first from detection while the good conductors are less affected Test various size iron objects to see the effects of Discrimination levels Then return to a zero Discrimination setting 1st LED Iron Check test Press and h...

Страница 15: ...chcoils such as the 20 Deepseeker coil Don t cancel a target Be careful not to ground balance over a target as you may effectively eliminate the target in most cases Hot rocks Hot rocks are typically highly ferrous iron based rocks that are either more or less conductive than the surrounding soil thereby creating a response that can resemble a target Because of the ATX s inherent immunity to most ...

Страница 16: ...ch region 3 Swing the searchcoil parallel to the water s edge to minimize changes in moisture levels within a given swing The detector may become less stable in shallow breaking surf where the searchcoil is in and out of the saltwater In this area the detector is encountering a constantly changing environment produced by the surf making it more difficult for the detector to stabilize Experiment wi...

Страница 17: ...ch that the coil is upside down see Figure 5 4 Partially slide the stem assembly out to access the coil connector 5 Slide connector cover down the cable to expose the connector see Figure 6 Loosen and disconnect from the electronics housing by hand see Figure 7 Figure 2 Figure 4 Figure 5 Figure 3 Figure 6 Figure 8 6 Remove the searchcoil stem assembly from the electronics housing see Figure 8 Note...

Страница 18: ...shipped with one set of alkaline batteries installed The set of rechargeable batteries also included with your detector can be recharged from AC power or a 12 Volt DC power source The ATX accepts alkaline 1 5V rechargeable AA batteries or 1 5V lithium batteries 3 7V lithium batteries must not be used as they can damage the detector Both ATX battery packs should be replaced when the unit indicates ...

Страница 19: ... or not suitable for charging Flashing Green LED indicates the battery is under going a discharge cycle Figure 3 Figure 4 Detail view of polarity markings sure to lubricate the O rings on each battery cover with silicone grease see Figure 4 O Ring STORING ATX IN SOFT CASE The soft carry case included with the ATX protects the detector during travel and when not in use When properly arranged it can...

Страница 20: ...ve sand sediment etc and wipe down with a clean cloth Hold the ATX under running fresh water to rinse off sediment Vigorously rotate the stem nuts back and forth and work the stems in and out while under the running water to help flush any grit from within the stem nuts Flush any debris from the stem rotation lock as well If a freshwater source is unavailable after water hunting rinse the unit in ...

Страница 21: ... when bumping coil against rocks etc Use a coil cover to cushion the coil s impact with items such as rocks trees etc The following is a Code of Ethics that many treasure hunt clubs endorse and hobbyists follow to preserve our exciting hobby of metal detecting We encourage you to do the same I will respect private and public property all historical and archaeological sites and will do no metal det...

Страница 22: ...t cover damage caused by alteration modification neglect accident or misuse Use of the ATX at submerged depths exceeding 10 feet 3 meters will void this warranty In the event you encounter problems with your ATX detector please read through this Owner s Manual carefully to ensure the detector is not inoperable due to misadjustments Press and hold the RETUNE PINPOINT pushbutton while switching the ...

Страница 23: ...h the Garrett ATX Not intended for submerged use 15 SuperSluice Gold Pan Part No 1650400 Great for wet or dry panning or finishing Traps fine gold up to nuggets over 1 oz Twin half inch riffles and deep throat funnel Hard Carry Case Part No 1626500 Protect your ATX and its optional searchcoils with this military grade transport case Foam padded interior is designed to house the ATX packed in its s...

Отзывы: