background image

Introduction

 WARNING

See the 

Important Safety and Product Information

 guide in the 

product box for product warnings and other important 

information.
It is your responsibility to use the device in a safe manner. 

Garmin

®

 will not be responsible for any property damage, injuries 

or deaths resulting from any use of this device in any activities.

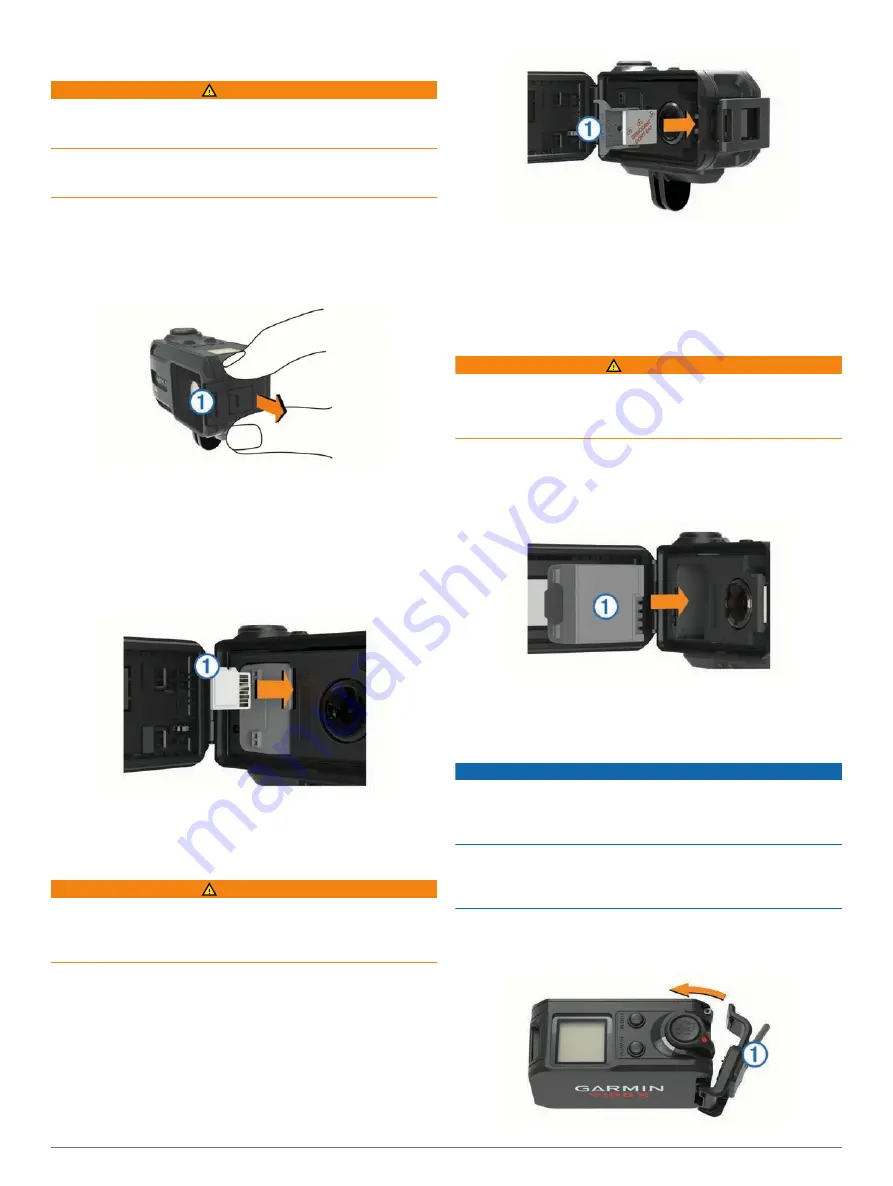
Opening the Front Cover

You must open the front cover to install the battery, memory 

card, and anti-fog desiccant pack.

1

Grip the top and bottom of the latch 

À

 and pull to open the 

latch.

2

Open the front cover.

Installing a Memory Card

You must install a microSD

 memory card to use your device. 

For optimal performance, use a class 10 or better memory card.

1

Open the front cover.

2

Insert the memory card 

À

 into the memory card slot with the 

contacts facing the lens.

3

Press in the card until it clicks.

4

Close and latch the front cover.

Installing the Desiccant Pack

 WARNING

Do not eat desiccant packs. Desiccant packs contain silica, 

which may cause irritation in your digestive system. Desiccant 

packs are harmful if swallowed by an infant or pet due to 

choking hazard.

You should install an anti-fog desiccant pack for optimal 

performance and fog resistance.

1

Open the front cover.

2

Insert the desiccant pack into the desiccant tray 

À

.

3

Insert the desiccant tray into the desiccant slot.

4

Close and latch the front cover.

The indicator dot on the desiccant pack turns pink when the 

desiccant pack becomes saturated. Heat the desiccant pack at 

85°C (185°F) for 60 minutes to dry the desiccant pack for reuse.

Installing the Battery

 WARNING

This product contains a lithium-ion battery. To prevent the 

possibility of personal injury or product damage caused by 

battery exposure to extreme heat, store the device out of direct 

sunlight.

1

Open the front cover.

2

Locate the metal contacts on the end of the lithium-ion 

battery.

3

Insert the battery 

À

 into the compartment, contacts first.

4

Press the battery into place.

5

Close and latch the front cover.

Charging the Battery

NOTICE

To prevent corrosion, thoroughly clean and dry the contacts and 

the surrounding area on the side of the device before charging 

or connecting to a computer. Refer to the cleaning instructions in 

the appendix.
Do not attempt to use the device to charge a battery that was 

not provided by Garmin. Attempting to charge a battery that was 

not provided by Garmin can damage the device and void the 

warranty.

1

Plug the USB cable into a USB port on your computer.

2

Align the charger posts with the contacts on the side of the 

device, and press the charger 

À

 until it clicks.

Introduction

1

Содержание VIRB

Страница 1: ...VIRB X XE Owner s Manual June 2015 Printed in Taiwan 190 01870 00_0B...

Страница 2: ...rademark of Garmin Ltd or its subsidiaries These trademarks may not be used without the express permission of Garmin The Bluetooth word mark and logos are owned by the Bluetooth SIG Inc and any use of...

Страница 3: ...Metrix 6 G Metrix Overlays 6 ANT Sensors 6 Pairing Your ANT Sensors 6 Tips for Pairing ANT Accessories with Your Garmin Device 6 Removing Paired ANT Sensors 6 Bluetooth Devices 6 Connecting a Wireless...

Страница 4: ......

Страница 5: ...ance 1 Open the front cover 2 Insert the desiccant pack into the desiccant tray 3 Insert the desiccant tray into the desiccant slot 4 Close and latch the front cover The indicator dot on the desiccant...

Страница 6: ...d be flush with the base 6 Insert the camera mount into the top of the adapter The device should be horizontal for the proper aspect ratio when recording video 7 Insert a thumbscrew into the larger op...

Страница 7: ...deo is saved on the memory card as an mp4 file The track log for the video and sensor data is saved on the memory card as a fit file Video Settings NOTICE To prevent damage to the device in wet condit...

Страница 8: ...the current pro settings NOTE Pro settings are available for the VIRB XE device only Color Sets the color palette You can use the Vivid option for a more vibrant color palette or the Flat option for a...

Страница 9: ...ite video cable to the VID OUT connector of the accessory cable and to an available port on your external display Photos Taking a Photo Your device provides several methods for taking a photo using th...

Страница 10: ...onnected to a compatible OBD II device ANT Sensors Your device can be used with wireless ANT sensors For more information about compatibility and purchasing optional sensors go to http buy garmin com...

Страница 11: ...IRB Edit application provides easy access to these tools and services for your device Review and edit recorded videos Add G Metrix gauges graphs and more Add titles and transitions Multi camera suppor...

Страница 12: ...on with the screen facing downward select This Side Dn Time and Date Settings Hold MENU and select System Time Date Time Format Sets the device to show time in a 12 hour or a 24 hour format Date Forma...

Страница 13: ...the recording switch Turning the Device On and Off Using the Recording Switch page 2 Use automatic recording Video Settings page 3 Disable ANT and Wi Fi Remote Wake Up when not in use Getting More Inf...

Страница 14: ...connecting 5 6 microSD card See memory card mounting the device 2 mounts optional 2 P pairing 3 ANT sensors 6 photos settings 5 taking 5 power force 3 6 power key 2 R remote control 7 S satellite sign...

Страница 15: ......

Страница 16: ...5 69 33 99 39 02 36 699699 52 001 855 792 7671 0800 0233937 47 815 69 555 00800 4412 454 44 2380 662 915 35 1214 447 460 386 4 27 92 500 0861 GARMIN 427 646 27 0 11 251 9999 34 93 275 44 97 46 7744 52...

Отзывы: