Garmin VHF 11X Series Скачать руководство пользователя страница 11

When a call is received on a valid channel, select an option:
• To accept the call and switch to the requested channel, 

select 

OK

.

• To review information about the call without switching to 

the requested channel automatically, select 

PAUSE

.

• To ignore the call and stay on the current channel, press 

CLEAR

.

Receiving Position Requests

You can configure the radio to reply automatically to incoming 

position requests, or prompt you to review and approve the 

incoming requests before replying (

Sending Automatic Replies

page 8

).

When you receive a position request with automatic position 

replies enabled, SENDING ACKNOWLEDGE appears on the 

screen, and the radio sends your position automatically. After 

the position successfully transmits, POSITION SENT appears 

on the screen.
When you receive a position request with automatic position 

replies disabled, POS. REQUEST appears on the screen.

When you receive a position request with automatic position 

replies disabled, select 

OK

, and select an option:

• To reply to the position request with your current position, 

select 

OK

.

If GPS-position or manual-position data is available, the 

radio transmits your position to the other vessel.

• To ignore the position request, press 

CLEAR

.

Receiving Position Calls

When you receive a position call, POS. SEND and the position 

data appear on the screen.

Select 

OK

.

The radio saves the position report in the call log.

Receiving Group Calls

When you receive a group call, GROUP appears on the screen, 

and the radio prompts you to change to the requested channel. 

If the channel requested is invalid, INVALID CH REQUEST 

appears on the screen.

1

Select 

OK

.

2

Turn the 

SELECT

 dial to select the requested channel.

3

Select 

OK

.

Position Tracking

When you enable position tracking, the radio uses interval-

based position requests to track up to three vessels.
Your radio transmits received position data over the NMEA 

network, and you can track the vessels using your Garmin 

chartplotter (

Configuring DSC NMEA Transmissions

, page 9

).

Selecting Vessels and Activating Position Tracking

Before you can use position tracking, you must have at least 

one vessel saved in the directory (

Directory

, page 8

).

1

Select 

DSC

 > 

POS. TRACKING

 > 

ADD ENTRY

.

2

Select the vessels you want to track.
You can track the position of up to three vessels at one time. 

If you select a fourth vessel, the radio sounds an error tone, 

and you must remove a vessel before you can add a new 

one.

3

Select 

BEGIN TRACKING

.

 appears on the screen when the radio tracks vessels.

Position-Tracking Polling Interval Sequence

Regulations allow transmission of one position-request call 

every five minutes. When tracking more than one vessel, the 

radio alternates calling each vessel in the list at five-minute 

intervals. If a vessel does not respond to five consecutive 

position-request calls, the radio removes the vessel from the 

position-tracking list.
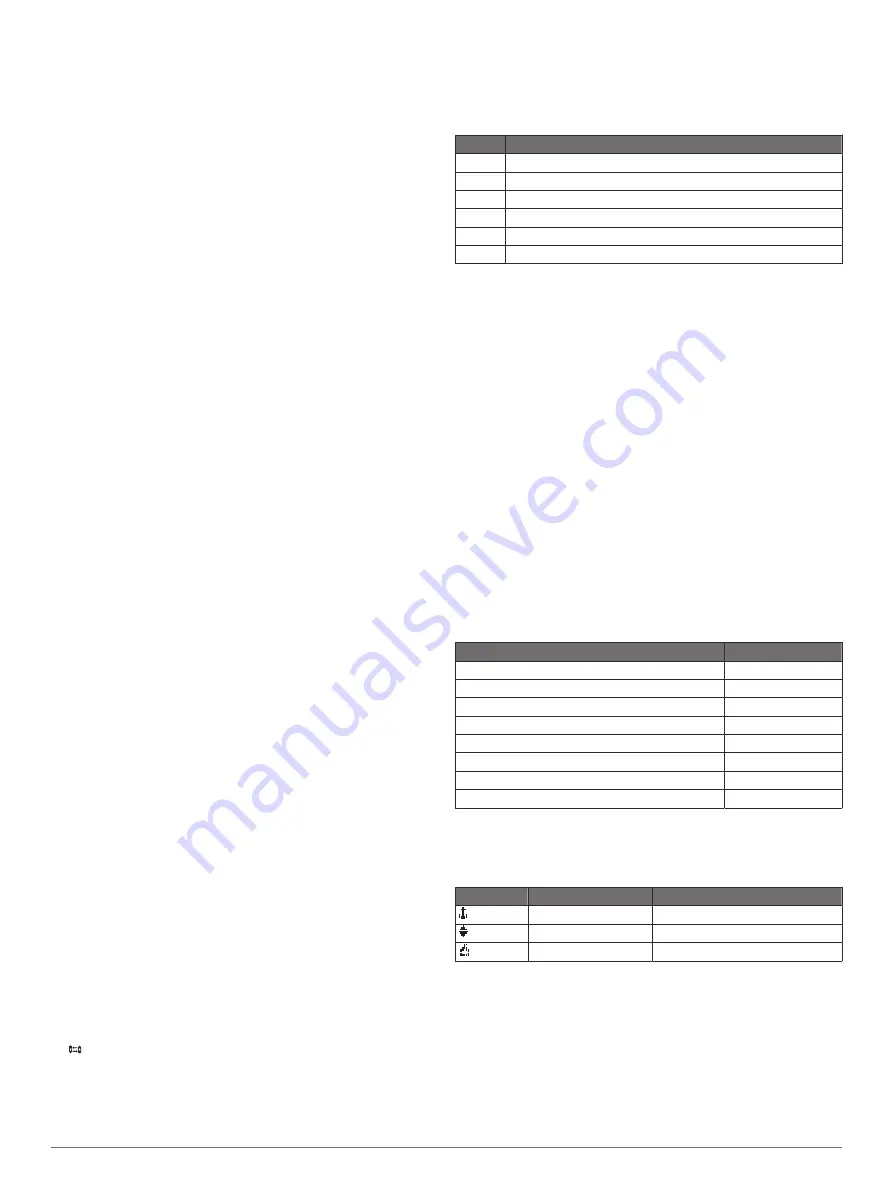
You can use this table to better understand how the time interval 

is applied to the vessels in the position-tracking list.

Vessel Time

Ship 1

0 minutes (immediately when starting position tracking)

Ship 2

5 minutes

Ship 3

10 minutes

Ship 1

15 minutes

Ship 2

20 minutes

Ship 3

25 minutes

Viewing and Deactivating Vessels on the Position 

Tracking List

You can deactivate vessels that you want to keep in the tracking 

list, but do not want to actively track.

1

Select 

DSC

 > 

POS. TRACKING

 > 

VESSELS

.

2

Select a vessel.

3

Select 

OFF

.

Deleting a Vessel From the Position Tracking List

You can delete vessels from the tracking list that you don't plan 

to track in the future.

1

Select 

DSC

 > 

POS. TRACKING

 > 

DELETE

.

2

Select a vessel.

3

Select 

YES

.

Call Log

When the radio receives a DSC call, it records the date and 

time, calling station, and type of call in the call log. The radio 

also records the latitude and longitude of the calling station if 

that data is transmitted with the call.
DSC calls are logged as distress, position, or other calls.

Call Type

Call Log

Distress

Distress

Distress relay

Distress

Distress acknowledge

Distress

Position send

Position

Position request

Position

Group

Other

All Ships

Other

Individual

Other

When you enter a calling station in your directory, the name of 

the station appears in the list of calls. If the calling station is not 

saved in your directory, the MMSI number appears in the list of 

calls. A symbol indicates the station type.

Symbol

Meaning

MMSI Number Format

Ship station

XXXXXXXXX

Group call

0XXXXXXXX

Coastal station

00XXXXXXX

Viewing the Calls in the Call Log

1

Select 

DSC

 > 

CALL LOG

.

2

Select a call-log category.

3

Select a call.
Information about the call appears on the screen.

Placing a Call from a Call Log

Calls placed from the call log are placed as individual routine 

calls.

Digital Selective Calling

7

Содержание VHF 11X Series

Страница 1: ...VHF11X 21XSERIESOWNER SMANUAL 110 110i 115 115i 210 210i 210AIS 210iAIS 215 215i 215AIS 215iAIS ...

Страница 2: ...ademarks of Garmin Ltd or its subsidiaries registered in the USA and other countries GHS is a trademark of Garmin Ltd or its subsidiaries These trademarks may not be used without the express permission of Garmin NMEA and NMEA 2000 are registered trademarks of the National Marine Electronics Association NOAA is a registered service mark of the National Oceanic and Atmospheric Administration BoatU S...

Страница 3: ...s 6 Receiving Distress Calls and Distress Relay Calls 6 Receiving All Ships Urgency and Safety Calls 6 Receiving Individual Routine Calls 6 Receiving Position Requests 7 Receiving Position Calls 7 Receiving Group Calls 7 Position Tracking 7 Selecting Vessels and Activating Position Tracking 7 Viewing and Deactivating Vessels on the Position Tracking List 7 Deleting a Vessel From the Position Track...

Страница 4: ......

Страница 5: ...ty CLEAR Select to return to the previous menu option Select to cancel or mute an incoming DSC call MENU From the home screen select to view configuration options From a menu select to return to the home screen Handset Overview PTT Hold to broadcast or Select to change the channel on the radio North America 16 9 International 16 Select to toggle between preset channels Home Screen Radio system sta...

Страница 6: ...ween 1 W and 25 W Transmitting Modes page 3 If other radios cannot receive these channels due to the low power setting you can bypass the default restriction during transmission NOTE In the International channel band the radio does not permit transmissions on these select channels to be changed to high 25 W 1 From a USA or Canadian channel set to low power by default such a 13 17 or 77 select PTT ...

Страница 7: ...matically You can select HI LO 1W to change the transmit power to low 1 W 2 On North American models select 16 9 to switch to your second priority channel 3 Select 16 9 or 16 to return to your previous channel and transmit power setting Setting the Receiving Sensitivity You can control the receiving sensitivity of the radio When you have noise in high traffic areas or areas with electromagnetic in...

Страница 8: ...E You can select to return to the previous entry in the sequence 4 Select ACCEPT NOAA Weather Broadcasts and Alerts NOTE This feature is not available on all radio models NOAA weather broadcasts on the weather WX channels are available only in the USA and certain regions in Canada Compatible radio models are programmed with 10 WX channels to monitor weather broadcasts from the National Oceanic and...

Страница 9: ...an select CLEAR to exit the screen without sending a distress call 3 Hold DISTRESS for at least three seconds The radio beeps and counts down the seconds DISTRESS CALL COUNTING DOWN appears on the screen The radio sounds an alarm switches to channel 70 and transmits your call on high 25 W power 4 Press any key to silence the alarm sound The radio tunes to channel 16 on high 25 W power 5 Select PTT...

Страница 10: ...from stations that respond to position request calls is sent over the NMEA network You can track the vessels on your Garmin chartplotter 1 Select DSC POS REQUEST 2 Select an option To enter the MMSI number manually select MANUAL enter the MMSI number and select ACCEPT To select an entry from the directory select DIRECTORY and select an entry 3 Select CALL The radio transmits the call on channel 70...

Страница 11: ...ion of up to three vessels at one time If you select a fourth vessel the radio sounds an error tone and you must remove a vessel before you can add a new one 3 Select BEGIN TRACKING appears on the screen when the radio tracks vessels Position Tracking Polling Interval Sequence Regulations allow transmission of one position request call every five minutes When tracking more than one vessel the radi...

Страница 12: ...osition and time manually MANUAL POS appears on the screen Manually entered position information must be updated regularly and the radio displays two alerts to remind you to update the position data When the position data you entered manually is more than four hours old DATA IS OVER 4 HOURS OLD appears on the screen The radio continues to transmit this position data but you should update it before...

Страница 13: ...distress and position information to any compatible connected chartplotter NMEA page 11 The radio can also receive GPS position information from a NMEA 0183 device or a NMEA 2000 network Received GPS position information appears on the home screen and is transmitted with DSC calls appears on the screen when GPS data is available and flashes when GPS data is not present When GPS data is not present...

Страница 14: ... UTC format 1 Select MENU SYSTEM UNITS TIME OFFSET 2 Turn the SELECT dial to adjust the time offset from UTC 3 Select OK Selecting the Frequency Band You can switch between the USA International or Canadian frequency bands Channel Lists page 10 NOTE Not all frequency bands are available on all device models 1 Select MENU CHANNEL FREQUENCY BAND 2 Select a frequency band Changing a Channel Name Chan...

Страница 15: ...mum specific Loran C data RMB Recommended minimum navigation information RMC Recommended minimum specific GNSS data You can purchase complete information about National Marine Electronics Association NMEA format and sentences from www nmea org NMEA 2000 PGN Information Transmit PGN Description 059392 ISO acknowledgment 060928 ISO address claim 126208 NMEA request command ack 126464 PGN list 126996...

Страница 16: ...g dual watch 3 F factory settings 10 foghorn 4 G group calling 6 8 H hailer 3 home screen 1 customizing 10 I icons 1 K keys 1 power 2 M MMSI 5 N networking 9 NMEA 0183 9 11 NMEA 2000 9 11 P placing calls 6 all ships 6 position 8 request 6 7 tracking 7 position request 8 power 3 R receiver sensitivity 3 receiving calls 6 8 S safety call 6 settings 2 10 squelch 2 system information 1 system settings...

Страница 17: ......

Страница 18: ...support garmin com GUID B7A0C5D8 4F64 4F06 BA16 2206EFCAF537 v2 April 2020 ...

Отзывы: