RTL511 Battery life
Up to 10 hr. in solid mode
Up to 5 mo. in standby mode
Operating
temperature range
From -20º to 50ºC (from -4º to 122ºF)
Charging temperature
range
From 0º to 45ºC (from 32º to 113ºF)
Radio frequency/
protocol
2.4 GHz @ 4 dBm nominal; 24 GHz @ 12 dBm
nominal
Water rating
IEC 60529 IPX7*
RTL510 LED
luminous flux
20 lm (solid mode)
29 lm (night flash mode)
65 lm (day flash mode)
RTL511 LED
luminous flux
7 lm (solid mode only)
*The device withstands incidental exposure to water of up to 1 m
for up to 30 min. For more information, go to
Varia RDU Specifications
Battery type
Rechargeable, built-in lithium-ion battery
Battery life
Up to 10 hr., typical usage
Operating temperature range From -20º to 60ºC (from -4º to 140ºF)
Charging temperature range From 0º to 45ºC (from 32º to 113ºF)
Wireless frequency/protocol
2.4 GHz ANT+ @ 0 dBm nominal
Water rating
IEC 60529 IPX7*
*The device withstands incidental exposure to water of up to 1 m
for up to 30 min. For more information, go to
Radar Detection
• The radar detects approaching vehicles up to 140 m away.
• The approaching vehicle speed must be from 10 to 160 km/h
(from 6 to 99 mph).
NOTE:
The radar does not detect vehicles traveling at the
same speed as your bike.
• The radar beam width is 40 degrees. It provides radar
coverage for typical bends in the road.
• The radar can detect up to eight approaching vehicles.
Taillight Modes and Intensity
The Varia RTL510 default light mode is solid. You can switch
the device to night flash and day flash modes by pressing the
device key. You can switch the device to standby mode by
pressing the device key. The device does not detect vehicles in
standby mode.
The Varia RTL511 has the solid mode only. You can switch the
device to standby mode by pressing the device key. The device
does not detect vehicles in standby mode.
Charging the Device
NOTICE
To prevent corrosion, thoroughly dry the USB port, the weather
cap, and the surrounding area before charging or connecting to
a computer.
The device is powered by a built-in lithium-ion battery that you
can charge using a standard wall outlet or a USB port on your
computer.
NOTE:
The device does not charge when outside the approved
temperature range (
).
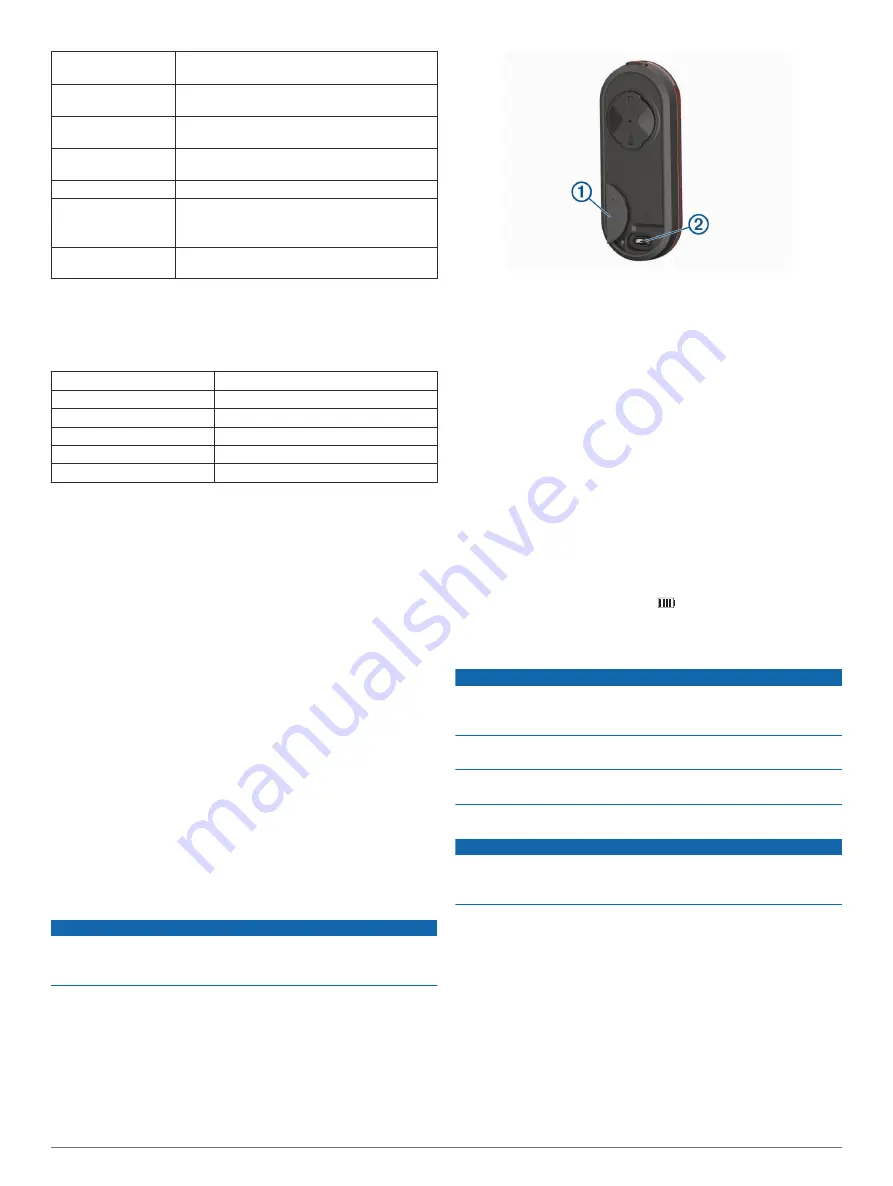
1
Pull up the weather cap
À
from the USB port
Á
.
2
Plug the small end of the USB cable into the USB port on the
device.
3
Plug the large end of the USB cable into an AC adapter or a
computer USB port.
4
Plug the AC adapter into a standard wall outlet.
5
Charge the device completely.
The status LED flashes green while charging. The status
LED is solid green when charging is complete.
6
Remove the USB cable, and close the weather cap.
Tips for Charging the Device
• Connect the charger securely to the device.
You can charge the device by plugging the USB cable into a
Garmin approved AC adapter with a standard wall outlet or a
USB port on your computer. Charging a fully depleted battery
takes about 5 hours using a computer and 3 hours using an
AC power source.
• Remove the charger from the device when the status LED is
solid green.
• View the remaining battery life
on your Edge 1030
settings widget (
).
Device Care
NOTICE
Do not store the device where prolonged exposure to extreme
temperatures can occur, because it can cause permanent
damage.
Avoid chemical cleaners, solvents, and insect repellents that can
damage plastic components and finishes.
Secure the weather cap tightly to prevent damage to the USB
port.
Cleaning the Device
NOTICE
Do not use a cloth or any material that can scratch the optical
lens on the front of the device. Scratching the optical lens may
cause poor radar performance.
• Clear mud and dirt from the weather cap area.
• While the weather cap is closed, hold the device under
running water.
After cleaning, allow the device to dry completely.
Other Compatible Devices
Pairing the Taillight with a Compatible Edge
This task is for the Edge 1000, 820, 520, and 130 devices. If
your device is not listed, go to
.
1
Bring the Edge device within range (3 m) of the sensor.
4
Other Compatible Devices
Содержание VARIA RTL510
Страница 1: ...VARIA REARVIEWRADARRTL510 RTL511 Owner sManual...
Страница 4: ......
Страница 12: ...support garmin com April 2018 190 02399 00_0A...


