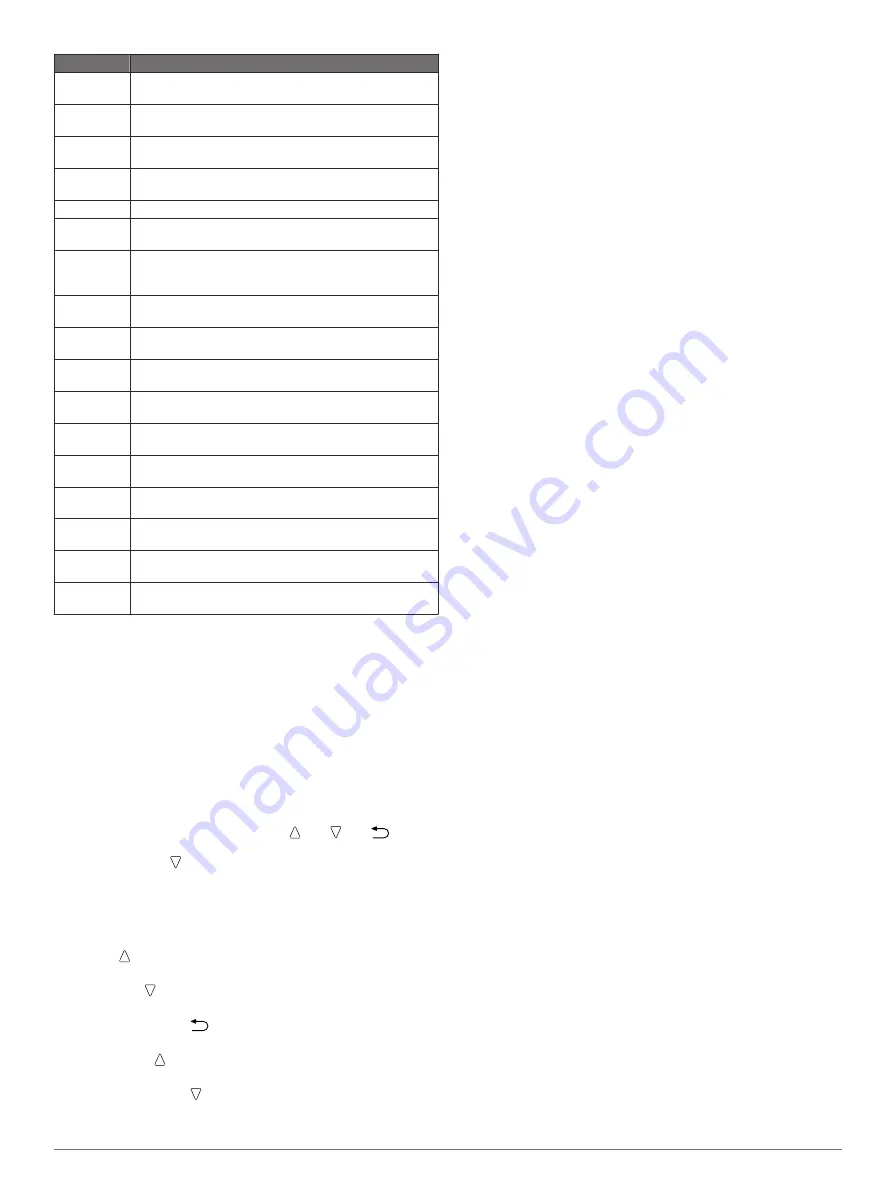
background image

Setup Item

Available Settings and Information

System

You can customize GPS settings, arrow keys, and the 
device language (

page 9

).

Data Pages

You can customize data pages and data fields 
(

page 9

).

Sensors

You can customize the compass (

page 9

) and 

altimeter (

page 10

) settings.

ANT Sensor

You can set up wireless accessories such as the heart 
rate monitor or tempe (

page 11

).

Tones

You can customize the tones and vibrations (

page 10

).

Display

You can adjust the backlight and screen contrast 
(

page 10

).

Reset

You can clear the trip data, sensor plots (

page 14

), 

waypoints, or track log, or you can reset all of your 
settings (

page 14

).

Map

You can customize the map orientation and how items 
appear on the map (

page 10

).

Tracks

You can customize the track recording settings 
(

page 10

).

Time

You can customize the appearance of the time page 
(

page 10

).

Units

You can change the units of measure for data such as 
distance, elevation, and temperature (

page 10

).

Pos. Format

You can change how your position data appears 
(

page 10

).

Profiles

You can change the active profile and edit your profiles 
(

page 2

).

Fitness

You can turn on 

Auto Lap

, customize your fitness user 

profile, and edit your heart rate zones (

page 10

).

Geocaches

You can customize how your geocaches are listed and 
activate chirp (

page 10

).

Menu

You can customize the items that appear in the main 
menu (

page 9

).

About

You can view information about the device and software 
(

page 13

).

Customizing the Main Menu

You can move or delete items in the main menu.

1

Select the action key.

2

Select 

Setup

 > 

Menu

.

3

Select a menu item.

4

Select an option:
• Select 

Move Up

 or 

Move Down

 to change the location of 

the item in the list.

• Select 

Remove

 to delete an item from the list.

Customizing the Arrow Keys

You can customize the hold function of   and   and 

 for 

your activity. For example, if the hiking profile is active, you can 

customize the hold   function to start and stop the timer.

1

Select the action key.

2

Select 

Setup

 > 

System

 > 

Hot Keys

.

3

Select an option:
• Select 

Hold Up

 to set the function performed when you 

hold  .

• Select 

Hold Down

 to set the function performed when 

you hold  .

• Select 

Data Page Back

 to set the function performed 

when you select 

.

• Select 

Data Page Up

 to set the function performed when 

you select  .

• Select 

Data Page Down

 to set the function performed 

when you select  .

NOTE: 

The available options depend on the current profile.

Customizing the Data Pages

You can customize the data pages for each profile. The 

organization and appearance of data pages depends on the 

active profile and the mode.

1

Select the action key.

2

Select 

Setup

 > 

Data Pages

.

3

Select a mode.

4

Select 

Add Page

 and follow the on-screen instructions to 

add a new page (optional).

5

Select a page to edit data fields.

6

Select an option:
• Select 

Edit

, and change the data fields.

• Select 

Move Up

 or 

Move Down

 to change the order of 

the data pages.

• Select 

Delete

 to remove the data page from the page 

loop.

System Settings

Select 

Setup

 > 

System

.

GPS Mode

: Sets the GPS to 

Normal

UltraTrac

 (

page 9

), 

Indoor

, or 

Demo Mode

 (GPS off).

WAAS

: Sets the device to use Wide Area Augmentation 

System (WAAS) GPS signals. For information about WAAS, 

go to 

www.garmin.com/aboutGPS/waas.html

.

Hot Keys

: Allows you to customize the hold function of the 

arrow keys (

page 9

).

Language

: Sets the text language on the device.

NOTE: 

Changing the text language does not change the 

language of user-entered data or map data.

About UltraTrac

UltraTrac is a GPS setting that records track points less 

frequently than normal GPS mode in order to save battery. The 

default interval between track points is one point per minute. 

You can adjust the interval.

Compass Settings

Select 

Setup

 > 

Sensors

 > 

Compass

.

Display

: Sets the directional heading on the compass to 

degrees or milli-radians.

North Ref.

: Sets the north reference of the compass 

(

page 9

).

Mode

: Sets the compass to use either a combination of GPS 

and the electronic sensor data when moving (

Auto

) or GPS 

data only (

Off

).

Calibrate

: Allows you to manually calibrate the compass sensor 

(

page 5

).

Setting the North Reference

You can set the directional reference used in calculating 

heading information.

1

Select the action key.

2

Select 

Setup

 > 

Sensors

 > 

Compass

 > 

North Ref.

.

3

Select an option:
• To set geographic north as the heading reference, select 

True

.

• To set the magnetic declination for your location 

automatically, select 

Magnetic

.

• To set grid north (000º) as the heading reference, select 

Grid

.

• To set the magnetic variation value manually, select 

User

enter the magnetic variance, and select 

Done

.

Customizing Your Device

9

Содержание tactix

Страница 1: ...tactix Owner s Manual September 2013 190 01652 00_0A Printed in Taiwan ...

Страница 2: ...d or its subsidiaries registered in the USA and other countries ANT BaseCamp chirp Garmin Connect GSC HomePort tactix and tempe are trademarks of Garmin Ltd or its subsidiaries These trademarks may not be used without the express permission of Garmin The Bluetooth word mark and logos are owned by the Bluetooth SIG Inc and any use of such marks by Garmin is under license Mac is a registered tradema...

Страница 3: ...ump Information 7 Entering Wind Information for HAHO and HALO Jumps 7 Entering Wind Information for a Static Jump 7 Constant Settings 7 Viewing Tide Information 7 Clock 7 Setting the Alarm 7 Starting the Countdown Timer 7 Using the Stopwatch 8 Adding a Custom Time Zone 8 Editing a Custom Time Zone 8 Alerts 8 Setting a Proximity Alarm 8 Calculating the Size of an Area 8 Viewing the Almanacs 8 Viewi...

Страница 4: ...onitor 14 Data Management 14 File Types 14 Disconnecting the USB Cable 14 Deleting Files 14 Troubleshooting 14 Locking the Keys 14 Resetting Your Device 14 Resetting the Device to Factory Settings 14 Clearing All Sensor Plot Data 14 Getting More Information 14 Appendix 14 Data Fields 14 Registering Your Device 16 Software License Agreement 16 Altimeter and Barometric Readings 16 Heart Rate Zone Ca...

Страница 5: ...side of the charging cradle À with the groove on the left side of the device 4 Align the hinged side of the charger Á with the contacts on the back of the device When you connect the device to a power source the device turns on 5 Charge the device completely Keys À Select to turn the backlight on and off Hold to turn the device on and off Á Select to scroll through the data pages options and setti...

Страница 6: ...d BaseCamp to your computer www garmin com basecamp You can view your tracks and waypoints on your computer 1 Connect your device to your computer using the USB cable Your device appears as a removable drive in My Computer on Windows computers and as a mounted volume on Mac computers 2 Start BaseCamp 3 Follow the on screen instructions Profiles Profiles are a collection of settings that optimize y...

Страница 7: ...y and to enter characters 7 Select _ Done Increasing the Accuracy of a Waypoint Location You can refine a waypoint location for more accuracy When averaging the device takes several readings at the same location and uses the average value to provide more accuracy 1 Select the action key 2 Select Waypoints 3 Select a waypoint 4 Select Average 5 Move to the waypoint location 6 Select Start 7 Follow ...

Страница 8: ...ck select Save Part and select the part to save Viewing Details about the Track 1 Select the action key 2 Select Tracks 3 Select a track 4 Select View Map The beginning and the end of the track are marked by flags 5 Select Details 6 Use and to view information about the track Clearing the Current Track 1 Select the action key 2 Select Tracks Current Clear Deleting a Track 1 Select the action key 2...

Страница 9: ...mbols appear on the map When you are navigating to a destination your route is marked with a line on the map Map navigation page 5 Map settings page 10 Browsing the Map 1 While navigating select to view the map 2 Select the action key 3 Select an option To pan up or down select Pan and select or To pan right or left select Pan and select or To navigate to a saved location select Pan select the act...

Страница 10: ...e to find a chirp in a geocache For more information about the chirp see the chirp Owner s Manual at www garmin com Finding a Geocache with a chirp 1 Select the action key 2 Select Setup Geocaches chirp On 3 Hold 4 Select Start GPS 5 Wait while the device locates satellites 6 Select the action key 7 Select GPS Tools Geocaches 8 Select a geocache and select chirp to show chirp details while you are...

Страница 11: ...s the drift distance to the DIP and a setting greater than 100 increases the drift distance More experienced jumpmasters may want to use smaller numbers and less experienced skydivers may want to use larger numbers Safety Fctr Sets the margin of error for a jump HAHO only Safety factors are usually integer values of two or greater and are determined by the jumpmaster based on specifications for th...

Страница 12: ... minimum and maximum heart rate values or select zone changes See page 12 and page 17 Cadence Range You can set minimum and maximum cadence values Battery Event You can set a low battery power alert Setting a Proximity Alarm Proximity alarms alert you when you are within a specified range of a particular location 1 Select the action key 2 Select Alerts Proximity Edit Create New 3 Select a location...

Страница 13: ...lect Select Data Page Up to set the function performed when you select Select Data Page Down to set the function performed when you select NOTE The available options depend on the current profile Customizing the Data Pages You can customize the data pages for each profile The organization and appearance of data pages depends on the active profile and the mode 1 Select the action key 2 Select Setup...

Страница 14: ...utes FIT records additional information such as lap data and is used to record a track greater than 10 000 points FIT files can be uploaded to Garmin Connect and are much more compact than GPX files GPX FIT allows you to output both file types Time Settings Select Setup Time Time Page Allows you to customize the appearance of the time of day Format Allows you to select a 12 hour or a 24 hour displ...

Страница 15: ...s appears by date 3 Select an activity 4 Select Details or View Map Saving an Activity as a Track You can save an activity as a track using GPS This allows you to perform GPS functions with the activity such as navigation and routes 1 Select the action key 2 Select FIT History 3 Select an activity 4 Select Save as Track Deleting an Activity 1 Select the action key 2 Select FIT History 3 Select an ...

Страница 16: ... You can use water saliva or electrode gel Tighten the strap on your chest Warm up for 5 10 minutes Wash the strap after every seven uses page 14 Wear a cotton shirt or wet your shirt if suitable for your activity Synthetic fabrics that rub or flap against the heart rate monitor can create static electricity that interferes with heart rate signals Move away from sources that can interfere with you...

Страница 17: ...nd insect repellents that can damage plastic components and finishes Thoroughly rinse the device with fresh water after exposure to chlorine salt water sunscreen cosmetics alcohol or other harsh chemicals Prolonged exposure to these substances can damage the case Avoid pressing the keys under water Avoid extreme shock and harsh treatment because it can degrade the life of the product Do not store ...

Страница 18: ...mputers drag the volume icon to the trash 2 Disconnect the cable from your computer Deleting Files NOTICE If you do not know the purpose of a file do not delete it Your device memory contains important system files that should not be deleted 1 Open the Garmin drive or volume 2 If necessary open a folder or volume 3 Select a file 4 Press the Delete key on your keyboard Troubleshooting Locking the K...

Страница 19: ... elevation The altitude of your current location using GPS GPS HDNG GPS heading The direction you are moving based on GPS GRADE The calculation of rise elevation over run distance For example if for every 10 feet 3 m you climb you travel 200 feet 60 m the grade is 5 GR DEST glide ratio to destination The glide ratio required to descend from your current position to the destination elevation You mu...

Страница 20: ...de good The speed at which you are closing on a destination along a route You must be navigating for this data to appear Registering Your Device Help us better support you by completing our online registration today Go to http my garmin com Keep the original sales receipt or a photocopy in a safe place Software License Agreement BY USING THE DEVICE YOU AGREE TO BE BOUND BY THE TERMS AND CONDITIONS...

Страница 21: ...tion possible Basic cardiovascular training good recovery pace 3 70 80 Moderate pace more difficult to hold conversation Improved aerobic capacity optimal cardiovascular training 4 80 90 Fast pace and a bit uncomfortable breathing forceful Improved anaerobic capacity and threshold improved speed 5 90 100 Sprinting pace unsustainable for long period of time labored breathing Anaerobic and muscular ...

Страница 22: ...ime athlete 10 locations 4 8 editing 3 saving 3 locking keys 14 M main menu customizing 9 man overboard MOB 6 maps 4 browsing 5 navigating 5 orientation 10 settings 10 viewing 11 zoom 5 menu 1 moon phase 8 N navigation 4 compass 4 Sight N Go 5 waypoints 3 north reference 9 P pairing ANT sensors 11 position format 10 product registration 16 profiles 2 10 proximity alarms 8 R registering the device ...

Страница 23: ......

Страница 24: ...99 0800 023 3937 035 539 3727 47 815 69 555 00800 4412 454 44 2380 662 915 35 1214 447 460 34 93 275 44 97 46 7744 52020 Garmin International Inc 1200 East 151st Street Olathe Kansas 66062 USA Garmin Europe Ltd Liberty House Hounsdown Business Park Southampton Hampshire SO40 9LR UK Garmin Corporation No 68 Zhangshu 2nd Road Xizhi Dist New Taipei City 221 Taiwan R O C 2013 Garmin Ltd or its subsidi...

Отзывы: