


4
Connect the adapter cable to the CAN 1 port on the back of
the stereo dock.
5
Connect the cable from the NRX remote control network to
the adapter cable.
6
Select an option:
• If the NRX remote control network connects to an
additional power source, continue with the dock
installation.
• If the NRX remote control network does not connect to an
additional power source, proceed to the next step.
7
Turn on the stereo.
8
On the stereo, from the music player, select >
Settings
>
NRX Power
.
When the check box is filled, the dock supplies power and
data to the connected NRX remote controls.
Dock Installation
You must use the included bracket to install the device dock into
a specific vehicle type.
The product package includes the hardware required to attach
the bracket to the dock. The product package does not include
the hardware to attach the bracket to the dashboard or the
dashboard panel.
Installing the Bracket for FIAT
™
Ducato Vehicles
You should use the included screws to attach the bracket to the
dock.
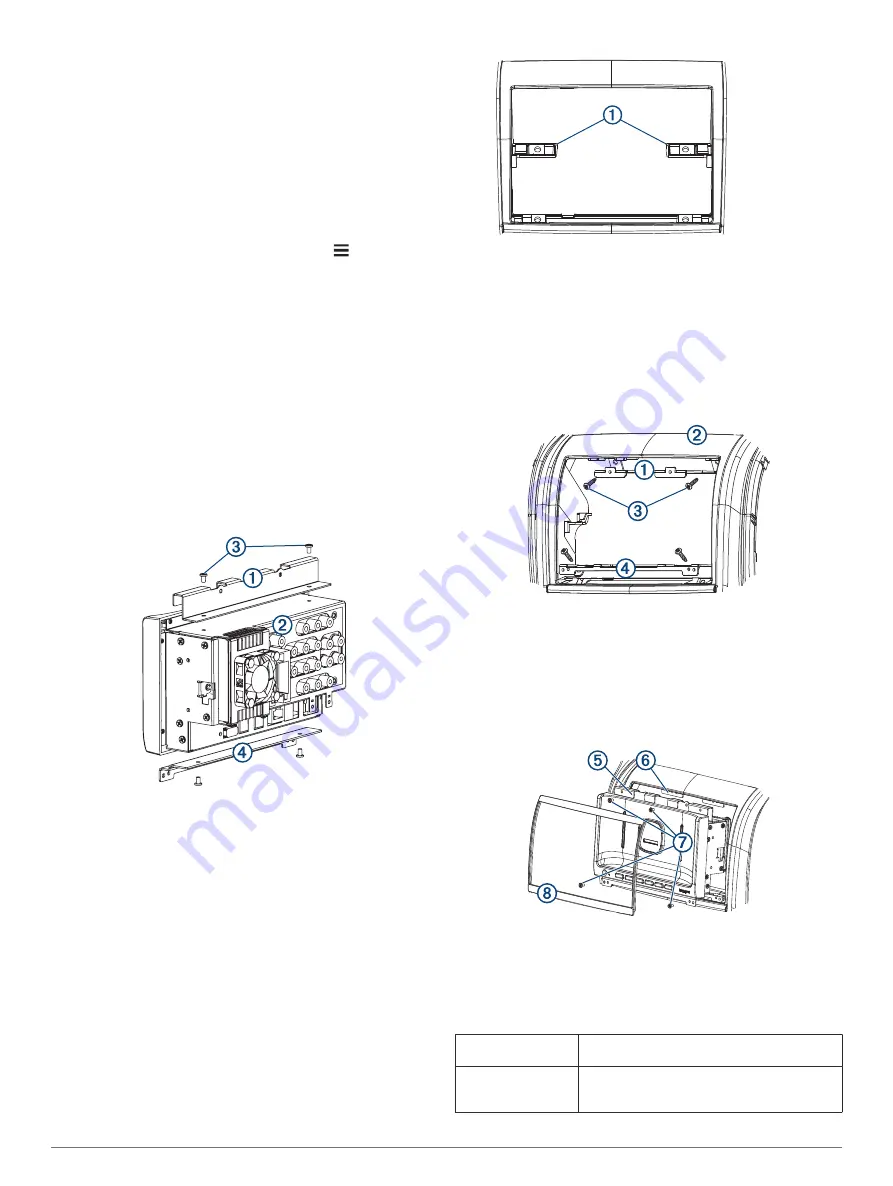
1
Place the upper half of the bracket
À
on the dock
Á
, aligning
the holes in the bracket with the holes on the top of the dock.
2
Using the included screws
Â
, secure the bracket to the top of
the dock.
3
Repeat this procedure for the lower half of the bracket
Ã
.
Preparing a FIAT Ducato Dashboard for Installation
The dashboard in a FIAT Ducato must be modified to support a
double-DIN stereo.
1
If necessary, remove the dashboard panel or components to
reach the stereo mounting location.
2
Using a utility knife or similar tool, remove the plastic
mounting posts in the center of the stereo mounting location
À
.
Installing the Dock in a FIAT Ducato Dashboard
Before you can install the dock in the dashboard, you must
install the bracket on the dock.
The product package does not include the screws required to
fasten the dashboard bracket to the dashboard.
The product package includes the screws required to fasten the
dock bracket to the dashboard bracket.
1
Place the upper dashboard bracket
À
on the dashboard
Á
,
aligning the holes on the bracket with the holes in the
dashboard.
2
Secure the upper dashboard bracket to the dashboard using
screws
Â
(not included).
3
Repeat this procedure for the lower dashboard bracket
Ã
.
4
From inside the dashboard, connect all necessary cables and
wires to the dock.
5
Place the dock in the dashboard, and connect the dock
bracket
Ä
to the dashboard bracket
Å
using the included
screws
Æ
.
6
Place the bezel
Ç
on the front of the dock.
Magnets hold the bezel in place.
Specifications
RV-BBT602 Series Remote Specifications
Operating
temperature range
From -20° to 60°C (from -4° to 140°F)
Charging
temperature range
(vehicle power)
From 0° to 40°C (from 32° to 104°F)
2
Содержание RV-BBT602
Страница 4: ......