background image

1.15  HIGHlIGHTING TRAffIC DATA USING MAP PANNING

Another map page function is panning, which allows changing the map beyond 

its current limits without adjusting the map scale.  Select the panning function by 
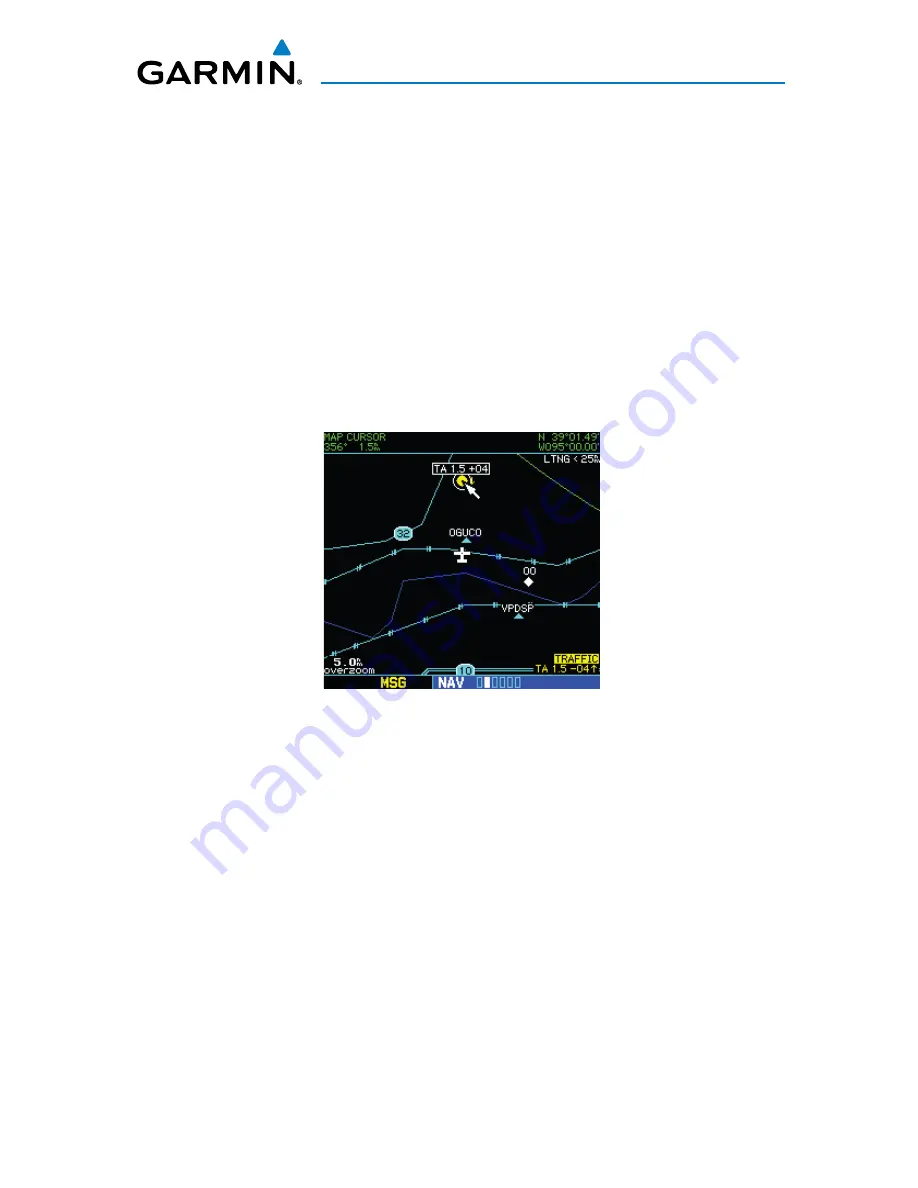
pressing the small right knob, a target pointer flashes on the map display (Figure 11).  
Also a window appears at the top of the map display showing the latitude/longitude 
position of the pointer, and the bearing and distance to the pointer from the present 
position.

Selecting the panning function and panning the map display:

1)  Press the small right knob to activate the panning target pointer (Figure 

11).

Figure 11  Panning the Map Display

2)  Turn the small right knob clockwise to move up, or counterclockwise to 

move down.

3)  Turn the large right knob clockwise to move right, or counterclockwise to 

move left.

4)  To cancel the panning function and return to the present position, press 

the small right knob.

When the target pointer is placed on traffic, the traffic range and relative altitude 

are displayed (Figure 11).  The traffic is identified as:

•  TA: Traffic Advisory
•  PA: Proximity Advisory
•  TRFC: Other Traffic

400/500 Pilot’s Guide Addendum for GTS 8XX Interface

190-00140-78 Rev. A

13

GTS 8XX Interface

Содержание GPSMAP 800 Series

Страница 1: ...400 500 Series GTS 8XX Interface Pilot s Guide Addendum...

Страница 2: ......

Страница 3: ...r Taipei County Taiwan Tel 886 02 2642 9199 Fax 886 02 2642 9099 Web Site Address www garmin com Except as expressly provided herein no part of this manual may be reproduced copied transmitted dissemi...

Страница 4: ...should be compared with other navigation sources WARNING For safety reasons 4XX 5XX operational procedures must be learned on the ground WARNING The United States government operates the Global Positi...

Страница 5: ...on is subject to the following two conditions 1 this device may not cause harmful interference and 2 this device must accept any interference received including interference that may cause undesired o...

Страница 6: ...Between Standby and Operating Modes 6 1 8 Traffic Page 7 1 9 Traffic Page Display Range 7 1 10 Altitude Display Mode 8 1 11 Traffic Warning Window 10 1 12 Map Page Traffic Banner 10 1 13 Configuring T...

Страница 7: ...t computes the responding aircraft s range bearing relative altitude and closure rate The GTS 8XX then determines the advisory status of the target and sends the location information and alert status...

Страница 8: ...gh 3 miles Out of Range Traffic Advisory This solid yellow half circle appears on the outer range ring under the same conditions and has the same urgency as a TA Its appearance differs from the TA onl...

Страница 9: ...less than 30 seconds of vertical and horizontal separation Or Intruder range is within 0 55 nm and vertical separation is within 800 feet B No Intruder closing rate is less than 20 seconds Table 2 TA...

Страница 10: ...switch and is on the ground the Standby Screen is displayed Figure 2 If the GTS 8XX passes the power up test and the aircraft both has a squat switch and is airborne the Traffic Page is displayed on...

Страница 11: ...teria are identical to the power up self test although the user initiated test is concluded by an aural pass fail message NOTE A user initiated test can only be performed when in standby or failed mod...

Страница 12: ...S 8XX switches out of standby into the 6 nm display range NOTE The GTS 8XX will automatically switch out of standby 8 to 10 seconds after takeoff which is determined by ground speed or by a transition...

Страница 13: ...splayed if more than one TA with no bearing info is active while the TA of most immediate threat is displayed in text below the banner Figure 4 Traffic Page Orientation Source Traffic Advisory with no...

Страница 14: ...ging the Altitude Display Mode 1 From the Traffic Page press the small right knob to activate the cursor and highlight the current mode Figure 6 2 Turn the small right knob to cycle through the option...

Страница 15: ...when using the small right knob Figure 6 Unrestricted UNR Mode Selected Altitude Display Mode 3 Press the small right knob to turn the cursor off after the selection is made 400 500 Pilot s Guide Adde...

Страница 16: ...age NOTE TheTrafficWarningWindow is disabled when the aircraft ground speed is less than 30 knots or when an approach is active Figure 7 Traffic Warning Window 1 12 Map Page Traffic Banner A Traffic b...

Страница 17: ...ll right knob to select the Map Page 2 Press the MENU Key to display the Page Menu 3 Turn the small right knob to select Setup Map 4 Press the ENT Key The flashing cursor highlights the GROUP field 5...

Страница 18: ...NU Key to display the Page Menu 3 Turn the small right knob to select Change Fields 4 Press the ENT Key 5 Turn the large right knob to select one of the three fields 6 Turn the small right knob to sel...

Страница 19: ...n and panning the map display 1 Press the small right knob to activate the panning target pointer Figure 11 Figure 11 Panning the Map Display 2 Turn the small right knob clockwise to move up or counte...

Страница 20: ......

Страница 21: ......

Страница 22: ...U K p 44 0 870 8501241 f 44 0 870 8501251 Garmin Corporation No 68 Jangshu 2nd Road Shijr Taipei County Taiwan p 886 2 2642 9199 f 886 2 2642 9099 www garmin com Garmin International Inc 1200 East 15...

Отзывы: