background image

80 

GPSMAP 495 Owner’s Manual

Automotive

Automotive Mode Pages and Features > 

Editing and Managing Waypoints

The total number of stored and available waypoint information 

is available at the bottom of the User sub tab, with the stored 

waypoints arranged in alphanumerical order.

To start a Go To from the User Points tab:

1.  Press 

MENU

 twice to open the Main Menu. 

2.  Highlight 

Points

 from the vertical list of tabs, then highlight 

User


from the top row of tabs.

3.  Use the 

ROCKER

 to highlight a waypoint. 

4.  Press 

Direct To 

. Highlight 

Go To


<Point Name>

, and press 

ENTER

  OR  

Press 

ENTER

 when the waypoint is highlighted to review the 

waypoint on the Waypoint Page. See the previous pages for 

detailed information on reviewing and editing waypoints.

Deleting Waypoints

You can delete waypoints from the waypoint list in the 

Points

 tab or 

from the Waypoint Pages. To delete a waypoint from the Waypoint 

Page, use the 

ROCKER

 to highlight the on-screen 

Delete

 button 

and press 

ENTER

.


NOTE: 

When you delete a waypoint, you cannot recover it 

from the unit. Back up important waypoints to a computer using 

the USB cable and software, such as MapSource, or write the 

coodinates down by hand. 

To access the Points tab:

1.  Press 

MENU

 twice to open the Main Menu. 

2.  Highlight 

Points

 from the vertical list of tabs. 

3.  Press the 

ROCKER

 right or left to highlight 

User

 or 

Proximity

 to 

open that sub tab.

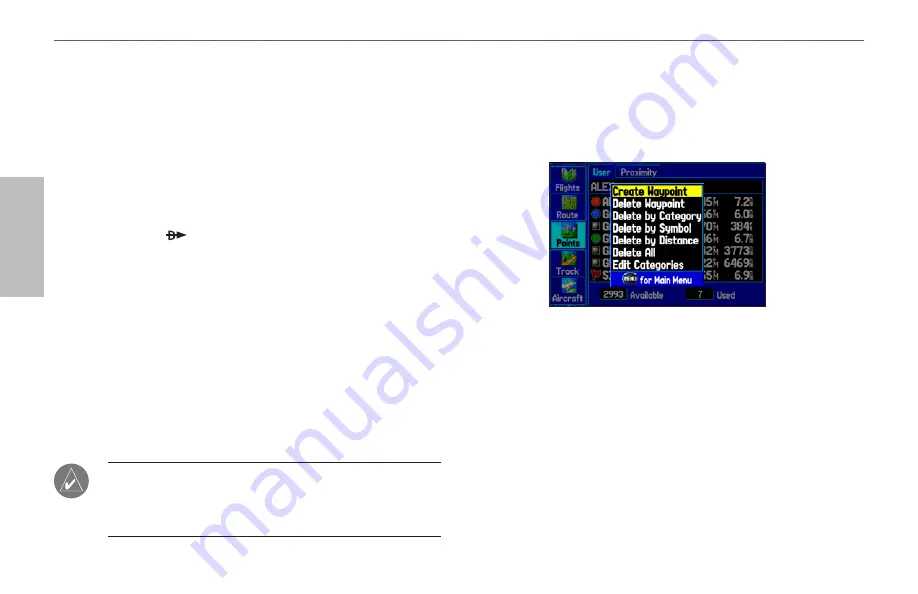
To delete a waypoint from the User sub tab:

1.  From the 

User

 sub tab, use the 

ROCKER

 to highlight the 

waypoint you want to delete. 

2.  Press 

MENU

, highlight 

Delete Waypoint,

 and press 

ENTER

.

3.  Press 

ENTER

 to confirm.

Содержание GPSMAP 495

Страница 1: ...Owner s Manual portable aviation receiver GPSMAP 495...

Страница 2: ...viewed and to print one copy of this manual or of any revision hereto provided that such electronic or printed copy of this manual must contain the complete text of this copyright notice and provided...

Страница 3: ...n database About This Manual To get the most out of your new navigation system read this manual and learn the operating procedures for your unit Manual Conventions This manual uses the term Warning to...

Страница 4: ...ting an Approach 23 Finding Points on Land 25 Marking a Waypoint 26 Creating a Flight Plan Route 27 Following your Flight Plan 28 Aviation Mode Pages 29 Map Page 29 Terrain Page 37 Panel Page 40 Activ...

Страница 5: ...nar Tab 99 Aircraft Tab 100 Alarms Tab 100 Celestial Tab 103 Message Tab 107 Display Tab 108 Sound Tab 109 Setup Tab 110 Location Sub Tab 114 Setting up and Using Sonar 120 Showing Sonar on the Map Pa...

Страница 6: ...Information 141 Optional Accessories 142 Installation Information 143 Learning About GPS 148 LORAN TD Setup 150 Map Datums and Location Formats 152 Digital Selective Calling DSC 153 Jeppesen Database...

Страница 7: ...e fully aware of all driving conditions Minimize the amount of time spent viewing the unit s screen while driving and use voice prompts when possible Do not input destinations change settings or acces...

Страница 8: ...attery away from children Do not disassemble puncture or damage the battery Only replace with a Garmin lithium ion battery pack Using another battery presents a risk of re or explosion To purchase a r...

Страница 9: ...ally generated turn by turn directions Detachable GPS antenna collapses for storage Be sure the antenna is up as shown here to receive satellite signals Refer to page 147 for instructions on removing...

Страница 10: ...draw on the aircraft vehicle boat battery Information about Charge Mode Applying external power to the GPSMAP 495 automatically turns on the unit for full operation If the battery is present and needs...

Страница 11: ...hold the POWER key When the unit turns on a tone sounds and the Warning Page appears Warning Page 2 Read and be sure you understand the warning Press ENTER to continue 3 To turn off the GPSMAP 495 pre...

Страница 12: ...Viewing GPS Status With the GPS Tab The GPS tab provides a visual reference of satellite acquisition receiver status and accuracy The sky view and signal strength bars give an indication of what sate...

Страница 13: ...tellite whose almanac has been collected which can take up to 5 minutes Acquiring Satellites the receiver is looking for and collecting data from satellites visible at its last known or initialized lo...

Страница 14: ...ltitude New Location allows you to enter a new location automatically or using the map When in Aviation Mode you can enter the airport identi er GPS Tips While the receiver is gathering information yo...

Страница 15: ...ress and hold to turn the unit on or off Press and release to adjust the backlighting and external speaker volume IN OUT Keys Press to zoom in or out on the Map Page ROCKER Keypad Press up down right...

Страница 16: ...t is controlled by the ROCKER The following features are referred to throughout this manual Highlight move the highlighted area on the screen up down left or right with the ROCKER to select individual...

Страница 17: ...rt an option 1 Press MENU on any page An options menu appears with a list of optional features for that page 2 Use the ROCKER to move the highlight up down right or left on the menu to your selection...

Страница 18: ...oice Guidance databases are available in the USA and Europe only Your GPSMAP 495 comes with AOPAAirport Directory Safe Taxi Jeppesen database Obstacle database Terrain database and Voice Guidance data...

Страница 19: ...When the unit is set to Simulator Mode the GPS receiver is turned off Any Satellite Signal Strength Bars shown are only simulations and do not represent the strength of actual satellite signals Start...

Страница 20: ...ap you want and press ENTER You can also select a New Location by entering an airport identi er code Select Use Identi er from the GPS tab options menu Enter the airport code using the ROCKER Refer to...

Страница 21: ...speci cally relate to that page To view the options menu for any page press MENU Aviation Mode features ve main pages Map Page Terrain Page Panel Page Active Route Page and Position Data Page An examp...

Страница 22: ...lect Route Find Land Points and Remove Point Go To Page Aviation Tab Airport identi er Facility name City To go to an airport or navaid 1 Press Direct To to show the Go To Page Use the ROCKER to show...

Страница 23: ...selected destination Viewing Details for the Destination The Show Details option shows detailed information for your destination waypoint or the next waypoint in a route This feature is convenient for...

Страница 24: ...r approach for which you would like to view additional information Viewing Frequency Restrictions The Comm tab on the Airport Details Page provides a list of communication frequencies for that airport...

Страница 25: ...e AOPA Airport Directory information 1 Select an airport using the map or the NRST FIND key 2 Use the ROCKER to select the AOPA tab 3 Press up and down on the ROCKER to scroll through the AOPA Directo...

Страница 26: ...Airport nearest 15 identi er bearing distance length of the longest runway and common traf c advisory CTAF or tower frequency Wx Airport Weather Sources nearest 15 airport weather sources including A...

Страница 27: ...o select the nearest airport as your destination 1 Press NRST twice to show the Airport tab and highlight the nearest airport 2 Press ENTER to view airport information 3 Verify the Go To button is hig...

Страница 28: ...ARTCC Tab 4 Select the numbered item that you want from the list and press ENTER to show the communication information The lowest numbers on the list are the closest communication points Viewing Airsp...

Страница 29: ...e Nearest Pages use the ROCKER to select the Airspace tab Nearest Pages Airspace Tab 2 Use the ROCKER to select the airspace alert entry on the page and press ENTER An information page opens to show t...

Страница 30: ...xcept water landing facilities Water Only shows only water landing facilities Minimum Runway Length allows you to enter a speci c length for the shortest runway allowed To enter airport criteria 1 Pre...

Страница 31: ...hen using a route the selected approach for the destination airport overrides your current route The original route is saved in the Route tab You can select an approach several ways Press Direct To an...

Страница 32: ...ing a bold magenta line If No is selected for the Vectors option the GPSMAP 495 creates a straight line course directly to the rst waypoint in the approach from wherever you are when you initiate the...

Страница 33: ...w the Go To Page 2 Press MENU to open the options menu Go To Page Options Menu 3 Highlight Find Land Points and press ENTER The Find Menu opens Find Menu 4 Press MENU to select the search method For e...

Страница 34: ...Managing Waypoints section beginning on page 74 To mark your present location 1 Press and hold ENTER MARK until the Mark Waypoint Page appears 2 To accept the waypoint with the default name Waypoint u...

Страница 35: ...ns menu Use the ROCKER to highlight New Route and press ENTER OR Highlight the rst blank line and press ENTER 4 Press MENU to show the options menu Use the ROCKER to highlight Add Waypoint and press E...

Страница 36: ...nce are xed The From point is the location where the Go To was initiated In Automotive Mode the Go To line on the map is constantly updated to your present location Terrain and Obstacle Changes Press...

Страница 37: ...a triangle symbol in Marine and Automotive Modes The GPSMAP 495 always turns on in location mode with the last known location centered on the map When you press the ROCKER the GPSMAP 495 enters pan mo...

Страница 38: ...ge value represents the distance between the ends of the range bar To select a map zoom range zoom in and out Press the OUT key to zoom out Press the IN key to zoom in The system uses optional MapSour...

Страница 39: ...your present location update as you move To re center your location on screen 1 When you are nished panning the map press QUIT 2 The map automatically moves to show your present location and the unit...

Страница 40: ...n on airspaces depicted on the map Airspace Information Highlighted airspace area Information box with airspace name type and oor ceiling limits To retrieve airspace information from the Map Page 1 Us...

Страница 41: ...ion Mode press ENTER again to return ALL detail to the map In Marine and Automotive Modes press MENU highlight Declutter On or Declutter Off and press ENTER Measuring Distance You can measure the dist...

Страница 42: ...des a visual cue of an important heading for current or future use You can also turn the Bug Indicator off here 4 Highlight the option from the list and press ENTER You can also set the Bug Indicator...

Страница 43: ...ress MENU to open the options menu 3 Highlight Set up Page Layout and press ENTER Changing the layout of the Map Page 4 Select the option you want and press ENTER The options vary between the three us...

Страница 44: ...are shown on the Map Page To change the setting for a Map Family highlight the box next to the Map Family name and press ENTER to select check mark or deselect no check mark the Show setting 4 To view...

Страница 45: ...in yellow are between 1 000 feet and 100 feet below the aircraft The black areas are further away than the Caution Elevation A projected point of impact is marked with an X Obstacle Information Obstac...

Страница 46: ...rning Shown on the Panel Page Additional Terrain Page Options Access the Terrain Page options menu by pressing MENU while you are on the Terrain Page Press ENTER to quickly declutter the map just as y...

Страница 47: ...e you reach the terrain or obstacle Alert Sensitivity The three Alert Sensitivity settings Terrain Obstacle and Descent Rate determines what level of alerts are annunciated The GPSMAP 495 defaults to...

Страница 48: ...tes your current ground track at the top of the page The course pointer and course deviation needle indicate the course and whether you are on the course A bug indicator provides information to guide...

Страница 49: ...R A window appears at the center of the HSI showing the scale settings The current setting is highlighted 3 Use the ROCKER to select the scale and press ENTER Manually Setting a Course Use the Set OBS...

Страница 50: ...above the target altitude the Approaching Target Altitude message appears the time to vertical navigation goes blank and the VNAV indicator disappears from the Panel Page CAUTION The GPSMAP 495 is a V...

Страница 51: ...point automatically changes to your destination after you begin navigating to a destination Target Altitude enter the altitude you want to be at when you reach your target location Select Above Waypoi...

Страница 52: ...Options Press MENU while on the Active Route Page to open the options menu You can edit the route using many of the options in the menu such as Edit on Map see page 73 for information Add Waypoint an...

Страница 53: ...Type The Wheeler Downtown KMKC airport is the nearest airport and you are 6 3 nm S of KMKC Position Data Page Options With the Position Data Page open press MENU to open the options menu You can set u...

Страница 54: ...irport is continuously updated as your ight progresses If you land and groundspeed drops below 30 knots the ight entry is saved and a new entry is recorded when you depart the airport A touch and go o...

Страница 55: ...e Review Page The maximum speed is used to de ne the range for airspeed on the Panel Page and is automatically updated if you exceed this gure To enter an aircraft pro le 1 From the Aircraft Pro le ta...

Страница 56: ...dbook for your airplane which also notes the weight limitations and fore aft CG limits Compare those gures to the values calculated by the GPSMAP 495 To perform weight and balance calculations 1 Press...

Страница 57: ...tor or directional gyro Baro Pressure required entry for density altitude true airspeed calculation Use current altimeter setting barometric pressure Total Air Temperature required entry for density a...

Страница 58: ...or True Airspeed and Density Altitude are shown in the designated elds E6B Tab Calculated gures Calculated gure Calculated or user entered gure Barometric pressure To calculate winds aloft 1 Follow th...

Страница 59: ...tional Highway and Compass Pages can also be enabled Two additional pages appear during active navigation while in Automotive Mode a Current Route Page appears if you are navigating a turn by turn rou...

Страница 60: ...route through the Routes tab on the Main Menu For more information refer to page 57 To go to a highlighted map item 1 Use the ROCKER to highlight the item you would like to navigate to on the Map Pag...

Страница 61: ...age Activating a Go To using the Find Menu 5 The Waypoint Page automatically opens With the Go To button highlighted press ENTER to begin navigation To search for an item and route to it 1 Press NRST...

Страница 62: ...nd From Feature The Find option also supports a nd from feature that allows you to center your search around an item that you have just found To nd an item from another location on the map 1 Open the...

Страница 63: ...r item 1 Press NRST FIND 2 From the Find Menu highlight the item you want to Find From 3 Press NRST FIND with the item highlighted The Find Menu opens again with items near the previously selected ite...

Страница 64: ...s and press ENTER to perform that operation Find Menu Options To view additional options for the Find Menu press NRST FIND and then press MENU Enable Auto Arrange automatically arranges the Find Menu...

Страница 65: ...using the Find Menu 1 Press MENU twice to show the Main Menu 2 Use the ROCKER to highlight Route from the vertical list of tabs 3 Press MENU to show the Route options menu Select New Route and press E...

Страница 66: ...the location as a waypoint and continue adding points to your route You can edit the properties of this waypoint as you can with any waypoint Creating a New Route on the Map 5 Repeat until you have ad...

Страница 67: ...t location from the map show using the ROCKER Text Entry allows you to enter a new waypoint s location coordinates manually Marking Your Present Location The ENTER MARK key lets you quickly capture yo...

Страница 68: ...map location or map feature 3 Press and quickly release ENTER MARK to capture the arrow location Pressing and holding ENTER MARK marks your present location not the arrow s location If you have highli...

Страница 69: ...eate a waypoint or use your favorite method discussed in previous sections The new waypoint is created with the next available waypoint number and the receiver s last known location as the default loc...

Страница 70: ...playing Your Route Watch your Trip Data Use the Trip Computer Page to view your trip data You can track your speed here as well as other information related to your trip Current Route Page in Automoti...

Страница 71: ...in your navigation Custom Avoids apply to all routes but Detours apply to only the active route Custom Avoids can be added while you are navigating a route or before you navigate To enter a custom av...

Страница 72: ...elpful when planning a long trip Add Edit Vias Page Showing the original route without via points To add Via Points to your route 1 While navigating your route press Direct To to open the Navigate men...

Страница 73: ...ep the white arrow map pointer within the screen area In Automotive Mode by default four user selectable data elds appear on the right side of the screen that can be con gured to show any one of the p...

Страница 74: ...highlight the Display tab 3 Highlight the Highway Page eld and press ENTER 4 Select Off to hide or On to show and press ENTER Using the Highway Page To stay on course steer toward the violet bar or a...

Страница 75: ...ss PAGE repeatedly until the Highway Page appears 2 Press MENU 3 Use the ROCKER to highlight the option 4 Press ENTER Highway Page Options Menu The following options are available from the Highway Pag...

Страница 76: ...nt Route Page You can scroll through the entire list by pressing the ROCKER up or down Highlight any of the turns on the list and press ENTER to view the Next Turn Page for that turn The Current Route...

Страница 77: ...er Page Some options are only available if you have changed the page layout from the default Set Up Page Layout allows you to choose the layout and number of data elds You can also select a graphical...

Страница 78: ...descriptive name for each route Highlight a route and press MENU to open the options menu From here you can start a route copy it delete it delete all routes and create a new route You can also set u...

Страница 79: ...t route from list 4 Press MENU to open the options menu 5 Highlight Follow Roads and press ENTER to create a turn by turn route auto route which appears in the Current Route Page Editing a Route After...

Страница 80: ...Page see the Editing and Managing Waypoints section beginning on page 74 When you return to the Route Review Page the next point in the route is automatically highlighted This allows you to review ea...

Страница 81: ...t highlight OK and press ENTER 7 Repeat steps 4 through 6 until all points are added to the route Press QUIT to nish To set speed and fuel plan your route 1 Open the Route Review Page options menu 2 H...

Страница 82: ...ge 2 Press ENTER to show the Waypoint Review Page If the waypoint is located on a map feature or MapSource or BlueChart feature the Waypoint Review Page can include additional tabs containing informat...

Страница 83: ...ame or highlight another eld you want to change and press ENTER 3 Use the ROCKER to select the symbol or enter data and press ENTER To view the waypoint on the map 1 From the Waypoint Page highlight S...

Страница 84: ...from the options menu The Select Route window appears 3 Highlight the route or select New Route and press ENTER 4 With OK highlighted press ENTER to save the waypoint Averaging the Waypoint s Locatio...

Страница 85: ...ation Menu Enter the distance bearing and location to project from 6 To change the location from which you are projecting the new waypoint highlight the From eld and press ENTER The Find Menu opens Se...

Страница 86: ...hat category by pushing a few buttons You can create up to 15 categories To create a waypoint category 1 From any of the waypoint pages or the Points tab press MENU to open the options menu 2 Select E...

Страница 87: ...ab features two sub tabs User and Proximity that let you edit waypoints and manage a large number of waypoints quickly and ef ciently For more information about creating editing and deleting waypoints...

Страница 88: ...information on reviewing and editing waypoints Deleting Waypoints You can delete waypoints from the waypoint list in the Points tab or from the Waypoint Pages To delete a waypoint from the Waypoint P...

Страница 89: ...istance using the ROCKER 4 You can select a waypoint or point of interest as the From location Highlight the From eld and press ENTER From the Find Menu select the location and press ENTER When OK is...

Страница 90: ...NTER The Find Menu appears 2 Select the waypoint or point of interest from the Find Menu With OK highlighted press ENTER to select that point For complete information about the Find Menu see Finding a...

Страница 91: ...ing track points save the track log when it approaches the 99 mark You must rst save the track log before you can use the Navigate Track feature The Save feature allows you to store up to 15 track log...

Страница 92: ...ht 3 Use the ROCKER to select Save and press ENTER 4 A window pops up asking if you want to save the entire track log To save the entire track highlight Yes and press ENTER To save a portion of the tr...

Страница 93: ...open the Main Menu 2 Highlight the Track tab Press the ROCKER right to highlight the Saved sub tab 3 Highlight the track you want to edit and press ENTER The Track Review Page opens Make changes you...

Страница 94: ...you want to navigate to TracBack to and press ENTER TracBack Tips When a TracBack has been started the GPSMAP 495 divides the track into segments called legs Up to 300 temporary turns are created to...

Страница 95: ...d hold the PAGE MODE button 2 Use the ROCKER to select either Aviation Automotive or Marine and press ENTER Marine Mode Page Sequence Marine Mode features ve main pages the Map Compass Highway Active...

Страница 96: ...ns from your current location to the destination on the Map Page You can use the Map Page Compass Page Highway Page and Position Data Page to help navigate to your destination Man OverBoard MOB The Ma...

Страница 97: ...ROCKER the GPSMAP 495 enters pan mode which moves the map to keep the white arrow map pointer within the screen area In Marine Mode by default ve user selectable data elds appear on the right side of...

Страница 98: ...going directly to the waypoint If the arrow points any direction other than up turn toward the arrow until it points up then continue in that direction NOTE You must be moving for the compass to accu...

Страница 99: ...er To use the Marine Timer 1 Press the ROCKER up or down to select the time you want to count Five 5 minutes is the default 2 Press ENTER to start the timer Use the ROCKER during the timing to quickly...

Страница 100: ...any nearby rescuer receives the DSC signal an alarm sounds and they immediately receive the location of the caller The rescuer can then choose to navigate to the caller s location to assist or forward...

Страница 101: ...l List and Log The Noti cation page contains information about the call including the type of call distress or position report the MMSI number of the caller a user de nable name the time and date of t...

Страница 102: ...second call is received from the same vessel it replaces the rst call in the Call List Press MENU to sort the list and delete entries DSC Call List DSC Log When DSC calls are received they are automat...

Страница 103: ...directory list and press ENTER OR Press MENU highlight New Item and press ENTER 3 Enter the MMSI number the name and any comments 4 When nished highlight OK and press ENTER New Directory Item Page En...

Страница 104: ...ate to a Position Report or Distress Call using the Call List or Log 1 Highlight the call on the Call List or Log and press Direct To 2 With Go To MMSI Name or DSC highlighted press ENTER Navigating t...

Страница 105: ...nd and Setup To restore defaults 1 Press MENU twice to open the Main Menu 2 Use the ROCKER to highlight a tab 3 Press Menu to open the options menu 4 Highlight Restore Default 5 Press ENTER to restore...

Страница 106: ...eversible routes with up to 300 points each See the Creating Routes section beginning on page 57 for more information about routes Points Tab The Points tab contains two sub tabs User and Proximity wh...

Страница 107: ...ing on page 83 Active Sub Tab The Active sub tab is for the active log the log currently being recorded It displays the amount of track memory used and current settings Saved Sub Tab The Saved sub tab...

Страница 108: ...rm name you want activate and press ENTER 4 Change the mode to On and press ENTER If necessary highlight the next eld to the right and press ENTER enter the settings and press ENTER When an alarm goes...

Страница 109: ...larm to go off For example if you enter 00 02 00 the Next Turn alarm sounds two minutes before you reach the next turn Select Auto for the unit to provide a Next Turn alarm at its discretion Arrival s...

Страница 110: ...ct On and then enter a speci c distance Sonar Alarms Sub Tab Marine Mode Only You must be receiving sonar NMEA data for Sonar alarms to work Sonar Alarms Sub Tab Shallow Water and Deep Water sets an a...

Страница 111: ...oon phase is also shown You can view Sun Moon information for any date or location You can also use the play fast forward and stop buttons to view an animation of the Sun Moon sub tab To view Sun Moon...

Страница 112: ...ormation in a 24 hour span starting at midnight station time You can choose from different dates and more than 3 000 tide stations Height of tide Smallest and largest tides for the AM hours Select the...

Страница 113: ...press ENTER 2 Enter the date with the ROCKER and press ENTER You can also use the Zoom IN and OUT keys to view information for another date Press and hold IN or OUT to scroll quickly through dates 3...

Страница 114: ...te you want You can also use the Zoom IN and OUT keys to view information for another date Press and hold IN or OUT to scroll quickly through dates 3 Press ENTER when nished The unit shows the informa...

Страница 115: ...he vertical list of tabs Message Log Tab 3 Use the ROCKER to highlight a message Press ENTER to view detailed information about that message To show or hide messages using the Log Filter 1 Press MENU...

Страница 116: ...t for optimum viewing during twilight times Backlight Timeout sets the backlight to stay on when it is turned on or to time out after a selected period of time has elapsed when using the battery The b...

Страница 117: ...de turns audible terrain alerts on and off Also enables or disables the audible Five hundred altitude reminder that occurs when you descend through 500 feet above the destination airport TIS Audio Avi...

Страница 118: ...ly controls ltering or On allows you to enter a value in seconds Text Language allows you to select from various languages for the unit s pages and menus WAAS allows you to Disable and Enable WAAS fro...

Страница 119: ...lect a route preference before route calculations Calculation Method sets how the unit searches for the route Quickest Calculation calculates the route the quickest but it might not produce the best r...

Страница 120: ...atically You can also set whether the unit announces the recalculation Automatic Announced or recalculates silently Automatic Silent You can also turn route recalculation Off Next Turn turns the Next...

Страница 121: ...ncorrect date is shown press MENU highlight Set Date and press ENTER Enter the current year The GPSMAP 495 uses this information when gathering satellite data to show the correct date Units Sub Tab Th...

Страница 122: ...or want to use a format you are familiar with When in doubt use the default WGS 84 datum for best overall performance Selecting a Different Heading Reference You can select from Auto Mag Var True Grid...

Страница 123: ...Show at Power up Press ENTER to place a check mark in the box To hide the welcome information at start up remove the check mark from the box Interface Sub Tab The Interface sub tab controls the input...

Страница 124: ...transmits out both NMEA data at 9600 baud and VHF frequency tuning information to a Garmin Nav Comm radio See page 132 RTCM In allows Differential GPS DGPS input using a standard RTCM format RTCM In...

Страница 125: ...00 at 6 second intervals Interface tab of the Setup tab with GARMIN DGPS selected Highlight Scan and press Enter Shows the status of the scan The Status eld shows one of the following Tuning the unit...

Страница 126: ...PS transmitter problems or to nd the most updated list of frequencies and coverage areas contact your local USCG or see their Web site www navcen uscg mil Advanced NMEA Output Setup If you are going t...

Страница 127: ...f the Lat Lon minutes set Waypoint IDs to names or numbers as well as turn on and off the GPS status the GARMIN Proprietary sentences and Waypoint Route WPL RTE GPSMAP 495 NMEA Sentence Output NMEA ve...

Страница 128: ...the Map Page to show a split screen to show the sonar and Map Page You must be in Marine Mode to use the sonar feature To show the Sonar Page on the Map Page 1 Press and hold PAGE Highlight Marine an...

Страница 129: ...hat re ects the depth of the area being shown The top left corner shows the Adjustment Option the depth and the water temperature Sonar Page The sonar returns show as red strongest then orange strong...

Страница 130: ...ment options When the adjustment option is shown press ENTER Press MENU highlight Adjustments and press ENTER Use the ROCKER to highlight the adjustment and press ENTER When you have selected an adjus...

Страница 131: ...pan available when a Zoom scale other than No Zoom is selected The View or Span setting is used to change the viewing range of a zoomed screen If the screen is 2X or 4X split only the zoomed portion o...

Страница 132: ...R 3 Move the horizontal double arrow left or right using the ROCKER until the vertical width line shows then press ENTER 4 If you want to cancel this operation press QUIT or press MENU highlight Stop...

Страница 133: ...te updates quicker and is recommended for low noise water deeper than 50 feet Auto is best for shallow water or high noise areas has a slower screen update and is best used if you travel a wide variet...

Страница 134: ...Speed and press ENTER 2 Bring the boat to a cruising speed Both the top ground and uncalibrated water speeds are shown at the bottom of the calibration window Note your top speed then stop the boat an...

Страница 135: ...pth scale shown Color Bar select On to show a gradient scale of the current Target Level setting on the Sonar Setup tab Flasher select On to show a graphic Flasher representation on the far right side...

Страница 136: ...and sets the bottom level Weaker secondary returns provide the detailed data Stronger returns appear on the screen in darker colors with red being the strongest return Understanding the Sonar Display...

Страница 137: ...right the 40 cone angle produces a coverage area of approximately a 20 foot diameter circle at a 30 foot depth The narrow cone angles 10 associated with the high frequencies 200 kHz provide better bo...

Страница 138: ...bottom The unit uses the whiteline function to make the bottom layer information easier to distinguish Whiteline Off Whiteline On Thick Whiteline Hard bottom Thermoclines A rough de nition of a therm...

Страница 139: ...row of tabs on the left then select Temperature from the row of tabs along the top of the screen Changing the Temperature Screen The graph adjusts and shown the temperatures changes according to the T...

Страница 140: ...aft Refer to page 144 for information on connecting your GPSMAP 495 to a GTX 330 Mode S transponder NOTE How TCAS differs from TIS the main difference between TIS and TCAS is the source of surveillanc...

Страница 141: ...stalled TIS relies on surveillance of the Mode S radar which is a secondary surveillance radar similar to the ATCRBS TIS operation may be intermittent during turns or other maneuvering TIS is dependen...

Страница 142: ...ing aircraft stabilizes When a rapidly closing intruder is on a course that crosses the client aircraft course at a shallow angle either overtaking or head on and either aircraft abruptly changes cour...

Страница 143: ...shown on an alert window and on the moving Map Page A Traf c Advisory TA symbol appears as a solid yellow circle All other traf c is shown as a hollow white diamond Altitude deviation from own aircra...

Страница 144: ...dio alerts can be turned off in the Main Menu Sound tab Traf c Ground Track Traf c ground track is indicated on the GPSMAP 495 screen by a target track vector a short line shown in 45 degree increment...

Страница 145: ...ighlight Set Up Map and press ENTER 4 Highlight the Map sub tab 5 Select TIS Traf c and use the ROCKER to change the Zoom range Highlighting TIS Traf c Using Map Page Panning Another Map Page feature...

Страница 146: ...aft they should contact ATC to obtain any information that may assist concerning the intruder aircraft Based on the above procedures minor adjustment to the vertical ight path consistent with air traf...

Страница 147: ...e the ROCKER to select TIS In NMEA VHF Out or Aviation In NMEA VHF out These comm modes send both NMEA data and VHF frequency information The following features are now available on the radio Remote f...

Страница 148: ...0 F 15 C to 60 C Power Battery Rechargeable lithium ion Battery Life 5 to 15 hours based on the backlight usage Source 11 35 VDC Fuse 3AG 1 5 Amp Performance Receiver Differential ready 12 parallel ch...

Страница 149: ...nd then wipe dry Avoid chemical cleaners and solvents that may damage plastic components Storing the GPSMAP 495 Do not store the GPSMAP 495 where prolonged exposure to temperature extremes can occur s...

Страница 150: ...with 12 24 Volt Adapter Cable Allows the unit to operate from the vehicle s power system through the cigarette lighter adapter Provides a speaker for vocal prompts PC Interface Cable Connects the unit...

Страница 151: ...ions Replacement fuse is a 3AG 1 5 Amp fuse Power Data Connector on the GPSMAP 495 Unit Data Out Blue Ground Black Voice Orange Alarm White Power Red Voice Brown Data In Yellow NOTE The Voice and Voic...

Страница 152: ...in Then set the corresponding RS 232 output con guration on the transponder to REMOTE TIS and set the GPSMAP 495 s Serial Data Format to TIS In or TIS In NMEA VHF Out For more information see the TIS...

Страница 153: ...onnect the larger end of the cable to a serial communications port on your computer Information about USB Drivers The USB drivers should have been automatically installed when you installed the MapSou...

Страница 154: ...d The handle is still exposed when it is properly inserted 3 If the unit is on a con rmation tone sounds The rst time you insert a programmed data card the unit takes a few seconds to read the card Wh...

Страница 155: ...can remove the antenna to use an external antenna After the antenna is removed the BNC connector is exposed and ready for use with an external antenna For information on connecting an external antenn...

Страница 156: ...itude Route A group of waypoints entered into the GPS receiver in the sequence you want to navigate them Waypoint a location you store in your GPS What is Differential GPS DGPS The United States and C...

Страница 157: ...o the FAA s Web site testing in September 2002 WAAS con rmed an accuracy performance of 1 2 meters horizontal and 2 3 meters vertical throughout the majority of the continental United States and porti...

Страница 158: ...ly thirty 30 meters When the unit is placed in the LORAN TD format mode it simulates the operation of a LORAN receiver Location coordinates can be showed as TDs and all navigation functions can be use...

Страница 159: ...s ENTER 7 When nished highlight the Save button and press ENTER LORAN TD Setup If the active GRI Chain secondary stations or offsets were changed since the waypoint was created the waypoint now refere...

Страница 160: ...ce the map datum in the GPS unit should be set to the same datum as the map to ensure the most accurate navigation What is a Location Format Your current location can be viewed on the GPS in the form...

Страница 161: ...on to assist or forward the call on to the Coast Guard When the Coast Guard receives the call they can immediately access the caller s information such as who they are and the type of vessel in their...

Страница 162: ...ency radio spectrum management of ce These procedures are currently under review by the National Telecommunications and Information Administration NTIA User Outside the United States Users can obtain...

Страница 163: ...rest VOR radial and distance from nearest VOR location latitude longitude and region country ARTCC Air Route Traf c Control Centers Airspace boundaries Class B Class C Control Zones SUAs and MOAs cont...

Страница 164: ...a valid speed Can t Unlock Maps no applicable unlock code for one or more maps was found All MapSource maps are not accessible Database Error internal problem with the unit Contact your dealer or Gar...

Страница 165: ...atched the search criteria Off Course you are off course by the distance set in the Off Course Alarm Proximity Memory Full no additional proximity waypoints can be saved Proximity Radius Overlaps the...

Страница 166: ...VNAV function has been cancelled due to a change in the active route Water Speed Sensor is Not Working the speed sensor is not detected Check the connections Water Temperature Alarm sonar has reporte...

Страница 167: ...n your route Elevation the altitude height above or below mean sea level MSL GPS Status the current status of the GPS receiver such as 3D GPS Location Lat Lon your current location as latitude longitu...

Страница 168: ...er Trip Timer Total the total time the unit has been tracking since the Trip Computer was reset Ttl Avg Spd see Trip Avg Speed Total Turn the distance between Bearing BRG and Track TRG L indicates you...

Страница 169: ...ng our online registration today Connect to our Web site at http my garmin com Keep the original sales receipt or a photocopy in a safe place Contact Garmin Contact Garmin if you have any questions wh...

Страница 170: ...provided by the local in country distributor and this distributor provides local service for your unit Distributor warranties are only valid in the area of intended distribution Units purchased in the...

Страница 171: ...not limited to the implied warranties of merchantability and tness for particular purpose or arising by statute or otherwise in law or from a course of dealing or usage in trade is made by NGA as to...

Страница 172: ...ice center Unauthorized repairs or modi cations could result in permanent damage to the equipment and void your warranty and your authority to operate this device under Part 15 regulations Industry Ca...

Страница 173: ...GPSMAP 495 Owner s Manual 165 Appendix License Agreement and Warranty...

Страница 174: ...ion 76 avoids 63 111 B backlight 3 108 baro pressure 50 battery level 4 pack 1 2 saver mode 110 beeper 109 BlueChart 146 bug indicator 41 90 setting 34 C cable 143 calculate routes for 111 calculation...

Страница 175: ...lete external power source 4 F faster time 111 FCC 153 154 163 eld 8 nd from 54 from a different location 54 55 menu 53 56 your current location 3 nding an Item in automotive or marine mode 54 56 ndin...

Страница 176: ...mark my location 26 maximum speed 47 MayDay 154 measuring distance 33 messages 107 161 military time 113 Mils 113 MMSI 92 153 154 MOB 88 modes 51 110 moon information 103 N navigate route 71 to point...

Страница 177: ...location 59 save track log 84 saving the current route 68 scanning for beacon 149 scan for a frequency 117 searching the sky 5 search history 55 selecting an approach 23 24 selecting options 9 senten...

Страница 178: ...o jeppesen database 155 usage mode 13 110 usage restrictions 16 USB 115 data cable 145 User Points tab 79 UTC 113 UTM UPS 152 V vectors 24 vertical navigation See VNAV vertical speed 113 VHF 153 VHF C...

Страница 179: ...garmin com Copyright 2008 Garmin Ltd or its subsidiaries Garmin International Inc 1200 East 151st Street Olathe Kansas 66062 USA Garmin Europe Ltd Liberty House Hounsdown Business Park Southampton Ham...

Отзывы: