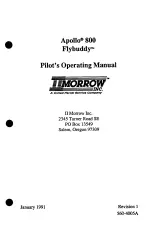
background image

Current Route Page

Whenever you have started a route in the GPSMAP 396 in 

Automotive Mode, the Current Route Page shows each turn of 

the active route, with the distance to the turn, the street name, and 

estimated time to arrival and time of arrival. As you navigate a route, 

the turn list automatically updates to indicate the next turn at the top 

of the list. 

Current Route Page

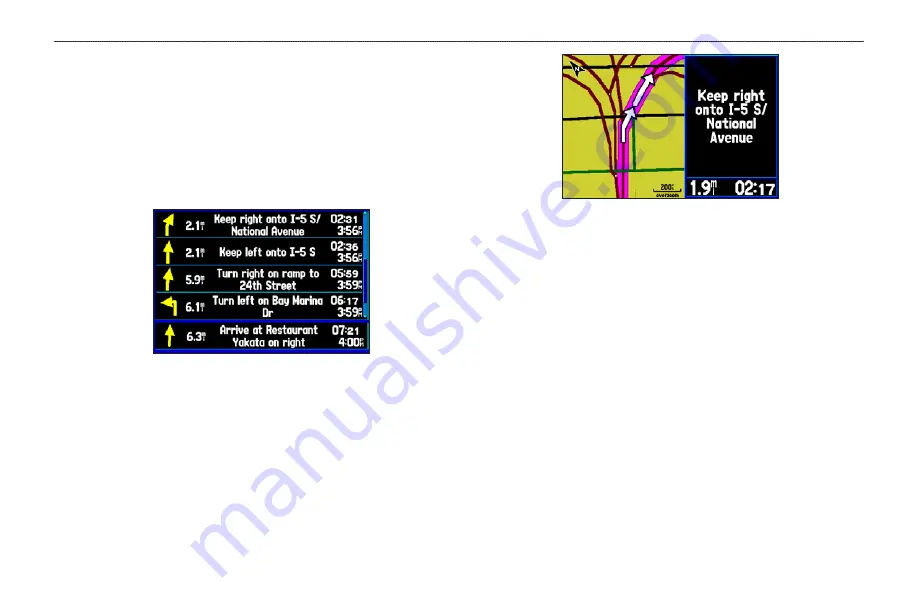
You can scroll through the entire list by pressing the 

ROCKER

 up 

or down. Highlight any of the turns on the list and press 

ENTER

 to 

view the Next Turn Page for that turn. The Current Route and Next 

Turn Page screen similar information, just in a different layout. The 

Next Turn Page shows your next turn on a map.

Next Turn Page

Saving the Current Route

You can save the current route from the Current Route Page. Press 

MENU


to save the route. Press 

ENTER

 when 

Save Route

 is 

highlighted. Your route is automatically saved, using the starting 

point and destination as the route name. Highlight 

OK

 and press 

ENTER

 to complete saving the route. 

GPSMAP 396 Pilot’s Guide 

71

A

UTOMOTIVE

 M

ODE

 P

AGES


AND

 F

EATURES

 > 

C

URRENT

 R

OUTE

 P

AGE

Содержание GPSMAP 396 - Aviation GPS Receiver

Страница 1: ...GPSMAP 396 portable aviation receiver pilot s guide...

Страница 2: ...y of this manual or of any revision hereto provided that such electronic or printed copy of this manual must contain the complete text of this copyright notice and provided further that any unauthoriz...

Страница 3: ...omputer Page and creating waypoints The Basic Operation in Marine Mode section provides you with information about navigating with the GPSMAP 396 in Marine Mode The Marine Mode Pages section reviews t...

Страница 4: ...26 Following your Flight Plan 27 Aviation Mode Pages 28 Map Page 28 Terrain Page 36 Panel Page 39 Active Route Page 43 Position Data Page 44 Flight Log 45 Aircraft Information 46 E6B Tab 48 XM Audio P...

Страница 5: ...Setup Tab 116 Location Sub Tab 120 Using XM WX Weather 126 Viewing XM WX Weather 126 Setting XM WX Weather Options 127 Using the Weather Explorer Tab 130 Finding Weather Information 133 Setting up and...

Страница 6: ...ation 158 Learning About GPS 163 LORAN TD Setup 165 Map Datums and Location Formats 167 Digital Selective Calling DSC 168 Jeppesen Database Information 170 Messages 171 Data Field Options 174 License...

Страница 7: ...y discrepancies or questions before continuing navigation The GPSMAP 396 contains a replaceable rechargeable lithium ion battery The battery may present a risk of re or chemical burn if mistreated Do...

Страница 8: ...ce of all GPS equipment including the GPSMAP 396 Although the GPSMAP 396 is a precision navigation device any navigation device can be misused or misinterpreted and therefore become unsafe Map Data In...

Страница 9: ...tal channels of commercial free music more than 30 channels of news sports talk and entertainment and more than 20 dedicated channels of XM Instant Traf c Weather Detachable GPS antenna collapses for...

Страница 10: ...xternal power to the GPSMAP 396 automatically turns on the unit for full operation If the battery is present and needs to be charged the external power source charges the battery while the unit is in...

Страница 11: ...Page appears Warning Page 2 Read and be sure you understand the warning Press ENTER to continue 3 To turn off the GPSMAP 396 press and hold the red POWER key again Adjusting the Backlight and Volume T...

Страница 12: ...ference of satellite acquisition receiver status and accuracy The sky view and signal strength bars give an indication of what satellites are visible to the receiver and whether they are being tracked...

Страница 13: ...s Acquiring Satellites the receiver is looking for and collecting data from satellites visible at its last known or initialized location but has not acquired a x 2D GPS Location At least three satelli...

Страница 14: ...g the map When in Aviation Mode you can enter the airport identi er GPS Tips While the receiver is gathering information your location on the map can show as different from where you actually are loca...

Страница 15: ...for more than one second to show the Next Turn Page and announce the next turn PAGE MODE Key Press to cycle through the main pages in sequence and return the screen from a submenu page Press and hold...

Страница 16: ...rred to throughout this manual Highlight move the highlighted area on the screen up down left or right with the ROCKER to select individual elds Moving the highlight to a given location allows you to...

Страница 17: ...h a list of optional features for that page 2 Use the ROCKER to move the highlight up down right or left on the menu to your selection Selecting an option from an options menu To exit a menu or return...

Страница 18: ...ase a Voice Guidance database and a basemap You also should update your Jeppesen database to use the most current data Refer to page 170 in the Appendix for more information MapSource Detailed Maps Op...

Страница 19: ...y Satellite Signal Strength Bars shown are only simulations and do not represent the strength of actual satellite signals Starting Simulator Mode You can start Simulator Mode for the GPS tab or the Se...

Страница 20: ...ring an airport identi er code Select Use Identi er from the GPS tab options menu Enter the airport code using the ROCKER Refer to page 14 for complete instructions about entering airport identi ers a...

Страница 21: ...Route Page Position Data Page and optional XM Audio Page The XM Audio Page must be turned on using the Main Menu page 114 An example of each page in Aviation Mode appears below Each of these pages ha...

Страница 22: ...o to an airport or navaid 1 Press the Direct To to show the Go To Page Use the ROCKER to show the Aviation tab 2 Press up or down on the ROCKER to select the identi er facility name or city eld and pr...

Страница 23: ...ws detailed information for your destination waypoint or the next waypoint in a route This feature is handy for retrieving airport information such as communication frequencies and runway information...

Страница 24: ...strictions The Comm tab on the Airport Details Page provides a list of communication frequencies for that airport Some frequencies are noted with an asterisk which indicates that the frequency has usa...

Страница 25: ...15 identi er bearing distance length of the longest runway and common traf c advisory CTAF or tower frequency Wx Airport Weather Sources nearest 15 airport weather sources including AWOS ASOS ATIS and...

Страница 26: ...tab and highlight the nearest airport 2 Press ENTER to view airport information 3 Verify the Go To button is highlighted and press ENTER Viewing Details for a Nearby Point To view details for a nearb...

Страница 27: ...communication information The lowest numbers on the list are the closest communication points Viewing Airspace Alert Information When an airspace alert appears press the NEAREST to automatically show...

Страница 28: ...he ROCKER to select the airspace alert entry on the page and press ENTER An information page opens to show the controlling agency status and oor ceiling limits 3 To show a communication frequency for...

Страница 29: ...llowed To enter airport criteria 1 Press NEAREST and open the Airport tab 2 Press MENU to show the options menu 3 Select Set Airport Criteria and then press ENTER A window appears with the current set...

Страница 30: ...original route is saved in the Route tab You can select an approach several ways Press the Direct To and press MENU on the Go To Page as described in the steps to the right From the Active Go To or Ac...

Страница 31: ...ou are when you initiate the approach This works much like any other route with course guidance from point to point and a turn usually required as you cross each waypoint CAUTION Steep Turns are not a...

Страница 32: ...nd Menu opens Find Menu 4 Press MENU to select the search method For example if you want to nd a land point near you destination select Near Destination and press ENTER 5 Highlight the nd menu icon fo...

Страница 33: ...nd hold ENTER MARK until the Mark Waypoint Page appears 2 To accept the waypoint with the default name Waypoint use the ROCKER to highlight OK and press ENTER To mark a selected location as a waypoint...

Страница 34: ...nd press ENTER 4 Press MENU to show the options menu Use the ROCKER to highlight Add Waypoint and press ENTER Or highlight the rst blank line and press ENTER 5 The Aviation Find Page Go To Page opens...

Страница 35: ...f the Map Page see Map Page beginning on page 28 Terrain and Obstacle Changes Press PAGE to open the Terrain Page and watch the changes in the terrain and the obstacles you are ying over with the Terr...

Страница 36: ...96 always turns on in location mode with the last known location centered on the map When you press the ROCKER the GPSMAP 396 enters pan mode which moves the map to keep the white arrow map pointer wi...

Страница 37: ...e range bar To select a map zoom range zoom in and out Press the OUT key to zoom out Press the IN key to zoom in The system has a built in worldwide database to 20 mile zoom range with more detailed c...

Страница 38: ...When the arrow is stationary xed coordinates appear in the location eld and the distance and bearing from your present location update as you move To re center your location on screen 1 When you are n...

Страница 39: ...ode can also be used to retrieve information on airspaces depicted on the map Airspace Information Highlighted airspace area Information box with airspace name type and oor ceiling limits To retrieve...

Страница 40: ...detail to the map In Marine and Automotive Modes press MENU highlight Declutter On or Declutter Off and press ENTER Measuring Distance You can measure the distance and bearing between two map items To...

Страница 41: ...ou can also turn the Bug Indicator off here 4 Highlight the option from the list and press ENTER You can also set the Bug Indicator on the HSI shown on the Panel Page Open the Panel Page and press MEN...

Страница 42: ...out and press ENTER Changing the layout of the Map Page 4 Select the option you want and press ENTER The options vary between the three usage modes and the page you are setting up To change a data eld...

Страница 43: ...ame and press ENTER to select check mark or deselect no check mark the Show setting 4 To view the list of maps within a Map Family highlight the name of the Map Family and press ENTER Individual Map I...

Страница 44: ...black areas are further than the Caution Elevation A projected point of impact is marked with an X symbol Obstacle Information Obstacles are shown on the Terrain Page at or below the map range of 12...

Страница 45: ...options menu by pressing MENU while you are on the Terrain Page Terrain Page Options Menu Press ENTER to quickly declutter the map just as you would on the Map Page See page 32 To quickly disable ale...

Страница 46: ...e Alert Sensitivity settings Terrain Obstacle and Descent Rate determines what level of alerts are annunciated The GPSMAP 396 defaults to High sensitivity which annunciates all red and yellow alerts a...

Страница 47: ...pointer and course deviation needle indicate the course and whether you are on the course A bug indicator provides information to guide you back to the course if you stray off course If you move off c...

Страница 48: ...gs The current setting is highlighted 3 Use the ROCKER to select the scale and press ENTER Manually Setting a Course Use the Set OBS and Hold option to manually set your course to the destination To m...

Страница 49: ...ime to vertical navigation goes blank and the VNAV indicator disappears from the Panel Page CAUTION The GPSMAP 396 is a VFR navigation tool and should not be used to perform instrument approaches VNAV...

Страница 50: ...navigating to a destination Target Altitude enter the altitude you want to be at when you reach your target location Select Above Waypoint to use eld elevation for airports in the Jeppesen database or...

Страница 51: ...tions menu You can edit the route using many of the options in the menu such as Edit on Map see page 76 for information Add Waypoint and Invert You can also change the data elds to suit your needs You...

Страница 52: ...m NW of KOJC Position Data Page Options With the Position Data Page open press MENU to open the options menu You can set up the layout of the page and change the data elds For an explanation of the da...

Страница 53: ...d groundspeed drops below 30 knots the ight entry is saved and a new entry is recorded when you depart the airport A touch and go or brief stop of less than 10 minutes appends to the current ight reco...

Страница 54: ...he Panel Page and is automatically updated if you exceed this gure To enter an aircraft pro le 1 From the Aircraft Pro le tab use the ROCKER to highlight the on screen New button and press ENTER 2 Hig...

Страница 55: ...aft CG limits Compare those gures to the values calculated by the GPSMAP 396 To perform weight and balance calculations 1 Press MENU twice to open the Main Menu 2 Highlight Aircraft from the vertical...

Страница 56: ...y altitude true airspeed calculation Use current altimeter setting barometric pressure Total Air Temperature required entry for density altitude true airspeed calculation Total Air Temperature TAT is...

Страница 57: ...he designated elds E6B Tab Calculated Figures Calculated Figure Calculated or User Entered Figure To calculate winds aloft 1 Follow the steps in the previous procedure to determine true airspeed Or us...

Страница 58: ...h XM Radio channels are grouped Classical Decades Traf c and so on For a complete list of available categories and channels visit the XM Radio Web site at www xmradio com Select All Channels to view a...

Страница 59: ...Audio Page is open press MENU to open the options menu XM Audio Page Options Menu The following options are available on the XM Audio Page options menu Add to Favorites enables you to add channels to...

Страница 60: ...m your list of favorites and press ENTER A triangle appears to the left of the newly selected channel To view and select Favorites with the ROCKER 1 Highlight the category eld and press ENTER 2 Use th...

Страница 61: ...y Or Select Favorites to scan only channels in your Favorites list 4 Press ENTER Each channel is played for ve seconds and then advances to the next channel 5 Press any key to stop scanning and select...

Страница 62: ...age appears if you are navigating a turn by turn route and an Active Route Page appears if you are navigating Off Road See Navigating in Automotive Mode beginning on the next page for more information...

Страница 63: ...highlighted map item 1 Use the ROCKER to highlight the item you would like to navigate to on the Map Page 2 Press Direct To Go To point name is added to the list of options and automatically highligh...

Страница 64: ...ighlighted press ENTER to begin navigation To search for an item and route to it 1 Press the NRST FIND to open the Find Menu 2 Using the ROCKER highlight a category such as Cities and press ENTER 3 Pr...

Страница 65: ...from feature that allows you to center your search around an item that you have just found To nd an item from another location on the map 1 Open the Map Page Use the ROCKER to pan the arrow pointer t...

Страница 66: ...m 3 Press NRST FIND with the item highlighted The Find Menu opens again with items near the previously selected item Search for the item Recently Found Items The Recently Found Page shows a list of th...

Страница 67: ...onal options for the Find Menu press NRST FIND and then press MENU Enable Auto Arrange automatically arranges the Find Menu Disable Auto Arrange and Restore Default options appear when you select Enab...

Страница 68: ...light Route from the vertical list of tabs 3 Press MENU to show the Route options menu Select New Route and press ENTER Or highlight the rst available blank route slot and press ENTER The Route Review...

Страница 69: ...properties of this waypoint as you can with any waypoint Creating a new route on the map 5 Repeat until you have added all points to the route 6 When nished press QUIT twice to return to the Route Rev...

Страница 70: ...int s location coordinates manually Marking Your Present Location The ENTER MARK key lets you quickly capture your present location to create a new waypoint You must have a valid location 2D or 3D x t...

Страница 71: ...location Pressing and holding ENTER MARK marks your present location not the arrow s location If you have highlighted a map feature an information page appears after you press ENTER Use the ROCKER to...

Страница 72: ...ew waypoint is created with the next available waypoint number and the receiver s last known location as the default location 2 On the New Waypoint Page use the ROCKER to highlight the Location eld an...

Страница 73: ...your speed here as well as other information related to your trip Current Route Page in Automotive Mode Whenever you have started a turn by turn route in the GPSMAP 396 set in Automotive Mode the Cur...

Страница 74: ...ive route Custom Avoids can be added while you are navigating a route or before you navigate To enter a custom avoid 1 Press Direct To while in Automotive Mode Or Open the Map Page and press MENU 2 Se...

Страница 75: ...ia points To add Via Points to your route 1 While navigating your route press Direct To to open the Navigate menu 2 Use the ROCKER to select Edit Vias and press ENTER 3 The Add Edit Vias window opens...

Страница 76: ...Mode by default four user selectable data elds appear on the right side of the screen that can be con gured to show any one of the possible data options The top of the screen shows the GPS status or t...

Страница 77: ...Off to hide or On to show and press ENTER Using the Highway Page To stay on course steer toward the violet bar or arrows until it lines up with the red bar in the middle The bottom section of the scr...

Страница 78: ...highlight the option 4 Press ENTER Highway Page Options Menu The following options are available from the Highway Page menu Setup Page Layout allows you to choose the number of data elds Change Data F...

Страница 79: ...wn Highlight any of the turns on the list and press ENTER to view the Next Turn Page for that turn The Current Route and Next Turn Page screen similar information just in a different layout The Next T...

Страница 80: ...t from the default Set Up Page Layout allows you to choose the layout and number of data elds You can also select a graphical Dashboard select to show the Position Data Page layout 2 Columns or select...

Страница 81: ...ptions menu From here you can start the route copy it delete it delete all routes and create a new route You can also set up the routes to manually transition to the next waypoint Manually Transitioni...

Страница 82: ...Roads and press ENTER to create a turn by turn route auto route which appears in the Current Route Page Editing a Route When you have created a route use the Route Review Page to edit change the name...

Страница 83: ...oute Review Page the next point in the route is automatically highlighted This allows you to review each point on the route by pressing ENTER repeatedly To add points to the route 1 Press MENU twice t...

Страница 84: ...T to nish To set speed and fuel plan your route 1 Open the Route Review Page options menu 2 Highlight Plan Route and press ENTER Highlight Set Speed and Fuel in Aviation Mode Entering Speed and Fuel F...

Страница 85: ...urce or BlueChart feature the Waypoint Review Page can include additional tabs containing information about the other features at that location Waypoint Review Page To access the Waypoint Edit Page 1...

Страница 86: ...Page highlight Next and press ENTER 2 The Waypoint list appears with the next waypoint highlighted Press ENTER to edit that waypoint Viewing the Waypoint on the Map To view the waypoint on the map 1...

Страница 87: ...press ENTER 4 With OK highlighted press ENTER to save the waypoint Averaging the Waypoint s Location Average Location makes the unit take several sample location measurements for the waypoint and rec...

Страница 88: ...m which you are projecting the new waypoint highlight the From eld and press ENTER The Find Menu opens Select the point from which you project you new waypoint just as you would select a waypoint or p...

Страница 89: ...ry 1 From any of the waypoint pages or the Points tab press MENU to open the options menu 2 Select Edit Categories and press ENTER 3 Use the ROCKER to highlight Add and press ENTER 4 Use the ROCKER to...

Страница 90: ...nage a large number of waypoints quickly and ef ciently For more information about creating editing and deleting waypoints refer to the Creating Waypoints section beginning on page 62 To access the Po...

Страница 91: ...ypoint list in the Points tab or from the Waypoint Pages To delete a waypoint from the Waypoint Page use the ROCKER to highlight the on screen Delete button and press ENTER NOTE When you delete a wayp...

Страница 92: ...ight the From eld and press ENTER From the Find Menu select the location and press ENTER When OK is highlighted press ENTER 5 Highlight Delete and press ENTER to delete all waypoints within the set lo...

Страница 93: ...hlighted press ENTER to select that point For complete information about the Find Menu see Finding an Item on page 57 The distance eld is now highlighted 3 Press ENTER to begin entry of the proximity...

Страница 94: ...rack log before you can use the Navigate Track feature The Save feature allows you to store up to 15 track logs from certain times and dates To access the Track tab 1 Press Menu twice to open the Main...

Страница 95: ...o save the entire track log To save the entire track highlight Yes and press ENTER To save a portion of the track log 1 Press MENU twice to open the Main Menu 2 Highlight the Track tab and highlight t...

Страница 96: ...d sub tab 3 Highlight the track you want to edit and press ENTER The Track Review Page opens Make changes you want Track Review Page 4 Highlight the Name eld and press ENTER Use the ROCKER to change t...

Страница 97: ...started the GPSMAP 396 divides the track into segments called legs Up to 300 temporary turns are created to mark the most signi cant features of the track in order to duplicate your exact path as clo...

Страница 98: ...es ve main pages the Map Compass Highway Active Route and Position Data Page as well as an optional XM Audio Page If you are connected to a sonar module such as a Garmin GSD 20 an additional Sonar Pag...

Страница 99: ...age Compass Page Highway Page and Position Data Page to help navigate to your destination Man OverBoard MOB The Man OverBoard function MOB lets you simultaneously mark and set a course to a location f...

Страница 100: ...eep the white arrow map pointer within the screen area In Marine Mode by default ve user selectable data elds appear on the right side of the screen that can be con gured to show any one of the possib...

Страница 101: ...arrow until it points up then continue in that direction NOTE You must be moving for the compass to accurately update and show your heading The right side of the Compass Pages features user selectable...

Страница 102: ...you want to count Five 5 minutes is the default 2 Press ENTER to start the timer Use the ROCKER during the timing to quickly select a different length of time 3 Press ENTER to stop timing Marine Timer...

Страница 103: ...y immediately receive the location of the caller The rescuer can then choose to navigate to the caller s location to assist or forward the call on to the Coast Guard When the Coast Guard receives the...

Страница 104: ...call including the type of call distress or position report the MMSI number of the caller a user de nable name the time and date of the call the Bearing and Distance from your current position and th...

Страница 105: ...ll in the Call List Press MENU to sort the list and delete entries DSC Call List DSC Log When DSC calls are received they are automatically stored in the Log with the latest call at the top The unit c...

Страница 106: ...d press ENTER 3 Enter the MMSI number the name and any comments 4 When nished highlight OK and press ENTER New Directory Item Page Enter the MMSI number Name and a Comment in the elds Highlight OK and...

Страница 107: ...g 1 Highlight the call on the Call List or Log and press Direct To 2 With Go To MMSI Name or DSC highlighted press ENTER Navigating to a DSC Call Setting up DSC The DSC Setup tab allows you to turn DS...

Страница 108: ...twice to open the Main Menu 2 Use the ROCKER to highlight a tab 3 Press Menu to open the options menu 4 Highlight Restore Default 5 Press ENTER to restore the tab to the defaults To restore all of un...

Страница 109: ...eatures described in this section For more information about subscribing to XM WX Weather see page 179 Map Page with XM WX Weather XM Tab The XM tab is where you can view and select XM Radio channels...

Страница 110: ...ws a list of any recorded ights including date route of ight and ight time The GPSMAP 396 saves up to 50 recorded ights while in Aviation Mode Entries on this list are automatically created for each i...

Страница 111: ...sub tab to shows an alarm circle around a stored waypoint location Track Tab Use the Track tab to specify whether or not to record a track log de ne how it is recorded or save the track log data for...

Страница 112: ...Sonar Tab of the Main Menu Aircraft Tab The Aircraft tab is divided into two sub tabs Aircraft Pro le and Weight Balance Information on the Aircraft Tab is located on page 46 Aircraft Pro le Tab E6B...

Страница 113: ...til you press ENTER to acknowledge the alarm Press NRST FIND to view the Airspace Information when an airspace alarm message appears To set a persistent alarm 1 Press MENU twice to open the Main Menu...

Страница 114: ...me before the destination for the alarm to go off Select Auto for the unit to provide an Arrival alarm at its discretion Off Course sets an alarm to sound when off your course Select On then enter a d...

Страница 115: ...ere a marine warning is in effect Sonar Alarms Sub Tab Marine Mode Only You must be receiving sonar NMEA data for Sonar Alarms to work Sonar Alarms Sub Tab Shallow Water and Deep Water sets an alarm t...

Страница 116: ...day are shown in a list as shown to the left You can select a different date by highlighting an arrow and pressing ENTER Press MENU to show an options menu Week View Sub Tab The Week View provides ma...

Страница 117: ...ormation for any date or location You can also use the play fast forward and stop buttons to view an animation of the Sun Moon sub tab To view Sun Moon information for a different date 1 Use the ROCKE...

Страница 118: ...tion time You can choose from different dates and over 3 000 tide stations Height of tide Smallest and Largest tides for the AM hours Select the Tide Station for which you want to view the information...

Страница 119: ...s ENTER You can also use the Zoom IN and OUT keys to view information for another date Press and hold IN or OUT to scroll quickly through dates 3 Press ENTER The unit shows the chart for the date you...

Страница 120: ...to view information for another date Press and hold IN or OUT to scroll quickly through dates 3 Press ENTER when nished The unit shows the information for the date you entered To use the current date...

Страница 121: ...ab 3 Use the ROCKER to highlight a message Press ENTER to view detailed information about that message To show hide messages using the Log Filter 1 Press MENU twice to open the Main Menu 2 Highlight M...

Страница 122: ...cklight to stay on when it is turned on or to time out after a selected period of time has elapsed when using the battery The backlight stays on regardless of this setting when external power is used...

Страница 123: ...d Status Route Guidance Only or No Voice Prompts Terrain Audio Aviation Mode turns audible terrain alerts on and off Also enables or disables the audible Five hundred altitude reminder that occurs whe...

Страница 124: ...t Language allows you to select from various languages for the unit s pages and menus WAAS allows you to Disable and Enable WAAS from this eld External Power Off allows you to select whether the GPSMA...

Страница 125: ...a direct line from your current location to your destination This is useful when you are travelling outside of detailed map coverage areas or where no roads exist Ask My Preference determines whether...

Страница 126: ...ale This is especially nice if you want to avoid major highways for example Select Auto Set to use preset values Guidance Sub Tab To open the Guidance sub tab press MENU twice to open the Main Menu Se...

Страница 127: ...ll Unit Defaults from the System tab Time Sub Tab The Time sub tab allows you to set the time format and zone You can also set the unit to conform to Daylight Saving Time The current time and date is...

Страница 128: ...on about location formats and map datums Also visit the National Imagery and Mapping Agency at http www nima mil for more information on grids and datums Location Format Sub Tab Changing the Location...

Страница 129: ...iation at your present location You must update the magnetic variation as your location changes Failure to update this setting can result in substantial differences between the information shown on yo...

Страница 130: ...Sonar supports the input output of a Garmin remote sonar device NMEA In NMEA Out supports the input output of standard NMEA 0183 version 3 01 data and sonar NMEA input support for the DPT MTW and VHW...

Страница 131: ...automatically scan for the DGPS beacon signal or you can enter the beacon frequency and bit rate on the unit and the information is used to tune the beacon receiver If you use a DGPS receiver WAAS ca...

Страница 132: ...t User and press ENTER 3 Highlight the Frequency or Bit Rate eld press ENTER and enter a frequency or bit rate Press ENTER when done When the unit is receiving a DGPS signal the SNR Signal to Noise Ra...

Страница 133: ...vertical tab list 3 Select Interface from the row of tabs along the top 4 Highlight the eld below Serial Data Format Press ENTER 5 Select NMEA In NMEA Out Press ENTER 6 Press MENU to open the options...

Страница 134: ...ge To view a speci c weather feature such as NEXRAD Radar or Storm Cells for example you can use the Weather Explorer tab on the Main Menu For more information see page 101 To view current weather con...

Страница 135: ...eather feature such as NEXRAD Radar or Storm cells through the Weather Explorer tab on the Main Menu For more information see page 101 To set up weather options on the Map Page 1 From the Map Page pre...

Страница 136: ...NEXRAD Radar Satellite Mosaic Lightning Storm Cells Hurricanes sets the zoom range at which the feature rst appears on screen Select Auto Off or 20 ft to 800 nm Avtn Wx Tab Use the Avtn Wx tab to set...

Страница 137: ...hich each feature rst appears on screen Select Auto Off or 20 ft to 800 nm Mrn Wx Tab Use the Mrn Wx tab on the Map Page Options to set up marine weather options Mrn Wx Tab Water Temperature Wave Peri...

Страница 138: ...MENU twice to show the Main Menu 2 Use the ROCKER to highlight the Weather Explorer tab 3 Press right on the ROCKER to highlight the Weather Information Type eld 4 Press up or down on the ROCKER to s...

Страница 139: ...ptions 1 Press MENU twice to open the Main Menu 2 Highlight the Weather Explorer tab and press MENU Declutter On Off allows you to toggle unwanted weather items on or off on the Map window Animate Wea...

Страница 140: ...M WX Weather subscription plan you purchased Weather Products shows a list of all weather features you can access based on your subscription plan Shows age of weather data in minutes Accessing GXM 30...

Страница 141: ...Item beginning on page 57 To nd weather information for your current location 1 From any page press FIND 2 Select Weather Data and press ENTER The Weather From Current Location Page appears Weather Fr...

Страница 142: ...d weather data for a different location 1 Press MENU on the Weather From Current Location Page 2 With Near Other highlighted press ENTER 3 Move the map pointer to a different location and press ENTER...

Страница 143: ...he sonar feature To show the Sonar Page on the Map Page 1 Press and hold PAGE Highlight Marine and press ENTER 2 Press PAGE or QUIT to show the Map Page 3 Press MENU Use the ROCKER to highlight Set up...

Страница 144: ...the depth and the water temperature Sonar Page The sonar returns show as red strongest then orange strong yellow medium green weaker and blue weakest The Fish Symbols option allows you to view the ac...

Страница 145: ...lected an adjustment option press the ROCKER up or down to change the setting You can also press MENU and highlight the shortcut setting to quickly change to commonly used settings values Press ENTER...

Страница 146: ...sts how far off the bottom the unit shows data Gain allows you to control the sensitivity of the unit s receiver which provides exibility in what is shown To see more detail increase the receiver sens...

Страница 147: ...esizing and press ENTER Using the Pointer on the Sonar Page You can show the pointer arrow to reference sonar items and mark underwater waypoints This makes it easier to nd and use an object such as a...

Страница 148: ...is best for shallow water or high noise areas has a slower screen update and is best used if you travel a wide variety of depths If the unit is unable to track the bottom for any reason the digits in...

Страница 149: ...d uncalibrated water speeds is shown at the bottom of the calibration window Note your top speed then stop the boat and press ENTER Calibrating the Water Speed 3 By default the top ground speed is aut...

Страница 150: ...Level setting on the Sonar Setup tab Flasher select On to show a graphic Flasher representation on the far right side of the sonar screen This graphic Flasher shows structure and bottom returns much t...

Страница 151: ...led data Stronger returns screen in darker colors with red being the strongest return Understanding the Sonar Display One of the rst things to understand about sonar is that the transducer sends a bea...

Страница 152: ...diameter circle at a 30 foot depth The narrow cone angles 10 associated with the high frequencies 200 kHz provide better bottom resolution and crisper detail but cannot show a large coverage area for...

Страница 153: ...ation easier to distinguish Whiteline Off Whiteline On Thick Whiteline Hard bottom Thermoclines A rough de nition of a thermocline is a break in water where the water temperature changes faster than t...

Страница 154: ...Changing the Temperature Screen The graph adjusts and shown the temperatures changes according to the Temperature Scale and Time Duration settings Temperature Scale select the degree span from the li...

Страница 155: ...TCAS differs from TIS the main difference between TIS and TCAS is the source of surveillance data TCAS uses an airborne interrogator with a half second update rate while TIS uses the terminal Mode S g...

Страница 156: ...radar which is a secondary surveillance radar similar to the ATCRBS TIS operation may be intermittent during turns or other maneuvering TIS is dependent on two way line of sight communications between...

Страница 157: ...truder is on a course that crosses the client aircraft course at a shallow angle either overtaking or head on and either aircraft abruptly changes course within nm TIS may show the intruder on the opp...

Страница 158: ...Page A Traf c Advisory TA symbol appears as a solid yellow circle All other traf c is shown as a hollow white diamond Altitude deviation from own aircraft altitude is shown above the target symbol if...

Страница 159: ...ck Traf c ground track is indicated on the GPSMAP 396 screen by a target track vector a short line shown in 45 degree increments extending in the direction of target movement Traf c Warning Window Whe...

Страница 160: ...ight the Map sub tab 5 Select TIS Traf c and use the ROCKER to change the Zoom range Highlighting TIS Traf c Using Map Page Panning Another Map Page feature is panning Refer to page 30 for more inform...

Страница 161: ...that may assist concerning the intruder aircraft Based on the above procedures minor adjustment to the vertical ight path consistent with air traf c requirements are not considered evasive maneuvers T...

Страница 162: ...es TIS data in and sends out both NMEA data at 9600 baud and VHF frequency tuning information The following features are now available on the radio Remote frequency lists for departure enroute and arr...

Страница 163: ...ery Life 4 to 15 hours based on the XM antenna and backlight usage Source 11 35 VDC Fuse 3AG 1 5 Amp Performance Receiver Differential ready 12 parallel channel receiver Acquisition Times Approx 15 se...

Страница 164: ...396 where prolonged exposure to temperature extremes can occur such as in the trunk of a car as permanent damage may result User information such as waypoints and routes is retained in the unit s memo...

Страница 165: ...ows the unit to operate from the vehicle s power system through the cigarette lighter adapter Provides a speaker for vocal prompts PC Interface Cable Connects the unit to a serial port on your PC Powe...

Страница 166: ...t indicates the appropriate harness connections Replacement fuse is a 3AG 1 5 Amp fuse Power Data Connector on the GPSMAP 396 Unit Data Out Blue Ground Black Voice Orange Alarm White Power Red Voice B...

Страница 167: ...In pin on the GPSMAP 396 You do not need to connect the transponder to the GPSMAP 396 s Data In pin Then set the corresponding RS 232 output con guration on the transponder to REMOTE TIS and set the...

Страница 168: ...upplied USB Data Cable connect the larger end of the cable to an available USB data port see illustration on the left When using a PC Interface Cable connect the larger end of the cable to a serial co...

Страница 169: ...P 396 Data cards are not waterproof should not be exposed to moisture or excessive static charges and should be stored in the case supplied with the card To install a data card 1 Insert the card into...

Страница 170: ...DBT DPT MTW VHW VTG and XTE sentences Garmin s proprietary communication protocol is available from the Web site www garmin com Removing the GPS Antenna You can remove the antenna to use an external a...

Страница 171: ...into the GPS receiver in the sequence you want to navigate them Waypoint a location you store in your GPS What is Differential GPS DGPS The United States and Canadian governments among others have se...

Страница 172: ...mance of 1 2 meters horizontal and 2 3 meters vertical throughout the majority of the continental United States and portions of Alaska WAAS is just one service provider that adheres to the MOPS Minimu...

Страница 173: ...RAN TD format mode it simulates the operation of a LORAN receiver Location coordinates can be showed as TDs and all navigation functions can be used as if the unit was actually receiving LORAN signals...

Страница 174: ...d press ENTER LORAN TD Setup If the active GRI Chain secondary stations or offsets have been changed since the waypoint was created the waypoint now references the active GRI chain and secondary stati...

Страница 175: ...ap to ensure the most accurate navigation What is a Location Format Your current location can be viewed on the GPS in the form of coordinates Since different maps and charts use different location for...

Страница 176: ...uard receives the call they can immediately access the caller s information such as who they are and the type of vessel in their database while they are in transit to the caller s location Any time a...

Страница 177: ...es are currently under review by the National Telecommunications and Information Administration NTIA User Outside the United States Users can obtain an MMSI assignment from their telecommunications au...

Страница 178: ...atitude longitude and frequency Intersections identi er nearest VOR radial and distance from nearest VOR location latitude longitude and region country ARTCC Air Route Traf c Control Centers Airspace...

Страница 179: ...essible Check XM Antenna internal problem with your GXM 30 antenna Contact Garmin Product Support Database Error internal problem with the unit Contact your dealer or Garmin Product Support to have th...

Страница 180: ...is available to calculate a DGPS position No Tide Stations for that Area no tide stations within 100 miles of the area No XM Signal the GXM 30 antenna is not receiving an XM signal None Found no data...

Страница 181: ...aded track will not t in memory The oldest track log points have been deleted Transducer Disconnected Sonar Turned Off the unit has no transducer attached has a bad cable transducer or has a disconnec...

Страница 182: ...ext point on your route ETE Destination Estimated Time Enroute The estimated time required to reach your destination ETE Next Estimated Time Enroute The estimated time required to reach the next point...

Страница 183: ...e Good the rate of closure on a destination based on your current speed and course of travel Shown as VMG Vertical Speed the rate of climb or descent Voltage the direct current voltage level of an ext...

Страница 184: ...reverse assemble reverse engineer or reduce to human readable form the Software or any part thereof or create any derivative works based on the Software You agree not to export or re export the Softwa...

Страница 185: ...BE YOUR SOLE AND EXCLUSIVE REMEDY FOR ANY BREACH OF WARRANTY Products sold through online auctions are not eligible for rebates or other special offers from Garmin Online auction con rmations are not...

Страница 186: ...or Internet partners or hardware manufacturers be liable to you or to any third party for any direct indirect incidental consequential special exemplary or punitive damages or lost pro ts resulting fr...

Страница 187: ...er NGA nor its personnel will be liable for any claims losses or damages arising from or connected with the use of this product The user agrees to hold harmless the United States National Geospatial I...

Страница 188: ...tee that interference will not occur in a particular installation If this equipment does cause harmful interference to radio or television reception which can be determined by turning the equipment of...

Страница 189: ...8 B Backlight 3 114 Baro Pressure 49 Battery level 4 Pack 1 2 Saver Mode 116 Beeper 115 BlueChart 161 Bug Indicator 40 93 Setting 33 C Cable 158 Calculate Routes for 118 Calculation Method 117 Calenda...

Страница 190: ...ntering Data 9 10 Erase See Delete External Power Source 4 F Faster Time 117 FCC 168 169 180 Field 8 Find From 57 From a Different Location 57 58 Menu 56 59 Your Current Location 3 Finding an Item in...

Страница 191: ...y See MMSI Marking a Waypoint 25 62 63 64 80 Underwater 139 Mark my Location 25 Maximum Speed 46 MayDay 169 Measuring Distance 32 Messages 113 176 180 Military Time 119 Mils 120 MMSI 95 168 169 MOB 91...

Страница 192: ...80 Sail Boat Racing Timer 94 Satellite Acquisition 5 Saved Route 26 73 Saved Track 89 Save Present Location 62 Save Track Log 87 Saving the Current Route 71 Scanning for Beacon 164 Scan for a Frequenc...

Страница 193: ...le 160 User Points Tab 82 UTC 119 UTM UPS 167 V Vectors 23 Vertical Navigation See VNAV Vertical Speed 120 VHF 168 VHF Comm 154 View Details 30 VNAV 41 42 Indicator 41 Pro le 41 Volume 3 115 VOR 17 17...

Страница 194: ......

Страница 195: ......

Страница 196: ...armin com Copyright 2005 Garmin Ltd or its subsidiaries Garmin International Inc 1200 East 151st Street Olathe Kansas 66062 U S A Garmin Europe Ltd Unit 5 The Quadrangle Abbey Park Industrial Estate R...

Отзывы: