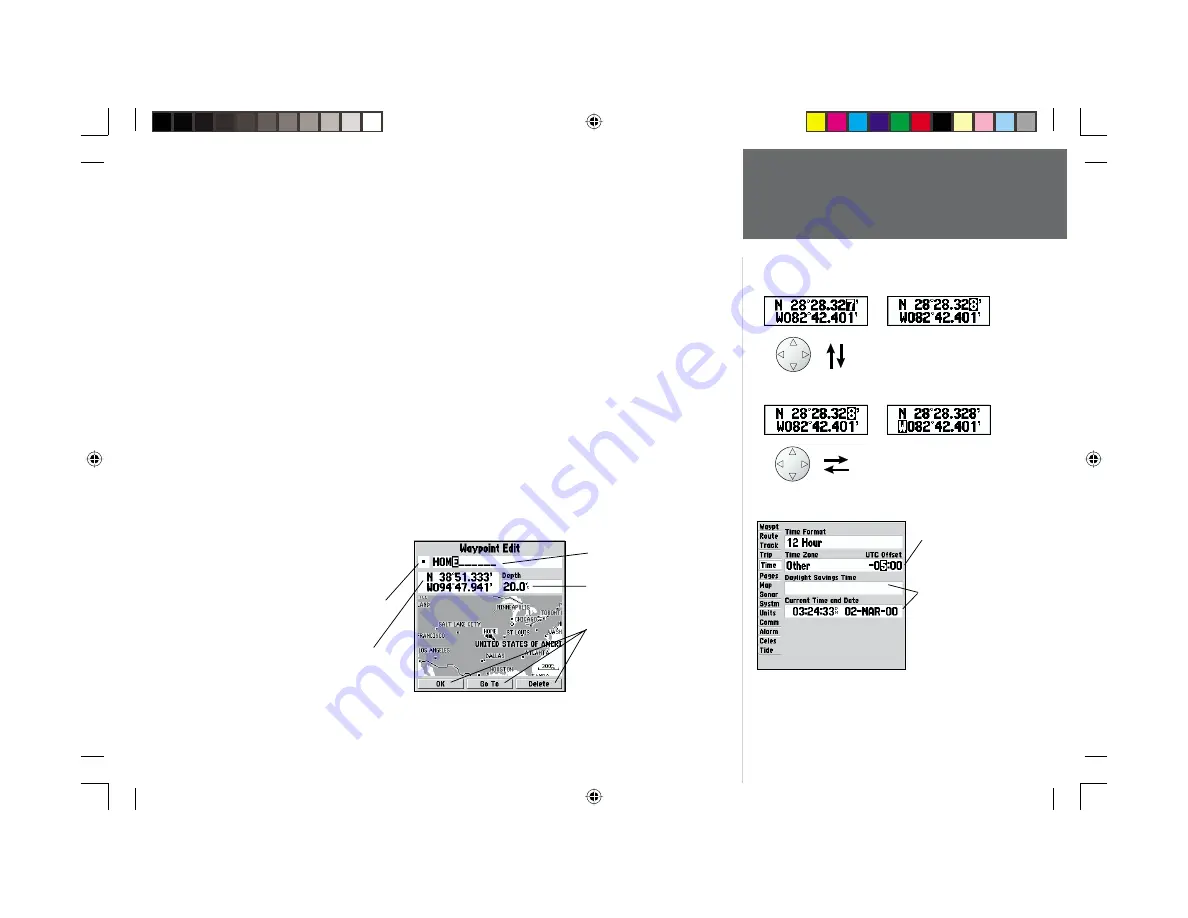
Garmin GPSMAP 168 Sounder Скачать руководство пользователя страница 12

3

Getting Started

Entering Data

Naming a waypoint or placing any sort of data that has not been predefi ned requires the use of 

both the 

ARROW KEYPAD

 and the 

ENTER/MARK 

key.

To enter a name or number in a data fi eld:

1.   Once you have accessed a page with programmable data fi elds (i.e. ‘ Waypoint Edit’) you can use 

the 

ARROW KEYPAD 

to move the cursor (highlight) to fi elds on the page. Use the UP/DOWN 

arrows to move up or down and the LEFT/RIGHT arrows to move sideways. 

2.   Pressing the 

ENTER/MARK 

key with the fi eld highlighted begins the process for entering data in 

the form of alphanumeric characters.

3.   Use the 

ARROW KEYPAD

 UP/DOWN arrows to cycle through numbers 0 to 9, plus/minus symbols, 

blank space, and the alphabet. Pressing and releasing the keypad moves you character by character 
through the list. Pressing and holding the keypad moves you rapidly through the list.

4.   Use the 

ARROW KEYPAD

 LEFT/RIGHT arrows to move to the next character on the line or 

backwards to edit characters. If there are more than two lines of data, keep pressing to the RIGHT 
to drop down to the next line.

5.   When data entry is complete, press 

ENTER/MARK 

to accept data, then move to the next program-

mable fi eld. Not all data fi elds are programmable, like the date and time. When moving about a 
page with these type of fi elds, the cursor will skip over them.

Every fi eld and button on this page 
can be programmed or activated.

•  A waypoint symbol can be selected 

from a list of symbols.

• The coordinates can be changed.

Pressing UP or DOWN 
on the ARROW KEYPAD 
changes numbers and 
letters.

Pressing LEFT or RIGHT 
on the ARROW KEYPAD 
moves the cursor along 
the line or to the next line.

• The waypoint can be renamed.

• A depth can be entered.

• Option buttons can be activated.

Data Entry Field

Non-programable 
data fi elds

168 Manual Part 1.indd

01/09/01, 10:40 AM

3

Содержание GPSMAP 168 Sounder

Страница 1: ...owner s manual and reference guide chartplotting receiver depth nder GPSMAP 168 Sounder 168 color cover indd 01 09 01 9 49 AM 1...

Страница 2: ...nloaded or stored in any storage medium for any purpose without prior written consent of GARMIN Corporation GARMIN Corporation hereby grants permis sion to download a single copy of this manual onto a...

Страница 3: ...vide detailed references to the advanced features and operations of the GPSMAP 168 Sounder This allows you to concentrate on a speci c topic quickly and look up detailed information about the GPSMAP 1...

Страница 4: ...speed if you suspect shallow water or submerged objects NOTE This equipment generates uses and can radiate radio frequency energy and if not installed and used in accordance with the instructions may...

Страница 5: ...UTORY OR OTHERWISE THIS WARRANTY GIVES YOU SPECIFIC LEGAL RIGHTS WHICH MAY VARY FROM STATE TO STATE IN NO EVENT SHALL GARMIN BE LIABLE FOR ANY INCIDENTAL SPECIAL INDIRECT OR CONSEQUENTIAL DAMAGES WHET...

Страница 6: ...semap to 20 miles includes detailed ocean river and lake coastlines cities interstates US state highways and local thoroughfares 20 reversible routes with up to 30 waypoints each Uploadable maps up to...

Страница 7: ...h external antenna Optional Accessories US A C PC Adapter P N 010 10276 00 EURO A C PC Adapter P N 010 10276 01 UK A C PC Adapter P N 010 10276 02 Cigarette Lighter Adapter P N 010 10208 00 MapSource...

Страница 8: ...s Page and Options 41 Highway Page and Options 42 Waypoints 44 Creating 44 Reviewing and Editing 46 Waypoint List 48 Nearest and Proximity 50 vii Introduction Table of Contents Going to a Destination...

Страница 9: ...s function keys 1 Mark your present location as a waypoint 10 44 Go to a destination 11 52 56 Create and use a route 57 64 Learn about the Map page 8 9 24 26 Pan using the map arrow 9 25 Zoom in or o...

Страница 10: ...nt on the Map Page The ENTER MARK Key The ENTER MARK key selects a highlighted menu option When entering data it allows you to initiate entry and then to accept the selected value s It also marks the...

Страница 11: ...eld box on a page 2 Use the ARROW KEYPAD to move the cursor highlight up and down a list or up down and sideways on menus 3 Once you have moved to the selection desired press the ENTER MARK key to ei...

Страница 12: ...nd holding the keypad moves you rapidly through the list 4 Use the ARROW KEYPAD LEFT RIGHT arrows to move to the next character on the line or backwards to edit characters If there are more than two l...

Страница 13: ...ctory in AutoLocate mode which will allow the receiver to nd itself anywhere in the world To speed up the initialization process we recommend using the graphic initialization process described on the...

Страница 14: ...ap Page or displays 2D or 3D Navigation during this process it is not necessary to initialize the unit The GPSMAP 168 Sounder will now begin searching for the appropriate satellites for your region an...

Страница 15: ...ion To turn the GPSMAP 168 Sounder on 1 Press and hold the POWER key until the power tone sounds then release the POWER key The Welcome Page will appear while the unit conducts a self test 2 Once the...

Страница 16: ...168 Sounder in simulator mode 1 From the Status Page press the MENU key The options page will appear displaying a menu of options and functions for the Status Page 2 Use the UP or DOWN arrow of the A...

Страница 17: ...route let s take a brief look at its various features and displays The map display shows your boat as a triangle marker on an electronically generated chart Geographic names roads markers and buoys th...

Страница 18: ...h the latitude longitude of the cursor 3 Press the QUIT key to remove the cursor and re center your boat on the map display As you become more familiar with the cursor you ll see that the map display...

Страница 19: ...ss ENTER MARK again and move the highlight to where you left off 5 After you have entered all the letters press ENTER MARK to con rm the name 6 To access the waypoint symbol menu highlight the waypoin...

Страница 20: ...the Map Page and pressing NAV MOB allows you to graphically select points to Go To For our simulated trip you re going to select a pre programmed tour route using the rst method This will also show h...

Страница 21: ...simple route with your boat at the rst route waypoint A data eld at the top of the page will now display the speed distance to the second route waypoint and a pointer which shows you which way to go...

Страница 22: ...will display the waypoint name the range and bearing from your present position and the coordinates for the waypoint To review the waypoint page for a selected waypoint 1 Press the ENTER MARK key 2 To...

Страница 23: ...ale which re ects the depth of the area being displayed If the unit does not detect a transducer attached to the unit a Sonar Turned Off message will appear across the top of the Sonar Page More on th...

Страница 24: ...display Note The Zoom function can be deactivated by pressing the OUT key until the No Zoom setting appears Once in Zoom mode you can control the view of the left side of the split When the unit is s...

Страница 25: ...nter arrow work independently to show at a glance the direction of your movement and the direction to your destination For instance if the arrow points up you are going directly to the waypoint If the...

Страница 26: ...ge when your main concern is following a de ned course When the GPSMAP 168 Sounder is in simulator mode you can also adjust your speed and course from the Highway Page using the ARROW KEYPAD As you he...

Страница 27: ...ver you have activated a route or TracBack this page will show each waypoint name along with useful data for each point As you navigate the route the information will automatically update to indicate...

Страница 28: ...page will appear 2 Highlight the OK prompt and press ENTER MARK to con rm 3 Press PAGE or QUIT to return to any of the main pages Congratulations You ve now gone through the basic operation of the GA...

Страница 29: ...a particular satellite the corresponding signal strength bar will be blank and the sky view indicator will not be highlighted Once the receiver has found the satellite a light signal strength bar will...

Страница 30: ...ion but has not collected enough data to calculate a x 2D Navigation at least three satellites with good geometry have been acquired and a 2 dimensional position x latitude and longitude is being calc...

Страница 31: ...nal being received If no optional DGPS receiver is used with the GPSMAP 168 Sounder the DGPS Rcvr eld will display Off and the DGPS SNR eld will be blank The SNR will depend upon the mounting of your...

Страница 32: ...e and Loran TD Time Delays For setup of Loran TD see pages 80 81 AutoLocate allows the receiver to locate your position automatically This process can take up to ve minutes Initialize Position allows...

Страница 33: ...r mode determine what cartography is shown on the map display Position mode pans the cartography to keep the present position marker within the display area while cursor mode pans the cartography to k...

Страница 34: ...irection As you move the cursor the distance and bearing from your present position to the cursor will be displayed in the data window along with the cursor s position coordinates Keep in mind that wh...

Страница 35: ...sents the distance from one end of the scale bar to the other The GPSMAP 168 Sounder s system has a built in worldwide database to 20 mi with more detailed coverage available through the use of the op...

Страница 36: ...ides access to functions and features relating to the Map Page and the layout options To display the Map Page options 1 Press MENU To select a menu option 1 Use the ARROW KEYPAD to highlight the desir...

Страница 37: ...er showing a graphic representation of sh water depth thermoclines and structure and bottom type and shape In Show Flasher mode the graphic Flasher displays structure and bottom returns much the same...

Страница 38: ...table lists the le tabs and the settings available under each tab General Detail Orientation AutoZoom Source Basemap MapSource Points Waypoints Active Route Marine Navaids Line Saved Tracks Track Log...

Страница 39: ...urce data loaded in the unit on or off Points Tab Waypoints Active Route and Marine Navaids Text None Small Medium and Large controls the screen size of the name Zoom Auto Off 120 ft 800 mi sets the m...

Страница 40: ...map con guration tab you can access the following menu options Restore Defaults restores settings back to factory settings for the tab highlighted Restore All Map Defaults restores settings back to f...

Страница 41: ...ta elds Small 3 Rows Small text 12 data elds Medium 1 Row Medium text 3 data elds Default setting Medium 2 Rows Medium text 6 data elds Large 1 Row Large text 1 data eld Huge 1 Row Huge text about 1 3...

Страница 42: ...t waypoint at current speed and course TO COURSE Distance to desired track TRACK Current compass heading TRIP ODOM Trip Odometer TTL AVG SPEED Total average speed TTL TRIP TIMER Total travel time of t...

Страница 43: ...ottom A black line is used to show the point where the water meets the whiteline This black line will follow the contour of the bottom and show any objects of reasonable size For more information on u...

Страница 44: ...led description of the available Zoom settings Gain allows the user to control the sensitivity of the unit s receiver This provides some exibility in what is seen on the display To see more detail inc...

Страница 45: ...esumed You may see a dicontinuity from where the sonar information stops to where it starts again To mark an underwater waypoint 1 From the Sonar Page press MENU highlight Show Pointer and press ENTER...

Страница 46: ...and bottom returns much the same as a true Flasher You may nd this feature particularly useful when using Fish Symbols To turn the Graphic Flasher on and off 1 From the Sonar Page menu highlight Show...

Страница 47: ...the unit will display all of the available information about the underwater environment If a sh symbol is selected the chart will display only the information related to that symbol Whiteline controls...

Страница 48: ...ing Water Type since sound waves travel through Fresh and Salt water at different rates it is necessary to select the Water Type to ensure accurate readings on the unit Remember the unit can be set to...

Страница 49: ...or Use No Calibration to use the speed sensor s uncalibrated speed If the boat is not moving fast enough or the speed sensor is not outputting a speed you will see a Boat Is Not Moving Fast Enough To...

Страница 50: ...y to the waypoint If the arrow points any direction other than up turn toward the arrow until it points up then continue in that direction Due to Selective Availability Error the bearing pointer and o...

Страница 51: ...aller view of the highway Five settings are available from 1X to 16X with a default setting of 8X To change the highway perspective scale 1 Press the IN or OUT key to select the desired setting The GP...

Страница 52: ...y and press ENTER MARK 2 Highlight the desired option and press ENTER MARK Setup Page Layout allows you to change the text size and number of data elds that will be displayed Change Data Fields allows...

Страница 53: ...resent position This can be determined by looking at the Status Page When you move the cursor over a map item you will see a highlighted description of that item To mark your present position 1 Press...

Страница 54: ...graphically 1 Use the ARROW KEYPAD to move the cursor to the desired map position If you want to create the new waypoint from an on screen map item highlight the map item on the map display 2 Press th...

Страница 55: ...r the last character in each section 4 When you have nished entering all your waypoint data highlight the OK prompt and press ENTER MARK Reviewing and Editing Waypoints Once you have created and store...

Страница 56: ...d and press ENTER MARK 2 Use the ARROW KEYPAD to edit the coordinates To drop to the next line press to the right on the ARROW KEYPAD 3 Press ENTER MARK when done To move the waypoint on the map 1 Fro...

Страница 57: ...waypoints currently stored in memory From the By Name list you may review edit rename or delete individual waypoints or delete all user waypoints The total number of stored and available waypoints is...

Страница 58: ...ion warning To delete waypoints by symbol 1 From the By Name tab highlight the waypoint to be deleted and press the MENU key then select Delete By Symbol and press ENTER MARK 2 Use the ARROW KEYPAD to...

Страница 59: ...review each waypoint you can scroll through any waypoint list by pressing the ENTER MARK key repeatedly To select a nearest waypoint as a NAV MOB destination 1 Use the ARROW KEYPAD key to select the d...

Страница 60: ...MARK The Select Waypoint screen appears 2 To select a waypoint from the lists use the ARROW KEYPAD to highlight the desired waypoint from the By Name or Nearest waypoint lists To select a waypoint fr...

Страница 61: ...V MOB key the GPSMAP 168 Sounder provides four ways to navigate to a destina tion Go To Waypoint Follow Track TracBack MOB Man OverBoard and Follow Route navigation Once you are actively navigating yo...

Страница 62: ...ame of the map item but the point will not be stored in the waypoint list See page 45 for creating waypoints using map items If you are selecting a new map point non map item as the Go To destination...

Страница 63: ...Track tab then highlight the Active tab to the right 3 Use the ARROW KEYPAD to select the Clear option and press ENTER MARK 4 Highlight the OK eld and press ENTER MARK You must rst save the track log...

Страница 64: ...rap There must be at least two track log points stored in memory to create a TracBack route If the track log interval is set to the Time option the route may not follow your exact path keep the interv...

Страница 65: ...with a diver down symbol will be created and the unit will be on an active navigation to that point Use any of the navigation pages to guide you back to the MOB point The MOB waypoint will be stored i...

Страница 66: ...xt from the Route Review Page 1 Press the MENU key twice to display the Main Menu Page 2 Use the ARROW KEYPAD to highlight the Route tab and press the MENU key to display the route options menu 3 Sele...

Страница 67: ...d symbol of the new waypoint see page 47 As you add each new waypoint to the route the data window at the top of the map display will show the waypoint map item name bearing and distance from your loc...

Страница 68: ...y Follow the route name 2 Highlight the route you wish to navigate and press ENTER MARK 3 Choose Activate or Invert and Activate and press ENTER MARK Activate will use the route as is Invert and Activ...

Страница 69: ...w the route points waypoints or map items one at a time from the list To review individual route points 1 Highlight the desired point and press ENTER MARK 2 On the Waypoint Review window you may choos...

Страница 70: ...again when done To remove a route point 1 Highlight the Remove option and press ENTER MARK To move a route point 1 Highlight the Move option and press ENTER MARK 2 Move the cursor to the new map posit...

Страница 71: ...sh to insert the new point before To add a point to the end highlight the blank eld at the bottom of the list and press MENU 2 Highlight Insert Waypoint or Add Waypoint and press ENTER MARK 3 From eit...

Страница 72: ...ing gures appears to the right of each route waypoint and its distance Use the LEFT RIGHT keys on the ARROW KEYPAD to select the desired item 3 To enter planning information Press MENU and select Plan...

Страница 73: ...ages share many of the same features and options The following route options are available from the Active Route Page Edit on Map see page 61 for instructions Insert Waypoint see page 62 for instructi...

Страница 74: ...hlight any of the tab items press to the RIGHT on the ARROW KEYPAD then move UP or DOWN to select individual items 3 You may then press either MENU for additional submenu options or press ENTER MARK t...

Страница 75: ...cBack information The Track submenu is divided in two tabs the Active tab and the Saved tab The Active tab is for the active log the log currently being recorded It displays track memory used and curr...

Страница 76: ...ear the active track log currently stored in memory For the Saved tab the following menu options are available Show Map displays the saved track log on a Track Map page Delete Track deletes highlighte...

Страница 77: ...e on page 80 for time offsets Daylight Savings choose from Auto On or Off to adjust for daylight savings Pages Tab allows you to turn on off any of the main pages or Jump To a particular page To selec...

Страница 78: ...tem Mode select from Normal normal navigation Simulator for practice ONLY Sounder Only or GPS Only Track Control Auto Track will steer to the current navigation point User Track allows you to enter a...

Страница 79: ...rmation on Loran TD setup see pages 80 81 Map Datum allows you to select the datum reference used to determine a given position The default setting is WGS 84 Datums are used to describe geographic pos...

Страница 80: ...ess ENTER MARK 2 Use the ARROW KEYPAD to enter the magnetic variation at your current position and press ENTER MARK WARNING If User Mag Var is selected you must periodically update the magnetic variat...

Страница 81: ...Tracks and Send Waypoints Garmin DGPS used to connect the GPSMAP 168 Sounder with a Garmin DGPS beacon receiver NMEA In NMEA Out supports the input output of standard NMEA 0183 version 2 3 data Text O...

Страница 82: ...ntial beacon receiver directly from your GPSMAP 168 Sounder You may have the unit automatically scan for the DGPS beacon signal or you can enter the beacon frequency and bit rate on the unit and the i...

Страница 83: ...ck Wiring unit is not making connection with DGPS receiver When the unit is receiving a DGPS signal the SNR Signal to Noise Ratio and Distance elds will show data The SNR range is 0dB to 30dB with 30...

Страница 84: ...nter a time in the time eld and turn the alarm on and off from the control eld menu Remember to enter alarm times in the same time format UTC or local you re using for your system The unit must be on...

Страница 85: ...ENTER MARK 3 Highlight the next eld to the right and press ENTER MARK then enter the desired settings and press ENTER MARK to nish In order to hear an audible alarm you must have the beeper turned on...

Страница 86: ...r Choose Waypoint use the ARROW KEYPAD to select a waypoint from the By Name or Nearest tab lists and press ENTER MARK The location the unit is using will appear in the Date Time Position eld The time...

Страница 87: ...will indicate the time of day when using current date and will intersect the tide graph to show their relation The tide curve shows as a shaded area with higher tides being taller and lower tides sho...

Страница 88: ...K 2 Highlight Select From Map and press ENTER MARK 3 Select a position on the map and press ENTER MARK 4 A list will appear showing up to nine of the nearest tide stations Highlight the desired statio...

Страница 89: ...operation of a Loran receiver Position coordinates may be displayed as TDs and all navigation functions may be used as if the unit was actually receiving Loran signals Using the Loran TD Format When...

Страница 90: ...Menu To setup Loran TD from the Status Page 1 Press MENU then use the ARROW KEYPAD highlight the Loran TD On and press ENTER MARK 2 To change the settings of any of the ve elds highlight the eld press...

Страница 91: ...E007 5 to E022 5 1 E022 5 to E037 5 2 E037 5 to E052 5 3 E052 5 to E067 5 4 E067 5 to E082 5 5 E082 5 to E097 5 6 E097 5 to E112 5 7 E112 5 to E127 5 8 E127 5 to E142 5 9 E142 5 to E157 5 10 E157 5 t...

Страница 92: ...ction Input DC voltage is too low for unit Boat is Not Moving Fast Enough to Calibrate Speed wheel is not turning Check for debris or boat speed is too slow Database Error Internal problem with the un...

Страница 93: ...allow water alarm depth has been detected below transducer Sonar Failed Unit Needs Repair Internal problem with the unit Contact your dealer or GARMIN Customer Service page iv to have the unit service...

Страница 94: ...d Indonesia Dos 1968 Dos 1968 Gizo Island New Georgia Islands Dutch Dutch Easter Isld 67 Easter Island 1967 European 1950 European 1950 Austria Belgium Denmark Finland France Germany Gibraltar Greece...

Страница 95: ...rabia Nhrwn United A Nahrwn United Arab Emirates Obsrvtorio 66 Observatorio 1966 Corvo and Flores Islands Azores Old Egyptian Old Egyptian Egypt Old Hawaiian Old Hawaiian Mean Value Oman Oman Oman Ord...

Страница 96: ...e estimated time you will reach your destination waypoint based on current speed and track ETA at Dest The estimated time you will reach a GOTO destination or the nal waypoint in a route ETA at Next T...

Страница 97: ...recommended direction to steer in order to reduce course error or stay on course Provides the most ef cient heading to get back to the desired course and proceed along your route Track The direction...

Страница 98: ...ormance Receiver Differential ready 12 parallel channel receiver tracks all satellites in view Acquisition Times Warm Approx 15 seconds Cold Approx 45 seconds AutoLocate Approx 5 minutes Update Rate 1...

Страница 99: ...uld not seriously degrade the GPS antenna s reception Never paint the antenna or clean it with harsh solvents The GARMIN antenna screws directly onto any standard 1 x 14 thread antenna mount If you ne...

Страница 100: ...emperature range for the GPSMAP 168 Sounder is 5 F to 158 F 15 C to 70 C Extended exposure to temperatures exceeding this range in storage or operating conditions may cause failure of the LCD screen T...

Страница 101: ...fuse Interfacing The following formats are supported for connection of external devices GARMIN proprietary Differential GPS DGPS NMEA 0183 version 2 3 ASCII Text Output RTCM SC 104 input version 2 0...

Страница 102: ...ransom mount transducer This transducer provides good all around performance Listed below are a variety of optional transducers and accessories which are available from your local dealer or GARMIN 200...

Страница 103: ...tion 010 10118 00 depth temp Transom Mount Transducer Do not mount transducer directly in the path of the prop The transducer can cause cavitation that may degrade the boat s performance and damage th...

Страница 104: ...r over any strakes or behind any obstruction on the hull that would create turbulence at speed Many modern hulls have a prelocated pocket for thru hull transducer installation If you are unsure if you...

Страница 105: ...rm gear and tighten until the band is through the worm gear 4 Place the clamp and transducer over the body of the trolling motor Finish tightening the clamp to secure the transducer to the trolling mo...

Страница 106: ...ely start showing the bottom Verify that the unit is not in the simulator mode If the unit is in the simulator mode make sure that the transducer is connected to the wiring harness To test the transdu...

Страница 107: ...for the transducer If you are in a slow moving boat such as a canoe or at bottom boat the mounting location is not as critical Follow these simple guidelines and you should be ne To install the sucti...

Страница 108: ...old temperatures will reduce battery life Installing the D Cell Batteries 1 Disconnect the Red and Black leads 2 Install the batteries noting the correct polarity 3 Reconnect the Red and Black leads a...

Страница 109: ...in the order that it is returned rst returned rst on the chart The diagram in the sidebar demonstrates this showing an underwater scene as it would be displayed on the chart Generally speaking if the...

Страница 110: ...ately 1 3 of the water depth As shown is Example 1 the coverage area at a 30 foot depth is approximately a 10 foot diameter circle The scale below illustrates how coverage increases as depth increases...

Страница 111: ...n the chart On the chart it appears the sh and tree are side by side but when we look at the scene from the top we can see that the sh is several feet from the tree It is important to remember that th...

Страница 112: ...is black While you can make some determination of the bottom type the black return makes this more dif cult With the whiteline active the bottom return appears layered in shades of gray and black and...

Страница 113: ...SMAP 168 Sounder to see through thermoclines and helps locate sh where they live and sh love the thermocline A rough de nition of a thermocline is a break in water where the water temperature changes...

Страница 114: ...ata Transfer 72 Date Time 20 68 Datum Map 70 85 86 Daylight Savings Time 68 Deep Water Alarm 75 Depth Line 14 34 35 37 Depth Scale 14 34 39 Depth Units 71 DGPS Interface Settings 73 74 DGPS Status 20...

Страница 115: ...9 Nearest Waypoint List 50 NMEA Output Formats 72 92 Noise Reject 39 O Odometers Trip 68 Off Course Alarm 75 Options Selecting 2 OUT Key 1 Overzoom 26 P Packing List vi PAGE Key 1 Pages Tab 68 Plan Ro...

Страница 116: ...hermoclines 14 34 104 Tide Charts 78 79 Tide Page Settings 78 79 Time Daylight Savings 68 Time Format 68 Time Offsets 82 Time Zone 68 TracBack 54 55 67 Track Log Clearing 19 54 67 Track Log Deleting 6...

Страница 117: ...168 Manual Part 2 indd 01 09 01 9 46 AM 108...

Страница 118: ...t Olathe Kansas 66062 U S A GARMIN Europe Ltd Unit 5 The Quadrangle Abbey Park Industrial Estate Romsey SO51 9AQ U K GARMIN Corporation No 68 Jangshu 2nd Road Shijr Taipei County Taiwan www garmin com...

Отзывы: