Garmin GPS II+ Скачать руководство пользователя страница 53

47

Reference

Route Definition Page (cont.)

The right side of the route definition page features several ‘function’ fields which

let you copy, clear, invert, or activate the displayed route. Routes 1-19 are used as
storage routes, with route 0 always serving as the active route you are navigating. If
you want to save a route that’s currently in route 0, be sure to copy it to another
open route, as it will be overwritten by the next route activation.

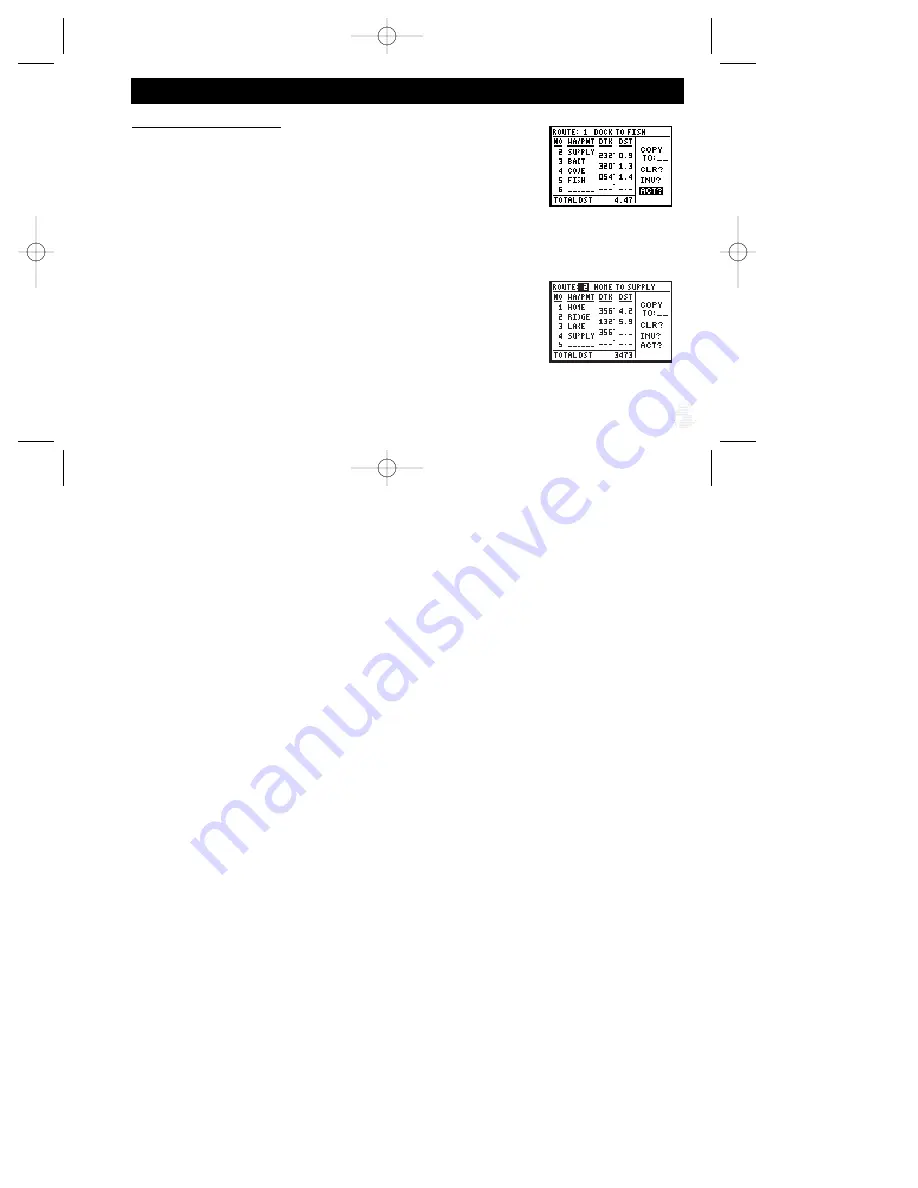
Routes can be copied, cleared, inverted, and activated (Fig. 47a) through the

route definition page.

To select the route definition page:

1. Highlight ‘ROUTES’ from the Menu Page, and press ENTER.

The ‘route number’ field is displayed at the top of the page (Fig. 47b), with a 16-

character ‘user comment’ field to the right. If no user comment is entered, the field
displays the first and last waypoint in the route. The waypoint list on the left side of
the page accepts up to 30 waypoints for each route, with fields for desired track and
distance between legs. The total route distance is indicated below the waypoint list.

Fig. 47a

Fig. 47b

gps ii +   8/4/98 3:28 PM  Page 47

Содержание GPS II+

Страница 1: ...Owner s Manual Reference gps ii 8 4 98 3 28 PM Page 1...

Страница 2: ...any means includ ing photocopying and recording for any purpose without the express written permission of GARMIN Information in this document is subject to change without notice GARMIN reserves the ri...

Страница 3: ...tions for your convenience Section One takes you through step by step instructions to initialize the receiver for first time use Section Two Getting Started Tour introduces you to the basic features...

Страница 4: ...r in a place where the driver or passengers are likely to have an impact with it in an accident or collision The mounting hardware provided by GARMIN is not warranted against collision damage or the c...

Страница 5: ...ce by relocating the equipment or connecting the equipment to a different circuit than the affected equipment Consult an authorized dealer or other qualified service technician for additional help if...

Страница 6: ...9 30 Creating and Using Waypoints 31 39 GOTO and MOB Mode 40 41 TracBack Navigation 42 45 Creating and Using Routes 46 53 Compass and Highway Page 54 59 Map Page 60 70 Menu Page and Auxiliary Function...

Страница 7: ...r can only see satellites above the horizon so it needs to know what satellites to look for at any given time To use this almanac data your GPS needs to either be told its general location or given th...

Страница 8: ...rom four to twelve satellites in view The receiver will then continuously select the best satellites in view to update your position If some of the satellites in view get blocked or shaded the receive...

Страница 9: ...partment door 3 Lock the door in the closed position by rotating the metal ring 90 clockwise Battery life varies due to a variety of factors including temperature and backlighting You may find that th...

Страница 10: ...4 Unit Features Antenna Function Keys LCD Display Battery Door Rocker Keypad Power Key red To change the screen orientation press and hold the page key gps ii 8 4 98 3 28 PM Page 4...

Страница 11: ...12 adjustable fields by selecting either the in or out keys from the Map Page KEYPAD Controls the movement of the cursor and is used to select options and positions and to enter data CURSOR A solid b...

Страница 12: ...y no matter if you re using the unit vertically Fig 6a or horizontally Fig 6b To change the screen orientation 1 Press and hold PAGE Data Entry The arrow keypad is used for all data entry Use the UP a...

Страница 13: ...displayed while the unit conducts a self test Once testing is complete the Welcome Page will be replaced by the Satellite Page You ll see the EZinit prompt which asks you to choose an initialization m...

Страница 14: ...he Satellite Page to the Position Page Figs 8a 8b Your receiver is now ready to use To turn the unit off 1 Press and hold the red power key for three seconds Fig 8c 8 Initializing the Receiver Power O...

Страница 15: ...surface area of the window it may be nec essary to mount an external antenna on your vehicle s roof or trunk in order to give the unit a better view of the sky Contact your local GARMIN dealer and inq...

Страница 16: ...te We ll go over all of them in more detail in the reference section This tour assumes that you have only initialized the receiver and have not changed any of the factory settings units of measure use...

Страница 17: ...as you use your unit It features a sky view of available satel lites corresponding signal strength bars the status of your current position fix acquiring 2D 3D etc and your estimated position error E...

Страница 18: ...ude fields are user selectable which means you can change them to display other navigation informa tion We ll cover those fields more in the reference section Marking a Position GPS is really about ma...

Страница 19: ...p page To change the waypoint symbol 1 Highlight the waypoint symbol field Fig 13b and press ENTER 2 Select the house symbol and press ENTER 3 Move the cursor to the DONE prompt and press ENTER 4 Pres...

Страница 20: ...l far enough to register useful information You ll also get a better indication of how the GPS II s steering guidance and mapping features work to guide you You ll see that the direction you are movin...

Страница 21: ...a diamond icon in the center of the map Use the zoom keys IN and OUT to change the map scale until you see the waypoint you just created HOME We ll cover more about this page in the reference section...

Страница 22: ...stination you ve selected To see how it works let s try navigating back to our starting position the HOME waypoint To select a GOTO destination 1 Press GOTO 2 Highlight the HOME waypoint Fig 16a and p...

Страница 23: ...ide a clear picture of the direction you re moving and the direction of HOME The bearing and distance to a waypoint are displayed at the top of the screen and your current track and speed are shown be...

Страница 24: ...g to a destination The last page available from the main page sequence is the Menu Page Fig 18a which provides access to the GPS II s waypoint management route and setup features To view the Menu Page...

Страница 25: ...p Page and press ENTER 2 Highlight the track setup field and press ENTER 3 Highlight the clear log field Fig 19a and press ENTER 4 Highlight Yes and press ENTER Congratulations You ve just completed t...

Страница 26: ...er has found the satellite s and is collecting data Fig 20a Solid signal strength bars the receiver has collected the necessary data and the satellite s is ready for use Each satellite has a 30 second...

Страница 27: ...whether you have a current position fix indicated by a 2D NAV or 3D NAV in the status field Fig 21b You can also set the sky view to a track up configuration by changing the orientation option on the...

Страница 28: ...er is collecting data from available satellites but has not collected enough data to calculate a 2D fix 2D Navigation at least three satellites with good geometry have been locked onto and a 2 dimensi...

Страница 29: ...cess to the EZinit prompt whenever a position fix has not been calculated Fig 23b The unit must be in searching AutoLocate acquiring simulator or poor coverage mode This allows you to reinitialize the...

Страница 30: ...rating off external power The battery level indicator is calibrated for alkaline batteries Ni Cad and lithium batteries will display the battery level differently due to voltage differences No other r...

Страница 31: ...er every keystroke There are three stages of backlighting When backlighting is on a bulb icon will appear at the bottom left of the sky view Fig 25 To adjust the duration of the screen backlighting re...

Страница 32: ...rip odometer fields default Track is the compass direction representing your course over the ground and speed is how fast you re moving The lower left hand corner of the page shows your current latitu...

Страница 33: ...reset Elapsed Time ELPSD hours and minutes since last reset Average Speed AVSPD average speed traveled Maximum Speed MXSPD maximum speed traveled since last reset Altitude ALT vertical distance above...

Страница 34: ...2 Press ENTER to confirm the RESET prompt Fig 28a Altitude Field When the GPS II is acquiring satellites or navigating in the 2D mode the last known altitude will be used to compute your position If t...

Страница 35: ...position can be entered by taking an instant electronic fix by manually entering coordinates see p 34 or by referencing a bearing and distance to a known position see p 35 To mark your present positi...

Страница 36: ...anges and press ENTER 3 Highlight SAVE and press ENTER Note To enter a different waypoint symbol or comment see pp 36 37 To add this waypoint to a route 1 Highlight the add to route number field Fig 3...

Страница 37: ...Reference Waypoint Pages The GPS II has three waypoint pages that let you quickly manage up to 500 waypoints These pages nearest waypoints waypoint list and waypoint defini tion can be accessed throug...

Страница 38: ...his page will also let you retrieve a waypoint definition page or GOTO a selected waypoint right from the list To review the waypoint definition page of a selected waypoint 1 Highlight the desired way...

Страница 39: ...ected waypoint see p 32 To delete all user defined waypoints 1 Highlight DELETE WPTS Fig 33a and press ENTER An options page will appear asking if you want to delete all user defined way points or if...

Страница 40: ...oordinates or its approximate distance and bearing from an existing waypoint To create a waypoint by entering coordinates 1 From the waypoint definition page highlight NEW Fig 34a and press ENTER 2 En...

Страница 41: ...erencing a stored waypoint 1 From the waypoint definition page highlight NEW and press ENTER 2 Enter a waypoint name and press ENTER 3 Highlight the reference field Fig 35a and press ENTER 4 Enter a r...

Страница 42: ...ight the symbol field Fig 36a and press ENTER 2 Use the arrow keypad to select the desired symbol and press ENTER 3 The cursor will move to the display field where you can select which waypoint infor...

Страница 43: ...efault comment is the UTC or Greenwich mean time date and time of the waypoint s creation To change or add a comment 1 Highlight the comment field 2 Press ENTER Fig 37a Note You can clear the comment...

Страница 44: ...waypoint name Fig 38b and press ENTER 3 Press ENTER to confirm the Yes prompt To delete a stored waypoint 1 Highlight DELETE and press ENTER 2 Highlight the Yes prompt and press ENTER Note To delete...

Страница 45: ...ar acter you have entered to that point This helps eliminate the need to always enter a waypoint s complete name To scan waypoints from a waypoint field 1 Highlight the waypoint name field and press E...

Страница 46: ...se from your present position To activate the GOTO function 1 Press GOTO 2 Select the waypoint you want to navigate to Fig 40a and press ENTER Once a GOTO waypoint has been activated the Compass Page...

Страница 47: ...ctivate the MOB mode 1 Press GOTO twice The GOTO waypoint page will appear with MOB selected Fig 41a 2 Press ENTER to begin MOB navigation Fig 41b The GPS II will now guide you to the MOB waypoint unt...

Страница 48: ...track plot will be continuously recorded wrapping through the available memory replacing the oldest data with new data To select a track log option 1 Highlight the record field Fig 42a press ENTER se...

Страница 49: ...features of the track log in order to duplicate your exact path as closely as possible These points will be indicated by a T001 number on the waypoint list and by a T sym bol on the Map Page Fig 43c...

Страница 50: ...memory to create a TracBack route If there are not enough available waypoints in memory to create a TracBack route you will be alerted with a waypoint memory full message and the receiver will use any...

Страница 51: ...with fewer changes in direction If you want to save a TracBack route copy route 0 to an open storage route before acti vating another TracBack Activating another TracBack or storage route will overwr...

Страница 52: ...routes of 30 waypoints each The route navigation feature lets you plan and navigate a course from one place to anoth er using a set of pre defined waypoints Routes are often used when it s not practic...

Страница 53: ...tes can be copied cleared inverted and activated Fig 47a through the route definition page To select the route definition page 1 Highlight ROUTES from the Menu Page and press ENTER The route number fi...

Страница 54: ...aypoints the list will automatically scroll down as needed Fig 48b Just like the TracBack feature routes are broken down and navigated in smaller segments called legs The waypoint you re going to in a...

Страница 55: ...te number This system allows you to have an active route that you may edit during naviga tion and save as an entirely new route from the original You will have to copy the active route to an unused st...

Страница 56: ...will also allow you to change the ete field to display desired track DTK or estimated time of arrival ETA for each leg You can also clear or invert the active route To display DTK or ETA for each leg...

Страница 57: ...e route number field and press ENTER Fig 51a 2 Enter the route number to be copied and press ENTER 3 Highlight the copy to field and press ENTER 4 Scroll through the available routes and select a dest...

Страница 58: ...ing options Review reviews the waypoint s definition page Insert adds a new waypoint that precedes the selected waypoint Remove deletes a selected waypoint Change replaces the selected waypoint with a...

Страница 59: ...vigating to the first waypoint in the active route you may be navigating to the last If you prefer to navigate a route out of sequence you can perform an on route GOTO from the active route page To pe...

Страница 60: ...is not possible The Highway Page provides a graphic highway that shows your movement relative to the desired course with an emphasis on your crosstrack error the distance and direction you are off cou...

Страница 61: ...TE the time left to your destination based on your present speed and track Estimated Time of Arrival ETA the time of day of your arrival at a destination based on current ground speed and track Course...

Страница 62: ...direction to your destination For instance if the arrow points up you are going directly to the waypoint If the arrow points any direction other than up turn toward the arrow until it points up then c...

Страница 63: ...Track Over Ground EstimatedTime Enroute User SelectableField Speed Over Ground Distance to Waypoint Graphic Compass Ring Pointer to Waypoint Destination Waypoint Bearing to Waypoint gps ii 8 4 98 3 2...

Страница 64: ...aypoint the highway will actually move indicat ing the direction you re off course relative to the position diamond on the CDI scale To stay on course simply move toward the center of the highway If y...

Страница 65: ...ference Track Over Ground EstimatedTime Enroute User SelectableField Speed Over Ground Distance to Waypoint Bearing to Waypoint Destination Waypoint Graphic Highway CDI Scale gps ii 8 4 98 3 29 PM Pag...

Страница 66: ...e of less than 5 miles Nearby waypoints are represented with names symbols or comments You may select which features are shown through the waypoint definition page see pp 64 65 The four corners of the...

Страница 67: ...61 Reference Bearing to Waypoint Track Log Route Line Track Over Ground Speed Over Ground Present Position Panning Cursor Distance to Waypoint gps ii 8 4 98 3 29 PM Page 61...

Страница 68: ...screen to the top To use the zoom keys 1 From the Map Page press either IN or OUT Fig 62a 2 To see the current map scale press and hold either button down A pop up window will display the current scal...

Страница 69: ...present position to the target crosshair When you pan around the map you ll notice the target crosshair will snap to on screen waypoints and highlight the waypoint name Fig 63b Once a waypoint name i...

Страница 70: ...aypoints as a name with a cor responding symbol e g nearest fuel and a gas pump symbol Fig 64a a symbol only e g a fish symbol Fig 64b or a 16 character comment and corresponding symbol e g great view...

Страница 71: ...name with symbol symbol only Fig 65b or comment with symbol 4 Press ENTER to confirm the DONE prompt 5 Press ENTER again on the waypoint definition page to return to the Map Page The last function you...

Страница 72: ...crosshair position as a new waypoint 1 Press MARK Fig 66a 2 Enter a name and or route number and press ENTER You can also use the target crosshair as an instant GOTO destination This fea ture is simi...

Страница 73: ...s you select Map Page and satellite sky view see p 21 orientation as well as specify what items are displayed The Map and Satellite Pages may be oriented to NORTH UP TRACK UP the direction of current...

Страница 74: ...t position not to the target cursor on the map Names displays the waypoint name for the nine nearest waypoints Track Log displays and plots track points on the map To turn a map item on or off 1 Highl...

Страница 75: ...hod The stored track method determines how often positions are stored in the track log The default setting is automatic which will store a track based on resolution This setting gives you the most eff...

Страница 76: ...the receiver records a track log or the ability to create a TracBack route Managing and Clearing the Track Log The rest of the track setup window displays the percentage of available memory currently...

Страница 77: ...ategories by function We ve already gone over the waypoint and route management pages in their respective sections Let s review the rest of these pages in the order they appear on the Menu Page To sel...

Страница 78: ...To perform a distance and sun calculation 1 Highlight the from field enter the desired waypoint Fig 72a and press ENTER 2 Highlight the to field enter the destination waypoint and press ENTER 3 The da...

Страница 79: ...performance and provides bat tery life of up to 24 hours on alkaline batteries Simulator Mode allows you to operate the unit without acquiring satellites and is ideal for practicing or entering waypoi...

Страница 80: ...r area note your position and refer to the chart in Appendix F To enter the time offset 1 Highlight the offset field Fig 74a and press ENTER 2 Enter the time offset and press ENTER Note Move the curso...

Страница 81: ...stable for 0 15 30 60 120 and 240 seconds The 0 setting will keep backlighting on continuously Whenever backlighting is on a bulb icon will appear on the Satellite Page To set the backlight timer 1 Hi...

Страница 82: ...British German Irish Maidenhead Swedish Swiss or Taiwan or User grid formats To select a position format 1 Highlight the posn field and press ENTER Fig 76b Select the desired setting and press ENTER U...

Страница 83: ...ress ENTER 2 Select the desired setting and press ENTER To define a user datum 1 Highlight the datum field and press ENTER 2 Scroll through the map datum options until User appears Fig 77 and press EN...

Страница 84: ...ale to either side To enter a CDI scale setting 1 Highlight the cdi scale field Fig 78a and press ENTER 2 Select the desired setting and press ENTER Units of Measure The GPS II lets you select statute...

Страница 85: ...magnetic north which is suitable for most applications To select a heading reference 1 Highlight the heading field Fig 79a and press ENTER 2 Select the desired heading preference and press ENTER To en...

Страница 86: ...nge infor mation such as waypoints routes and track logs between two GARMIN GPS units or a GARMIN GPS and a PC There are eight data transfer options send alm send wpt send trk send rte request alm req...

Страница 87: ...TCM NMEA 81b which allows DGPS input and NMEA output Once a RTCM setting has been selected the GPS II will either automatically try to tune the last frequency and bit rate you selected or will switch...

Страница 88: ...If a beacon signal is tuned and no corrections are being received a no data message will be displayed If a beacon signal cannot be tuned a no status message will be displayed The message page will al...

Страница 89: ...t the mode field and press ENTER 3 Select Simulator Fig 83b and press ENTER Once the simulator mode has been activated use the Position Compass or Highway Page to set your speed and track by highlight...

Страница 90: ...he sky 2 Remove the paper strip liners from both pieces of Velcro 3 Make sure the surface to which you re adhering the Velcro is clean and dry Place the adhesive side of the rough piece of Velcro on t...

Страница 91: ...s to come into contact with the case To clean the case and lens use a soft cloth and a household window cleaner Appendix B PHYSICAL Case Fully gasketed high impact plastic alloy waterproof to IPX7 sta...

Страница 92: ...onsumption 0 75 watts max Battery Life Up to 24 hours Note Alkaline batteries lose a significant amount of their capacity as temperature decreases Use lithium batteries when operat ing the GPS II in b...

Страница 93: ...r interface with another unit or PC Power Data Cable Allows connection to DC power source and Input Output devices Cigarette Lighter Adapter Allows connection to a 12 volt DC cigarette lighter plug Da...

Страница 94: ...PRMC GPRTE GPWPL GPBOD Proprietary sentences PGRME estimated error PGRMM map datum PGRMZ altitude PSLIB beacon receiver control Appendix B DGPS corrections are accepted on RTCM 104 v 2 0 format The GA...

Страница 95: ...ed antenna 1 Rotate the antenna toward the rear of the unit as shown Note The antenna can only be removed or installed in this position 2 Pull the antenna gently away from the unit 3 To install the op...

Страница 96: ...ready Exists The name you are entering already exists in the GPS II s memory Approaching You are one minute away from reaching a des tination waypoint Arrival at You have reached your destination wayp...

Страница 97: ...s an invalid identifier Receiver has Failed A failure in receiver hardware has been detected If this message persists do not use the unit and take it to an authorized dealer for repair Route is Full Y...

Страница 98: ...land Astro B4 Sorol Astro B4 Sorol Atoll Tern Island Astro Bcn E Astro Beacon E Iwo Jima Astro Dos 71 4 Astro Dos 71 4 St Helena Astr Stn 52 Astronomic Stn 52 Marcus Island Astrln Geod 66 Australian G...

Страница 99: ...odetic Datum 49 New Zealand Guam 1963 Guam 1963 Guam Island Gux 1 Astro Gux 1 Astro Guadalcanal Island Hjorsey 1955 Hjorsey 1955 Iceland Hong Kong 63 Hong Kong 63 Hong Kong Hu Tzu Shan Hu Tzu Shan Tai...

Страница 100: ...man Jamaica Leeward and Turks Islands NAD27 Central North American 1927 Central America Belize Costa Rica El Salvador Guatemala Honduras Nicaragua NAD27 CONUS North Am 1927 Mean Value NAD27 Cuba North...

Страница 101: ...nto Island Sao Braz Sao Braz Sao Miguel Santa Maria Islands Azores Sapper Hill 43 Sapper Hill 1943 East Falkland Island Schwarzeck Schwarzeck Namibia Sth Amrcn 69 South American 69 Argentina Bolivia B...

Страница 102: ...to W127 5 9 W127 5 to W112 5 8 W112 5 to W097 5 7 W097 5 to W082 5 6 W082 5 to W067 5 5 W067 5 to W052 5 4 W052 5 to W037 5 3 W037 5 to W022 5 2 W022 5 to W007 5 1 W007 5 to E007 5 0 Longitudinal Zone...

Страница 103: ...cale Setup 78 Compass Page 17 56 57 Course To Steer CTS 55 Crosstrack Error XTk 55 D Data Entry 6 Date and Time Setup 74 Desired Track DTK 50 DGPS Antenna 88 DGPS Setup 81 88 Distance and Sun Calculat...

Страница 104: ...Basics 100 Navigation Pages 54 59 Navigation Setup 74 Navigation Units 78 Nearest Waypoint Page 32 NMEA Output Formats 88 O Offset local time 96 Operating Mode Setup 73 Operating Terms 5 Output Setup...

Страница 105: ...etup 69 70 Track Recording 69 70 Trip Odometer 27 Turn TRN 55 U Unit Features 4 UTC time 96 UTM Coordinates 76 V Velocity Made Good VMG 55 W Warranty 101 Waypoints 29 31 39 Create Waypoints By Text 34...

Страница 106: ...100 Appendix H NORTH ACTIVE FROM WAYPOINT NORTH DTK C R O S S T R A C K E R R O R X T K BRG COG S P E E D O V E R G R O U N D D IS T A N C E ACTIVE TO WAYPOINT gps ii 8 4 98 3 29 PM Page 100...

Страница 107: ...are exclusive and in lieu of all other warranties expressed or implied including any liability arising under warranty of merchantability or fitness for a particular purpose statuto ry or otherwise Th...

Страница 108: ...n 1200 E 151st Street Olathe KS 66062 US Web Site Address www garmin com GARMIN Europe Ltd Unit 5 The Quadrangle Abbey Park Industrial Estate Romsey SO51 9AQ UK Part Number 190 00130 00 Rev A gps ii 8...

Отзывы: