background image

Tracks Settings

Select 

Setup

 > 

Tracks

.

Track Log

: Turns track recording on or off.

Record Method

: Sets a track recording method. The Auto 

option records the tracks at a variable rate to create an 

optimum representation of your tracks.

Recording Interval

: Sets a track log recording rate. Recording 

points more frequently creates a more-detailed track, but fills 

the track log faster.

Viewing the Current Track

From the main menu, select 

Track Manager

 > 

Current 

Track

 > 

View Map

.

Saving the Current Track

1

Select 

Track Manager

 > 

Current Track

.

2

Select an option:
• Select 

Save Track

 to save the entire track.

• Select 

Save Portion

, and select a portion.

Clearing the Current Track

Select 

Track Manager

 > 

Current Track

 > 

Clear Current 

Track

.

Deleting a Track

1

Select 

Track Manager

.

2

Select a track.

3

Select 

Delete

.

Navigating a Saved Track

Before you can navigate a saved track, you must save a track.

1

Select 

Where To?

 > 

Tracks

.

2

Select a saved track.

3

Select 

Go

.

Using the Main Pages

The information needed to operate this device is found on the 

main menu, map, compass, and trip computer pages.

1

Select 

PAGE

.

2

Select the active main page.

Map

 represents your location on the map. As you travel,   moves 

and leaves a track log (trail). Waypoint names and symbols 

appear on the map. When you are navigating to a destination, 

your route is marked with a dashed line on the map.

Navigating with the Map

1

Use the arrow keys to move the pointer.

2

From the map, select 

SELECT

 > 

Go

.

A triangle represents your location on the map. As you travel, 

the triangle moves and leaves a track log (trail).

3

Select   and   to zoom in and out of the map.

Changing the Map Orientation

1

From the map page, select 

MENU

 > 

Setup

 > 

Orientation

.

2

Select an option:
• To show north at the top of the page, select 

North Up

.

• To show your current direction of travel at the top of the 

page, select 

Track Up

.

Measuring Distance on the Map

You can measure the distance between two locations.

1

From the map, select a location.

2

Select 

MENU

 > 

Measure Distance

.

3

Move the pin to another location on the map.

Map Settings

From the map, select 

MENU

 > 

Setup Map

.

Orientation

: Adjusts how the map is shown on the page. The 

North Up option shows north at the top of the page. The 

Track Up option shows a top-down view with your current 

direction of travel toward the top of the page.

Data Fields

: Customizes the data fields and dashboards of the 

map, compass, and stopwatch.

Advanced Map Settings

From the map, select 

MENU

 > 

Setup Map

 > 

Advanced Map 

Setup

.

Auto Zoom

: Enables the device to automatically select the 

zoom level for optimal use of your map. When the Off option 

is selected, you must zoom in or out manually.

Select User Waypoint Zoom Level

: Sets the zoom level at 

which waypoints appear on the map. Waypoints do not 

appear when the map zoom level is higher than the selected 

level.

Select User Waypoint Text Size

: Sets the text size for 

waypoints on the map.

Compass

The compass uses GPS course over ground (COG) to guide 

you to your destination, and does not account for other factors 

that can affect your destination, such as currents and tides. You 

can use a bearing pointer or a course pointer to navigate to your 

destination.

Navigating with the Compass

When navigating to a destination,   points to your destination, 

regardless of the direction you are moving.

1

Begin navigating to a destination.

2

Select 

Compass

.

3

Turn until   points toward the top of the compass, and 

continue moving in that direction to the destination.

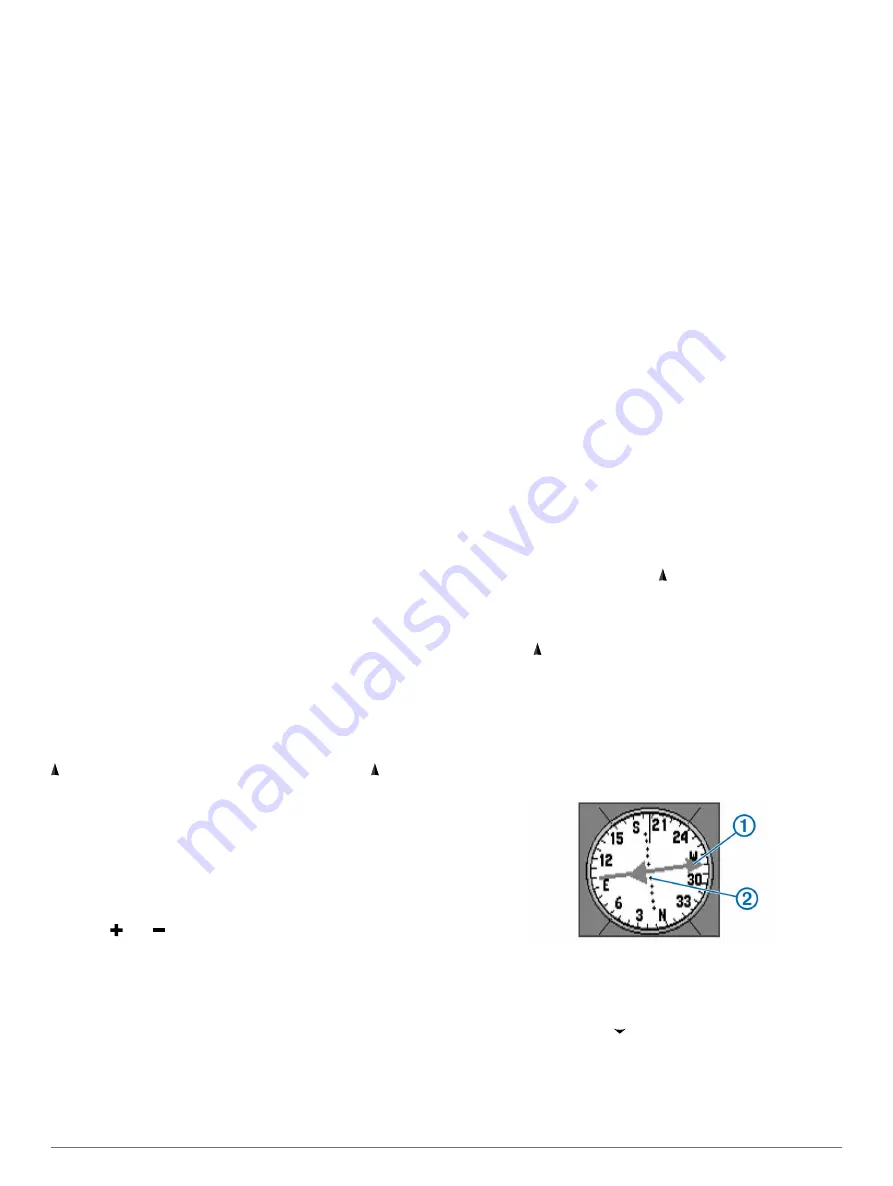
Course Pointer

The course pointer is most useful when you are navigating on 

water or where there are no major obstacles in your path. It can 

also help you avoid hazards near the course, such as shoals or 

submerged rocks.
To enable the course pointer, from the compass, select 

MENU

 > 

Setup Heading

 > 

Go To Line

 > 

Course

.

The course pointer 

À

 indicates your relationship to the course 

line leading to the destination. The dots 

Á

 tell you how far off 

course you are.

Data Fields

From the compass, select   > 

SELECT

.

ETE to Dest

: Displays the estimated time to your destination.

ETA to Dest

: Displays the estimated time of your arrival at your 

destination.

To Course

: Displays the recommended direction to steer in 

order to stay on course.

Using the Main Pages

3

Содержание GPS 73

Страница 1: ...GPS 73 Owner s Manual September 2015 Printed in Taiwan 190 01936 00_0A ...

Страница 2: ...ormation concerning the use of this product Garmin and the Garmin logo are trademarks of Garmin Ltd or its subsidiaries registered in the USA and other countries Garmin Connect Garmin Express and HomePort are trademarks of Garmin Ltd or its subsidiaries These trademarks may not be used without the express permission of Garmin NMEA is a registered trademark of the National Marine Electronics Associ...

Страница 3: ...ck Assist 5 Configuring Tack Assist Settings 5 Speed History 5 Configuring the Speed History 5 Main Menu Features and Settings 5 Satellite Page 5 Satellite Settings 5 Additional Main Menu Tools 5 Calculating the Size of an Area 6 Geocaches 6 Customizing Your Device 6 Customizing the Data Fields 6 System Settings 6 Serial Interface Settings 6 Display Settings 6 Setting the Device Tones 6 Setting Up...

Страница 4: ......

Страница 5: ... The handheld device operates using two AA batteries not included For best results you should use NiMH or lithium batteries 1 Slide the battery cover down and remove the cover from the back of the device 2 Insert two AA batteries observing polarity 3 Replace the battery cover 4 Hold 5 Select Setup System Battery Type 6 Select an option Turning On the Device Select Profiles A profile is a collectio...

Страница 6: ...nfidence status bar reaches 100 select Save For best results collect four to eight samples for the waypoint waiting at least 90 minutes between samples Routes A route is a sequence of waypoints or locations that leads you to your final destination Creating a Route 1 Select Routes Planner Create Route Select First Point 2 Select a category 3 Select the first point in the route 4 Select Use 5 Select...

Страница 7: ...he pin to another location on the map Map Settings From the map select MENU Setup Map Orientation Adjusts how the map is shown on the page The North Up option shows north at the top of the page The Track Up option shows a top down view with your current direction of travel toward the top of the page Data Fields Customizes the data fields and dashboards of the map compass and stopwatch Advanced Map...

Страница 8: ...e vessel Your device must be connected to a NMEA 0183 device capable of acquiring the wind angle Apparent Wind Speed The measured speed of the wind Battery Level The remaining battery power Bearing The direction from your current location to a destination You must be navigating for this data to appear Course The direction from your starting location to a destination Course can be viewed as a plann...

Страница 9: ... acquiring the wind direction Restoring Default Page Settings 1 Open a page for which you will restore the settings 2 Select MENU Restore Defaults Tack Assist While cruising or racing into the wind the tack assist feature can help you determine if your boat is being lifted or headed When you calibrate tack assist the device stores your boat s port À and starboard Á courses over ground COG the mean...

Страница 10: ...n or off use of GLONASS Russian satellite system data When the system is used in situations with poor sky visibility GLONASS data can be used with GPS data to provide more accurate position information WAAS EGNOS Turns on or off use of WAAS in North America or EGNOS in Europe satellite system data which can provide more accurate GPS position information When using WAAS or EGNOS the device may take...

Страница 11: ...n com waterrating Appendix Registering Your Device Help us better support you by completing our online registration today Go to www garmin com express Keep the original sales receipt or a photocopy in a safe place Support and Updates Garmin Express www garmin com express provides easy access to these services for Garmin devices Product registration Product manuals Software updates Data uploads to ...

Страница 12: ... If you do not know the purpose of a file do not delete it Your device memory contains important system files that should not be deleted 1 Open the Garmin drive or volume 2 If necessary open a folder or volume 3 Select a file 4 Press the Delete key on your keyboard Disconnecting the USB Cable If your device is connected to your computer as a removable drive or volume you must safely disconnect you...

Страница 13: ...ving 2 M main menu 5 map 3 maps 3 measuring distances 3 navigating 3 updating 7 measuring distances 3 N navigating 3 navigation chart 2 NMEA 0183 6 P pages 4 position format 7 power key 1 product registration 7 profiles 1 renaming 1 selecting 1 R registering the device 7 resetting the device 6 8 restoring settings 8 routes 2 creating 2 deleting 2 editing 2 navigating 2 viewing on the map 2 S saili...

Страница 14: ...55 69 33 99 39 02 36 699699 52 001 855 792 7671 0800 0233937 47 815 69 555 00800 4412 454 44 2380 662 915 35 1214 447 460 386 4 27 92 500 0861 GARMIN 427 646 27 0 11 251 9999 34 93 275 44 97 46 7744 52020 886 2 2642 9199 ext 2 0808 238 0000 44 0 870 8501242 49 0 89 858364880 zum Ortstarif Mobilfunk kann abweichen 913 397 8200 1 800 800 1020 2015 Garmin Ltd or its subsidiaries ...

Отзывы: