


Getting Started
WARNING
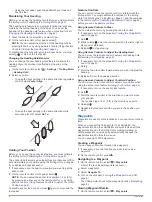
Do not run the motor when the propeller is out of the water.
Contact with the rotating propeller may result in severe injury.
Do not use the motor in areas where you or other people in the
water may come into contact with the rotating propeller.
Always disconnect the motor from the battery before cleaning or
servicing the propeller to avoid injury.
CAUTION
When stowing or deploying the motor, be aware of the risk of
entrapment or pinching from moving parts, which can result in
injury.
When stowing or deploying the motor, be aware of slick surfaces
around the motor. Slipping when stowing or deploying the motor
may result in injury.
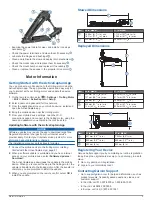
Deploying the Motor from the Stowed
Position
1
Disengage the safety strap.
2
Pull the pull-cable back until it stops to release the latch, and
continue to hold it tight.
3
Lift the motor up and forward using the pull-cable, then lower
it slowly into the deployed position.
4
If necessary, push down on the mount arm to lock the motor
in the deployed position.
Adjusting the Depth of the Trolling Motor
1
Move the motor so that it stops halfway between the stowed
and deployed positions.
2
Loosen the collar at the base of the steering system housing.
NOTE:
You should be prepared for the motor to slide down
when you loosen the collar.
3
Raise or lower the depth of the trolling motor.
NOTICE
Do not set the motor depth so low that it compresses the
coiled cable. When the coiled cable is compressed, it may be
damaged by friction as the motor steers.
4
Tighten the collar at the base of the steering system housing.
5
Select an action:
• If you are deploying the trolling motor, move the motor to
the fully deployed position to check the depth.
• If you are stowing the trolling motor, move the motor to the
stowed position to check the depth.
6
Repeat this procedure if necessary to set the correct depth
for the deployed or stowed position.
Stowing the Motor from the Deployed
Position
NOTICE
You must allow the motor to stop rotating completely before
moving it to the stowed position. If the motor is rotating when
you move it to the stowed position, it may damage the steering
system.
1
Pull the pull-cable up until it stops to release the latch, and
continue to hold it tight.
2
Lift the pull-cable up and backward to lift and lower the motor
slowly into the stowed position.
NOTE:
You may need to adjust the depth of the trolling motor
so it rests correctly on the mount base in the stowed position
(
Adjusting the Depth of the Trolling Motor
). If it is
adjusted too shallow, it may press on the gas spring. If it is
adjusted too deep, it may hang off the end of the mount base.
3
If necessary, push down on the steering system housing to
lock it in the stowed position.
4
Secure the safety strap (
).
Securing the Safety Strap
The safety strap holds the motor securely to the base in the
stowed position and prevents unintended deployment.
1
With the motor in the stowed position, lift the long end of the
strap over the top of the motor.
2
Feed the end of the strap through the buckle on the other
end of the strap.
3
Pull the strap through the buckle until it holds the motor
securely to the mount.
4
Pull the strap away from the buckle, and push down to fasten
it to the other side of the strap.
Trolling Motor Display Panel
The display panel on the trolling motor mount shows important
information at a glance.
NOTE:
The backlight on the display panel reacts to the ambient
light, and dims automatically at night.
Getting Started
1
Содержание Force
Страница 1: ...FORCE TROLLINGMOTOR Owner sManual...
Страница 4: ......
Страница 16: ...support garmin com August 2019 190 02521 00_0A...