Step 5: Test the Installation
NOTE:
Although it is possible to perform some checks with the boat on a trailer, the boat should be in the water to properly test the installation.
Press and hold the
POWER
key until the Fishfinder 300C beeps. Use
ROCKER
and
SELECT
to highlight and select menu items on the
Fishfinder 300C.
The first time you turn your Fishfinder 300C on, you must configure a series of initial settings.
To initialize your Fishfinder 300C settings:
1.
Language
—select the on-screen language.
2.
Units
—select
Statute (mh, ft, °F)
,
Metric (kh, m, °C)
, or
Nautical (kt, ft, °F)
.
3.
Color Scheme
—select
White
or
Blue
as the background on sonar screens.
4. Select
OK
to return to the Home screen.
The Home screen appears after you select your configuration options.
NOTE:
If the transducer is not detected, a “Transducer Disconnected, Sonar Turned Off” message appears.
The transducer must be in the water to work properly. You cannot get a depth or distance reading when the transducer is out of the water.
When you place your boat in the water, check for leaks around any screw holes that were added below the water line. Do not leave your boat in
the water for an extended period of time without checking for leaks.
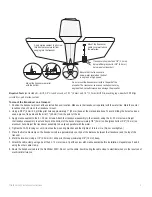
To test the transom-mount transducer installation:
1. Begin testing the installation at a slow speed. If the sonar appears to be working properly, gradually increase boat speed while observing
sonar operation. If the sonar signal is suddenly lost, or the bottom return is severely degraded, note the speed at which this occurs.
2. Return the boat to the speed at which the signal was lost. Make moderate turns in both directions to see if the signal improves.
3. If the signal strength improves while turning, adjust the transducer so that it extends another 1/8" (3 mm) below the transom of the boat. It
might take several adjustments to eliminate the degradation.
4. If the signal does not improve, you might have to move the transducer to a different location.
NOTE:
When adjusting the depth of the transducer, make the adjustments in small increments. Placing the transducer too deep can adversely affect
boat performance and put the transducer at greater risk of striking underwater objects.
For the latest free software updates (excluding map data) throughout the life of your
Garmin products, visit the Garmin Web site at
.
© 2007 Garmin Ltd. or its subsidiaries
Garmin International, Inc.
1200 East 151st Street, Olathe, Kansas 66062, USA
Garmin (Europe) Ltd.
Liberty House, Hounsdown Business Park, Southampton, Hampshire, SO40 9RB UK
Garmin Corporation
No. 68, Jangshu 2nd Road, Shijr, Taipei County, Taiwan
Part Number 190-00864-03 Rev. B

