background image

2

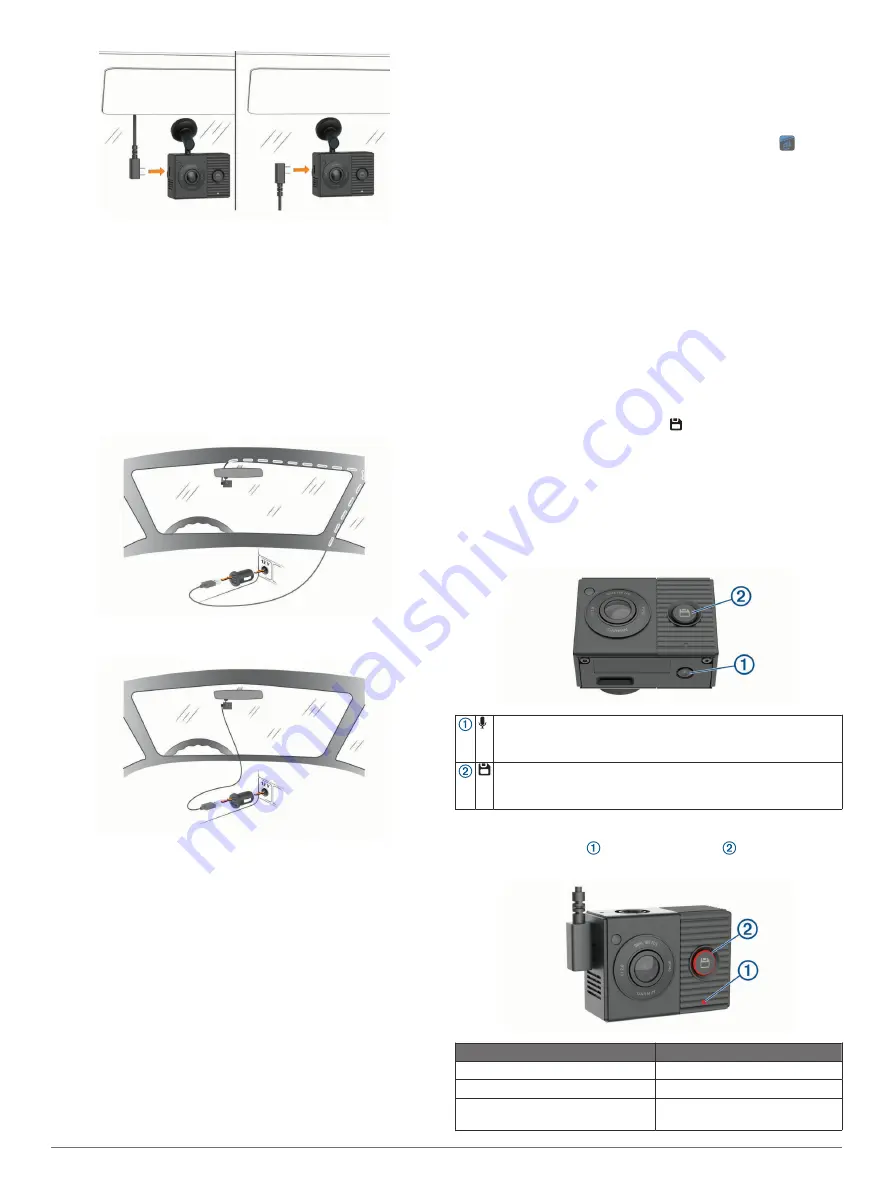
Route the power cable to your vehicle power outlet.

NOTE: 

You should power the camera using the included 

vehicle power adapter and avoid using a vehicle USB port. A 

vehicle USB port may not provide enough power for reliable 

camera operation. Also, the camera may enter USB mass 

storage mode if you connect it to a vehicle USB port using 

the shorter cable. The camera cannot record video or 

connect to your smartphone while it is in USB mass storage 

mode.
The longer, lightweight power cable is designed to be routed 

upward and out of sight. To hide the 4 m (13 ft.) cable, route 

it behind the vehicle trim along the windshield, doorframe, or 

dash.

The shorter cable is designed to be routed down to your 

vehicle power supply.

3

Plug the Garmin Dash Cam Tandem power cable into the 

included vehicle power adapter.

4

Plug the vehicle power adapter into the power outlet in your 

vehicle.

5

If necessary, turn on the vehicle ignition switch to provide 

power to the power outlet in your vehicle.
The camera turns on and starts recording.

Turning Off the Device Manually

The camera does not have a power button. It turns on 

automatically when it receives power, and it turns off when it 

stops receiving power.
When the device is connected to an ignition-switched power 

outlet, it turns off automatically when you turn off the vehicle.

To manually turn off the camera, disconnect the device from 

power.

Pairing with Your Smartphone

You can pair your Garmin Dash Cam Tandem camera with your 

smartphone and the Garmin Drive app. The Garmin Drive app 

allows you to set up a multiple-camera network, change camera 

settings, and view, edit, and save photos and videos.

1

From the app store on your smartphone, install the 

Garmin Drive app.

2

Connect the camera to power using the included vehicle 

power adapter and a USB cable.
The camera turns on.

3

Place the camera and your smartphone within 3 m (10 ft.) of 

each other.

4

On your phone, open the Garmin Drive app.

5

Select an option:
• If this is the first Garmin

®

 device you are pairing with your 

smartphone, accept the Garmin Drive app license 

agreements.

• If you are pairing an additional Garmin device or camera 

with your smartphone, select 

Add Another Device

.

6

Select 

Garmin Dash Cam Series

 > 

Garmin Dash Cam 

Tandem

.

7

On your camera, press and hold   until the status 

LED flashes blue.

8

Follow the on-screen instructions to complete the pairing and 

setup process.

After pairing is complete, the main app dashboard appears. 

After the device and smartphone are paired, they connect 

automatically when they are turned on and within range.

Device Overview

Press to enable or disable audio recording.
Hold to format the memory card (

Formatting the Memory Card

page 6

).

Press to save a picture and a video clip.
Hold to enter pairing mode (

Pairing with Your Smartphone

page 2

).

Status LEDs

The microphone LED   and the status LED   show the device 

status.

Microphone LED Activity

Status

Red

The device is recording audio.

Off

The device is not recording audio.

Flashing green, alternating with 
status LED

An update is being installed.

2

Getting Started

Содержание DASH CAM TANDEM

Страница 1: ...GARMINDASHCAM TANDEM Owner sManual ...

Страница 2: ...d supplemental information concerning the use of this product Garmin and the Garmin logo are trademarks of Garmin Ltd or its subsidiaries registered in the USA and other countries Garmin Dash Cam Garmin Drive and Garmin Express are trademarks of Garmin Ltd or its subsidiaries These trademarks may not be used without the express permission of Garmin The BLUETOOTH word mark and logos are owned by th...

Страница 3: ...ing the Camera Using Voice Commands 4 Voice Control Tips 4 Multiple Camera Network 4 Creating Picture in Picture Multi Camera Videos 5 Settings 5 Camera Settings in the Garmin Drive App 5 Video Resolution Settings 5 Renaming a Camera 5 Device Information 5 Memory Card Specifications 5 Cleaning the Camera Lenses 6 Removing the Camera Mount from the Windshield 6 Updating Your Device Using the Garmin...

Страница 4: ......

Страница 5: ...an install the adhesive mount onto your windshield you should review the windshield mounting considerations Mounting Considerations page 1 For the best results the ambient temperature should be from 21 to 38 C from 70 to 100 F while installing the camera on your windshield The adhesive may not bond correctly if the temperature is outside this range If you need to install the camera at lower temper...

Страница 6: ...pair your Garmin Dash Cam Tandem camera with your smartphone and the Garmin Drive app The Garmin Drive app allows you to set up a multiple camera network change camera settings and view edit and save photos and videos 1 From the app store on your smartphone install the Garmin Drive app 2 Connect the camera to power using the included vehicle power adapter and a USB cable The camera turns on 3 Plac...

Страница 7: ... possible incidents and saves video footage automatically before during and after the detected event The video footage is stamped with the time date and location of the event Saving Videos and Photos By default the device uses a sensor to detect a possible incident and saves video footage automatically before during and after the detected event You can also save video files and photos manually at ...

Страница 8: ...ur Computer page 4 The videos and photos are sorted into several folders NOTE Unsaved videos are not available when the option to promptly delete unsaved video is enabled Camera Settings in the Garmin Drive App page 5 100EVENT Contains videos saved automatically when the device detects an incident 101PHOTO Contains photos 102SAVED Contains videos saved manually by the user 103PARKM Contains videos...

Страница 9: ...e is full When the Promptly Delete option is selected the device continually deletes unsaved video more than three minutes old and deletes all unsaved video each time it is powered off This is useful to help protect data privacy Units and Time Sets the date and time format Voice Commands Allows you to enable or disable the voice control feature and set the language for voice commands About Device ...

Страница 10: ...p the mount 2 Pull the mount up and away from the windshield applying steady pressure until the adhesive releases from the windshield or mount 3 Remove all remaining adhesive from the windshield and mount 4 Clean the windshield and mount You can replace the adhesive on the mount Replacing the Adhesive on the Mount page 6 Replacing the Adhesive on the Mount You can replace the adhesive disc on the ...

Страница 11: ...rmance Because the dash camera records continuously you may need to replace the memory card periodically Installing a Memory Card page 6 Your device detects memory card errors automatically and alerts you when it is time to format or replace your memory card You can take these actions to help extend the useful life of the memory card Format the memory card at least one time every six months Format...

Страница 12: ...emory card 5 7 installing 6 microSD card 5 7 mount 6 removing removing mount 6 mounting windshield 1 multiple cameras 4 5 O operating temperature 7 P pairing phone 2 parking mode cable 7 phone pairing 2 photos viewing 4 power key 2 R resolution 5 S settings 5 setup 1 smartphone features connecting 2 software updating 6 T troubleshooting 7 U updating software 6 V video deleting 4 editing 5 live 3 p...

Страница 13: ......

Страница 14: ...support garmin com December 2019 190 02630 00_0A ...

Отзывы: