


default camera and appears first each time the camera view
appears.
Unpair
: Removes the paired camera.
Automatic Activation
: Enables the Garmin navigation device to
display the default camera view automatically each time the
navigation device is turned on. If the navigation device is
connected to an ignition-switched power outlet, this feature
allows you to view the backup camera automatically when
you start your vehicle.
Video Resolution
: Allows you to set the quality of the camera
video. Higher resolution settings provide a more detailed
image but use more battery power.
NOTE:
This setting is not available for all navigation device
product models.
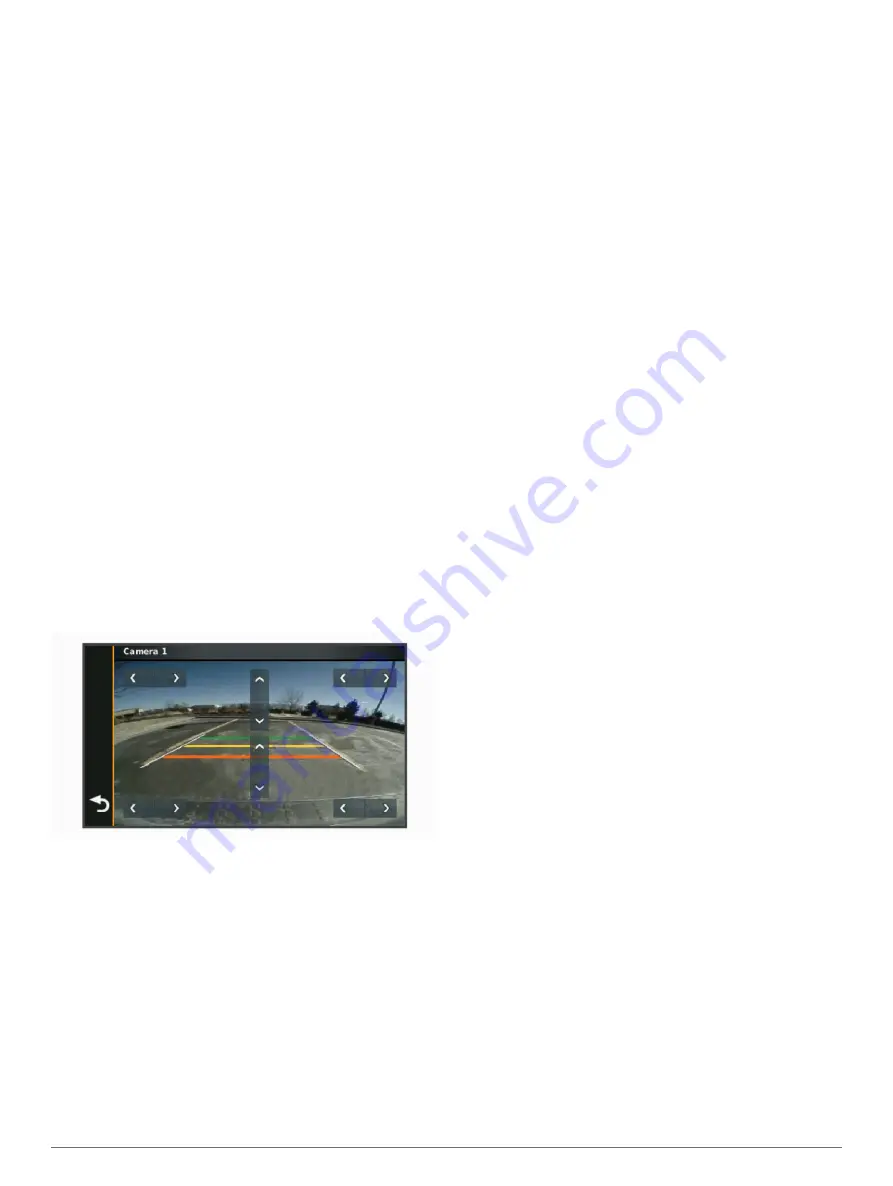
Aligning the Guidance Lines
For the best reference, the guidance lines should be aligned to
reflect the outside edges of the vehicle. You should align the
guidance lines separately for each backup camera. When you
change the camera angle, you should immediately align the
guidance lines again.
1
Position your vehicle with the driver's side closely aligned to a
curb, driveway, or parking stall lines.
TIP:
It can be helpful to position the vehicle in the center of a
parking stall, and then pull forward into the next stall. This
allows you to use the parking stall lines at the rear of the
vehicle as reference points for alignment.
2
From the paired Garmin navigation device, select
Settings
>
Wireless Camera
.
3
Select the paired camera name, and select
Guidance Lines
>
Adjust Guidance Lines
.
4
Use the arrows in the corners of the screen to move the ends
of the white, driver's-side guidance line.
The guidance line should appear directly on top of the curb,
driveway, or parking stall line.
5
Use the arrows in the center of the screen to move the
colored distance guidance lines up or down.
The red guidance line should be aligned with the rearmost
part of your vehicle. This could be the rear bumper, a trailer
hitch, or another object protruding from the rear of the
vehicle.
6
Reposition the vehicle with the passenger side closely
aligned to a curb, driveway, or parking stall lines, and use the
arrows to align the white, passenger-side guidance line.
The guidance lines should be symmetrical.
Changing the Camera Order
You can change the order in which cameras appear when you
switch cameras.
1
Select
Settings
>
Wireless Camera
.
2
Select a camera.
3
Select
Set Default Camera
.
A list of paired cameras appears.
4
Drag each camera to the desired location in the list.
When you switch cameras from the camera view, the
cameras appear in the listed order, from top to bottom. The
camera at the top of the list is the default camera and
appears first each time the camera view appears.
Renaming a Camera
You can change the name that appears above a camera in the
camera view. You should use a descriptive name that clearly
identifies the location of the camera.
1
Select
Settings
>
Wireless Camera
.
2
Select a camera.
3
Select
Rename
.
Removing a Paired Camera
You can pair up to 4 wireless cameras with a compatible Garmin
navigation device. If you have already paired the maximum
number of cameras, you must unpair one before you can pair
another one.
1
From a paired Garmin navigation device, select
Settings
>
Wireless Camera
.
2
Select a camera.
3
Select
Unpair
.
Device Information
Software Updates
Software updates for your camera are received automatically
from the paired Garmin navigation device. You should update
your Garmin navigation device software regularly to keep both it
and the camera up to date. For more information about updating
software, see the owner's manual for your Garmin navigator.
Updating the Camera Software
Before you can update the camera software, you must pair the
camera with a compatible Garmin navigation device (
Camera with a Garmin Navigation Device
).
On the paired Garmin navigation device, select an option:
• Connect to a Wi
‑
Fi
®
network, and select
Settings
>
Updates
>
Install All
.
• Install all available updates using the Garmin Express
™
application.
See the owner's manual for your Garmin navigation device
for more information.
The navigation device downloads updates for itself and updates
for your BC 40 camera, if available. The next time the device
connects to your camera, it sends the update to the camera
automatically. A message and progress indicator appear on the
navigation device screen while the camera is updating. It takes
about one minute to install the camera update.
Checking the Camera Software Version
Before you can check the camera software version, you must
pair the camera with a compatible Garmin navigation device
(
Pairing the Camera with a Garmin Navigation Device
).
1
On the paired Garmin navigation device, select
Settings
>
Device
>
About
.
The device displays version information for all software on
the device.
2
Locate the camera name in the list.
The software version number appears next to the camera
name.
Device Information
5
Содержание BC 40
Страница 1: ...BC 40WIRELESSBACKUPCAMERA Owner sManual ...
Страница 4: ......
Страница 13: ......
Страница 14: ...support garmin com TA 2018 331 March 2019 190 02365 00_0A ...


