background image


Garmin G5 Electronic Flight Instrument Part 23 AML STC Maintenance Manual 

190-01112-11 


Rev. 1 

Page 5 of 18 

4.4 Battery 

Capacity 

Check 

1.


Without power applied to the aircraft, turn on the G5 by pressing the power button in the lower 
left corner of the unit. 

2.


Note the remaining battery capacity (%) at the top left corner of the display.   

3.


After about a minute, the remaining capacity will change from (%) to time (hour:min). 

4.


If the remaining capacity is less than one hour (1:00), allow the battery to charge until the 
capacity shows greater than 95% and repeat the check. 

5.


If the remaining capacity is less than one hour (1:00) after charging, the battery must be replaced. 


5 TROUBLESHOOTING 

5.1 General 

NOTE


T

he term ‘Red-X’ refers to a red “X” that appears on different areas of the display to indicate the 

failure of that particular function 

If a Red-X appears on the display or anywhere in the configuration mode menus, the following 
troubleshooting steps may be used to help identify the cause.


1.


Review the airframe logbook to verify if any G5 or other avionics or electrical maintenance has 

been performed recently that may have contributed to the failure. 

2.


Check for loose wire terminals on the circuit breaker connections on the power wire(s) causing 

intermittent power connections.  Also, check for intermittent circuit breakers. 

3.


Check that all connectors are fully seated, and that the jack screw connectors are fully tightened 

on both sides of all connectors. 

4.


Check for a loose wire harness that is able to move around during flight.  This condition may 

cause the wire to pull on or vibrate the connector, making intermittent connections.  

5.


Ensure that the G5 is mounted securely.   

6.


Look for any heavy objects that may not be fastened tight to the aircraft structure that could be 

inducing vibration in the G5's attitude sensors.  

7.


Look for evidence of water or fluid contamination in the area around the G5.  

8.


Unplug the connector on the G5 or any affected LRU and check for bent pins.  

9.


Inspect the wire harness clamp on the rear of all connectors to verify that it is not too tight and 

smashing/shorting the wires.   

Содержание Approach G5 - GPS-Enabled Golf Handheld

Страница 1: ...190 01112 11 July 2016 Revision 1 Garmin G5 Electronic Flight Instrument Part 23 AML STC Maintenance Manual Including Instructions for Continued Airworthiness...

Страница 2: ...tronic or printed copy of this manual or revision must contain the complete text of this copyright notice and provided further any unauthorized commercial distribution of this manual or any revision h...

Страница 3: ...Garmin G5 Electronic Flight Instrument Part 23 AML STC Maintenance Manual 190 01112 11 Rev 1 Page B RECORD OF REVISIONS Revision Revision Date Description 1 7 22 16 Initial Release...

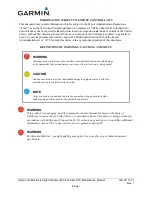
Страница 4: ...OF WARNINGS CAUTIONS AND NOTES WARNING This product its packaging and its components contain chemicals known to the State of California to cause cancer birth defects or reproductive harm This notice...

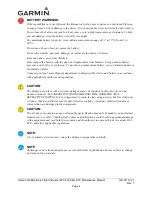
Страница 5: ...r or the Garmin website Contact your local waste disposal department to dispose of the device and battery in accordance with applicable local laws and regulations CAUTION The display uses a lens with...

Страница 6: ...Airworthiness Limitations 4 4 2 Servicing Information 4 4 3 Maintenance Intervals 4 4 4 Battery Capacity Check 5 5 TROUBLESHOOTING 5 5 1 General 5 5 2 G5 Attitude 6 5 3 G5 Air Data 6 5 4 G5 MicroSD Ca...

Страница 7: ...e 5 2 G5 Outline Drawing back view 7 Figure 5 3 G5 Exploded View 8 Figure 5 4 J51 on the G5 8 Figure 5 5 G5 with RS 232 Interface 9 Figure 5 6 G5 with External GPS Antenna 9 Figure 6 1 G5 Hex Driver 1...

Страница 8: ...tinued Airworthiness Provides maintenance instructions for continued airworthiness of the G5 Section 5 Troubleshooting Provides troubleshooting information to aid in diagnosing and resolving potential...

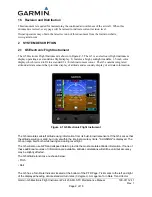
Страница 9: ...ut The G5 contains integrated attitude air data sensors that provides display of attitude and secondary display of air data information Figure 2 1 G5 Electronic Flight Instrument The G5 calculates air...

Страница 10: ...7XX series navigator GNS 4XXW 5XXW series navigator The following functions are provided by the GPS input Ground Track Ground Speed GS The G5 installation is connected to the aircraft Pitot Static sy...

Страница 11: ......

Страница 12: ...to help identify the cause 1 Review the airframe logbook to verify if any G5 or other avionics or electrical maintenance has been performed recently that may have contributed to the failure 2 Check f...

Страница 13: ...it happen Did it happen on more than one day 5 Was the problem correlated with a specific maneuver or a specific geographic area 6 Can the problem be repeated reliably 7 Did the onset of the problem...

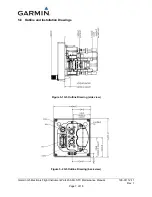
Страница 14: ...ectronic Flight Instrument Part 23 AML STC Maintenance Manual 190 01112 11 Rev 1 Page 7 of 18 5 6 Outline and Installation Drawings Figure 5 1 G5 Outline Drawing side view Figure 5 2 G5 Outline Drawin...

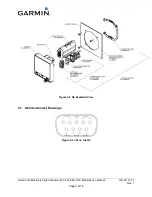
Страница 15: ...Garmin G5 Electronic Flight Instrument Part 23 AML STC Maintenance Manual 190 01112 11 Rev 1 Page 8 of 18 Figure 5 3 G5 Exploded View 5 7 G5 Interconnect Drawings Figure 5 4 J51 on the G5...

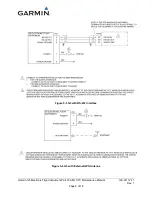
Страница 16: ...Garmin G5 Electronic Flight Instrument Part 23 AML STC Maintenance Manual 190 01112 11 Rev 1 Page 9 of 18 Figure 5 5 G5 with RS 232 Interface Figure 5 6 G5 with External GPS Antenna...

Страница 17: ...plies Removal 1 Insert a hex drive tool through the access hole in the front cover of the G5 as shown in Figure 6 1 loosen the unit from the mounting ring Figure 6 1 G5 Hex Driver 2 Disconnect the pit...

Страница 18: ...ex socket head screw To replace the captive mounting screw remove the two 4 40 flat head Phillips mount plate screws the G5 screw mount plate and the captive screw as shown in Figure 6 2 Install a lon...

Страница 19: ...mounting ring can be gained while these items remain connected 2 Remove the three 6 32 screws that secure the mounting ring to the instrument panel 3 Remove the G5 mounting ring Reinstallation 1 Locat...

Страница 20: ...em Leak Check If the pitot and or static system lines were removed from the G5 unit perform a pitot static system leak check in accordance with the aircraft manufacturer s approved data CAUTION To avo...

Страница 21: ...figuration Attitude used to configure Indicator Type Pitch Display preferences and User Pitch offset Air Data used to enable disable the G5 Air Data Sensors and configure the Vertical Speed rate Airsp...

Страница 22: ...Data Sensors Enabled Vertical Speed Indicator Airspeed Note Configure Units prior to setting airspeeds VNE VNO VSO VS1 VFE VA VX VY VG VR VMC VYSE Flight Controls Autopilot Servos None Backlight Curr...

Страница 23: ...Units Altitude Feet ft Distance Nautical nm or Statute mi Airspeed Nautical kt or Statute mph Ground Speed Nautical kt or Statute mph Ground Track Magnetic Vertical Speed Feet Minute Pressure Inches H...

Страница 24: ...evel cruise attitude In flight level cruise attitude is not necessarily the same as the level reference provided by the manufacturer such as fuselage longerons 1 Select the Attitude configuration page...

Страница 25: ...may be cancelled at any point should the test setup require adjustment before repeating A progress screen will be displayed showing the status of the test 6 Select Done when the static pressure calib...

Отзывы: