background image


Aerosensor Quickstart Guide V1.1


6


Aerosensor calibration 

1.  Out/back x 2 


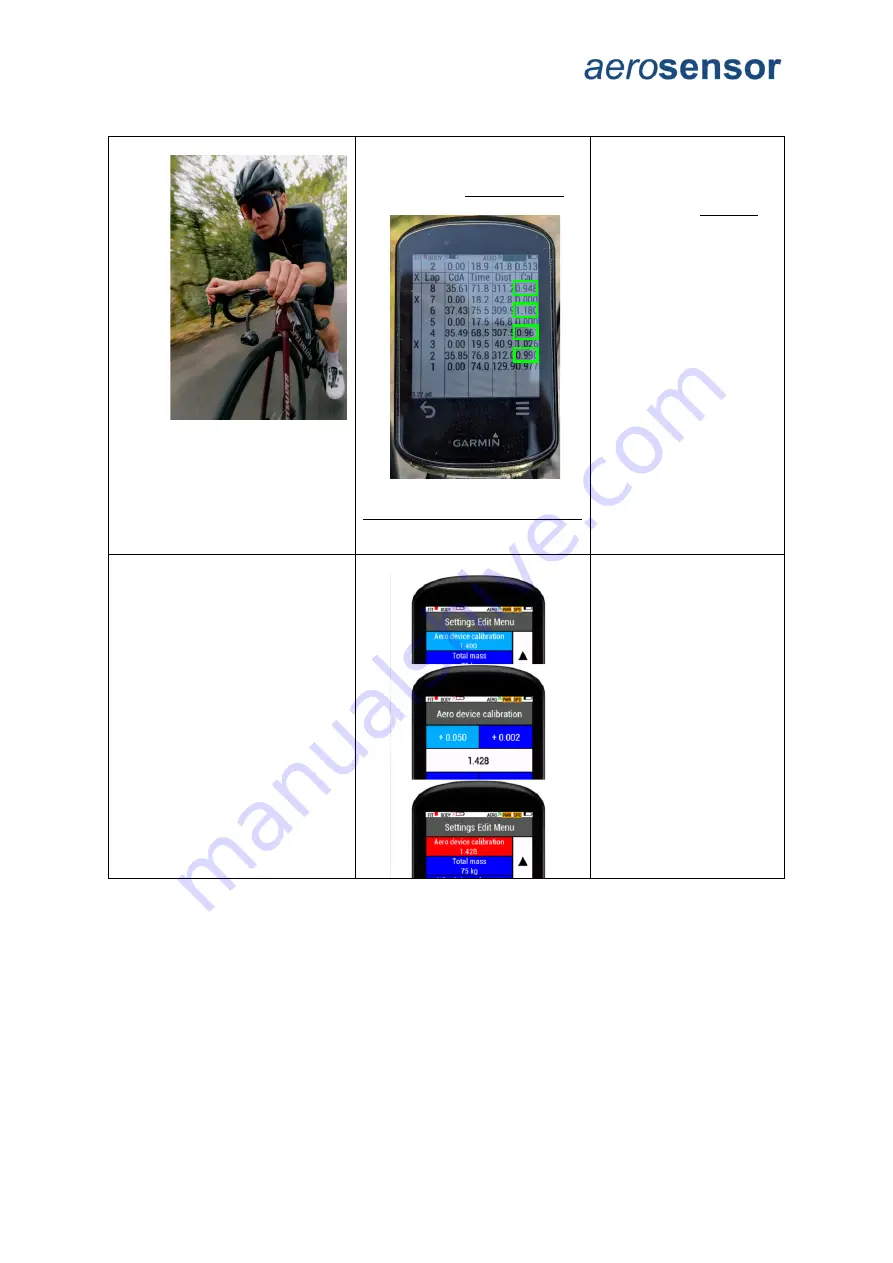
2.  Average cal values 


𝐴𝑣𝑔 𝐶𝑎𝑙 =  

𝑆𝑢𝑚 𝐿𝑎𝑝 𝐶𝑎𝑙𝑠

𝐿𝑎𝑝 𝑐𝑜𝑢𝑛𝑡


In this example: 

0.948 + 1.180 + 0.961 + 0.990

4


 = 1.020 

3.  Post-correct CdA  


𝐶𝑑𝐴 𝐶𝑜𝑟. =

𝐶𝑑𝐴

𝐴𝑣𝑔 𝐶𝑎𝑙


In the velodrome you 
can do every run. 
Outdoor you should 
perform periodically. 
 
Unless making large 
changes to setup you 
do not need to do this to 
get correct result 
directionally: lower CdA 
is always lower CdA 
even if cal factor 
changes.   

4.  Calculate new cal 


𝑁𝑒𝑤 𝐶𝑎𝑙 = 𝑂𝑙𝑑 𝑐𝑎𝑙  ×  𝐴𝑣𝑔 𝐶𝑎𝑙


In our example 
Old cal = 1.40 
New cal = 1.400x1.020 = 1.428  

5.  Enter new cal. 


The air “sees” you coming towards it due to high pressure build up ahead of you.  For this 
reason the air at A

erosensor’s location on your bike is slower than freestream.  We need to 

correct for this.  

1. 

Perform at least two out/backs or 4 laps of velodrome

.   

a. 

Be sure to start recording (“Start activity” button on Garmin). 

2. 

On page 9 of the CIQ app you see a “Cal” value for every valid lap

.  Take the 

average of all of these values.   

3. 

Post-correct your CdA

 values by dividing them by this value, i.e.  

CdA_corrected = CdA_reported / Avg_cal 

4. 

Calculate new calibration factor

.   

AeroCal_New = AeroCal_Old * Cal 

5. 

Enter new “Aero device calibration”


Содержание Aerosensor

Страница 1: ...Aerosensor Quickstart Guide V1 1 1 aerosensor Quickstart Guide V1 1 08 10 23...

Страница 2: ...Aerosensor Quickstart Guide V1 1 2 Contents Aerosensor Quickstart Guide 3 Aerosensor setup 4 Aerosensor calibration 6 Aero testing guidance 7 Data Analysis 7 Aerosensor basics 8...

Страница 3: ...4072 9e85 57030e4949a6 ACS screen layout 1 FIT file recording status Red square means not recording green triangle means recording 2 Aerobody connection and battery status 3 Aerosensor connection stat...

Страница 4: ...erosensor Quickstart Guide V1 1 4 Aerosensor setup 1 Install 2 Pair ANT sensors 3 Calibrate PM 4 Start ACS App 5 Select test type 6 Connect device 7 Update settings 8 Check connections 9 Start activit...

Страница 5: ...a value of 1 4 ii Total mass your total mass i e you bike clothing iii Wheel circumference you can get from speed sensor info in Garmin or roll out wheel and measure distance on ground iv Power meter...

Страница 6: ...1 400x1 020 1 428 5 Enter new cal The air sees you coming towards it due to high pressure build up ahead of you For this reason the air at Aerosensor s location on your bike is slower than freestream...

Страница 7: ...un For out and back testing we recommend a stretch between 500 and 1000m The more out and backs you do the better the repeatability will be Data Analysis Data is recorded to FIT file You can view the...

Страница 8: ...release to shut down o Press and hold push reset button then release for full factory reset This resets the internal settings used to calculate CdA Reset button o To be used in case the device becomes...

Отзывы: