Garland PacketMAX GAA10G10AC Скачать руководство пользователя страница 18

Aggregator

PacketMAX™ Advanced Aggregator | GAA10G10AC | 1.19.2

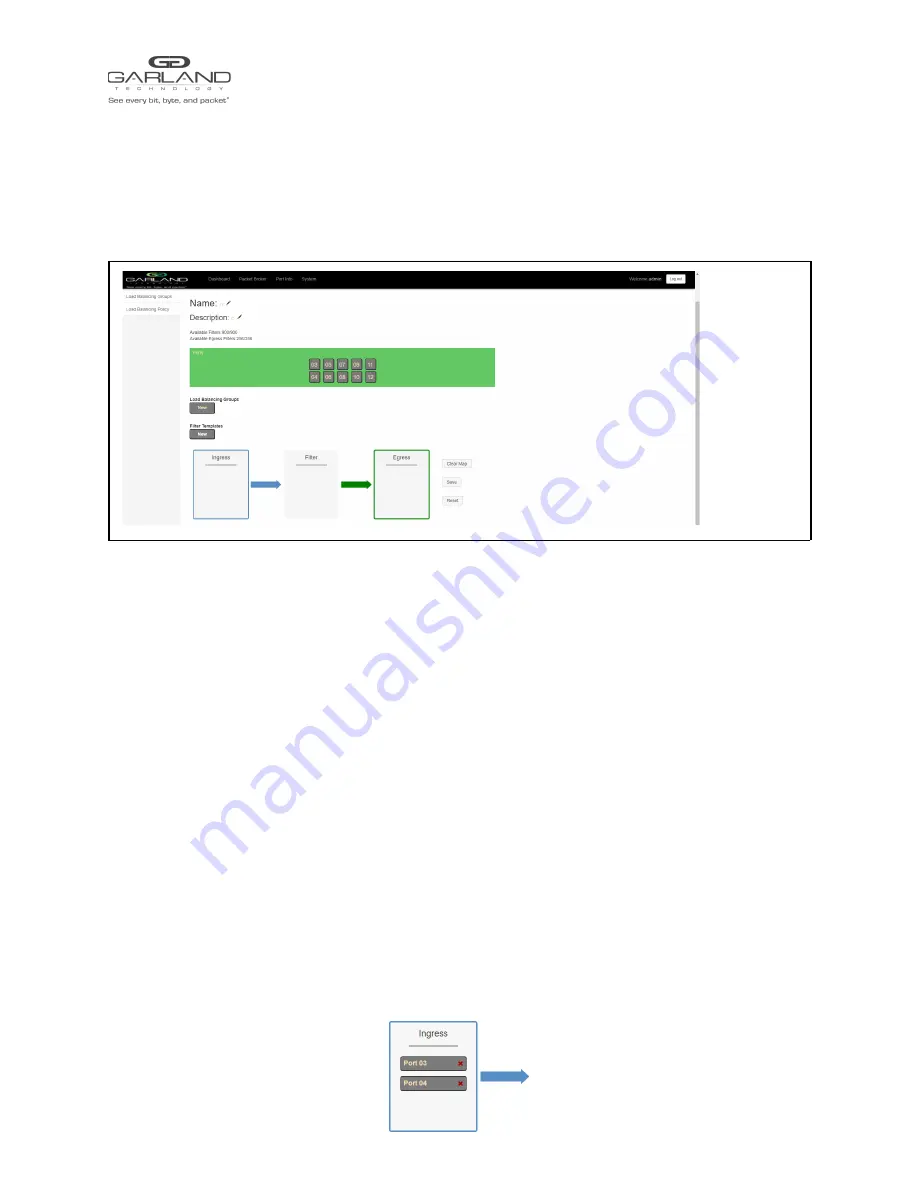
3.3 Config Map

Config maps are unidirectional connections between ingress port(s) to egress port(s) and/or a load

balancing group.

1. Select Create Config Map on the Packet Broker Configurations panel.

The Create Config Map panel will be displayed. Any previously created load balancing groups

or filter templates will be displayed along with the new options. Any port shaded gray can be
used for a config map, any port shaded black may not be used.

2. Select the Name pencil icon to apply a name, optional. If no name is entered the system will

automatically apply a name to the config maps as follows, map, map(1), map(2) etc.

3. Place the cursor in the Name panel and enter the name.

4. Select the Check to apply.

5. Select the Description pencil to apply a description, optional.

6. Place the cursor in the Description panel and enter the description, optional.

7. Select the Check to apply updates.

3.3.1 Ingress

1. Add an ingress port by placing the cursor on the desired port. Select with the left mouse button. Drag

the port to the Ingress panel and release. Ports may be added in any combination. If multiple ports are
added, then the traffic from all ingress ports will be aggregated.

Figure 1 Ingress

Garland Technology  |  716.242.8500  | garlandtechnology.com/support
Copyright © 2022 Garland Technology, LLC. All rights reserved.

17

Содержание PacketMAX GAA10G10AC

Страница 1: ...PacketMAX Advanced Aggregator GAA10G10AC 1 19 2 User Manual...

Страница 2: ...ice The purchased products services and features are stipulated by the contract made between Garland Technology and the customer All or part of the products services and features described in this doc...

Страница 3: ...10 Software Upgrade 11 2 11 Reboot 12 3 Packet Broker 13 3 1 Filter Template 13 3 2 Load Balancing Policy 14 3 2 1 Load Balancing Group 14 3 3 Config Map 15 3 3 1 Ingress 16 3 3 2 Filters 17 3 3 3 Eg...

Страница 4: ...1 19 2 4 Port Info 24 4 1 Port Configuration 24 4 1 1 Port Description 24 4 1 2 Set Speed 25 4 1 3 Mode 25 4 2 Port Statistics 25 Garland Technology 716 242 8500 garlandtechnology com support Copyrigh...

Страница 5: ...port utilization of existing infrastructure or as a stand alone device in L2 L4 filtering applications 1 2 Rack 1U Chassis Specifications Max system throughput Support for SFP SX LX and TX and SFP SR...

Страница 6: ...ower Supply 2 LED PS1 Power Supply 1 LED SYS System LED Ethernet Interface Upper Left LED Serial Interface Lower Right LED 1 2 Packet Broker The Packet Broker Section of the Dashboard consists of the...

Страница 7: ...al Export Configuration Admin Import Configuration Network Settings Software Upgrade Date Time Reboot Syslog 1 Select System on the Dashboard Menu bar The System panel will be displayed The System con...

Страница 8: ...played modified enabled or disabled Groups Users Local Authentication TACACS Authentication 1 Select Admin The panel will display the current configuration The default user is admin gtadmin1 The admin...

Страница 9: ...ave to save updates 6 Select Cancel to return to the Admin Settings panel The new local user will be displayed on the Admin Settings panel 7 Edit the username password or assigned group by selecting t...

Страница 10: ...ion options may be displayed modified enabled or disabled Any change made to any network setting option could cause network connectivity disruption for about 60 seconds DHCP IP Address Mask Gateway DN...

Страница 11: ...ed cert pem file 11 Select Open 12 Select the Choose File for Select Key File 13 Select the desired key pem file 14 Select Open 15 Select Upload 16 Select Restart Import to select a different cert pem...

Страница 12: ...bled or disabled V2 Read Write V2 read Only V3 MD5 DES V3 SHA AES Access Port Access Port Access Port Access Port Trap Port Trap Port Trap Port Trap Port Trap IP AddressTrap IP AddressTrap IP AddressT...

Страница 13: ...le 1 Select Import Configuration The Import Configuration panel will be displayed 2 Select Choose File 3 Select the desired exportCfg json file 4 Select Open 5 Select Upload The unit will automaticall...

Страница 14: ...s the unit to be rebooted The traffic will be affected for up to 3 minutes 1 Select Reboot The Reboot Device panel will be displayed 2 Select Reboot The unit will present an Are you sure message 3 Sel...

Страница 15: ...system as and options Thus for traffic to pass or be denied it must match all defined options Once a template is created it will appear on the Create Config Map panel and may be used to create an ing...

Страница 16: ...ing the template name 10 The filter template may be deleted by selecting the red X 3 2 Load Balancing Policy The load balancing policy determines the hashing applied to all load balancing groups taps...

Страница 17: ...c 4 Enter the description optional 5 Add ports by placing the cursor on the desired port Select with the left mouse button Drag the port to the New L B Group panel and release Repeat for all desired p...

Страница 18: ...he system will automatically apply a name to the config maps as follows map map 1 map 2 etc 3 Place the cursor in the Name panel and enter the name 4 Select the Check to apply 5 Select the Description...

Страница 19: ...lter may be selected and moved up or down depending on priority preference Figure 2 Filter Figure 3 Filter System Considerations 2 Filter templates may be modified by selecting the green filter icon f...

Страница 20: ...the load balancing group to the Egress panel and release Ports may be added or removed from any load balancing group If ports are added or removed from a previously created load balancing group the or...

Страница 21: ...actual egress filter once the config map is saved Filters may be added in any combination If multiple filters are added then the top filter is the highest priority The filters are considered from top...

Страница 22: ...be made using the create sections previously discussed 3 3 7 Config Map Statistics Config map statistics are displayed in the filter match column for each config map The number displayed represents al...

Страница 23: ...tics 7 Select Refresh Counts to refresh the statistics 8 Select Clear Counts to clear and refresh the statistics 3 3 8 Delete Config Map 1 Select the Delete in the Delete column for the desired config...

Страница 24: ...est priority 1 the Traffic_B config map is the next priority 2 and finally the Traffic_C is the next priority 3 Figure 9 Config Map System Considerations The Priority of a config map may be changed to...

Страница 25: ...g map has a green check then it is enabled If the config map has a red dash then it is disabled 3 3 11 Disable Config Map 1 Select the green check for the config map in the Enable column The green che...

Страница 26: ...will be displayed 4 1 Port Configuration The port configuration is displayed by default The Description Set Speed and Mode may be modified All other options are display only However they may be updat...

Страница 27: ...rt 2 Select the desired mode The available port modes are Normal Loopback Listen Only and Force Link 3 Select Save to save updates 4 2 Port Statistics The following statistics may be displayed on the...

Отзывы: