Garland Air-Deck G56PT Скачать руководство пользователя страница 18

Part # 1382670 (12/07)

Page 18

MAINTENANCE AND CLEANING

Oven Exterior

Stainless Steel Surface 

Stainless Steel surfaces can often be cleaned adequately 

using a mild soap and warm water solution on a sponge or 

soft cloth . Dry Thoroughly . 

Stubborn stains or heat tint may require the use of a 

commercial type cleaner, such as Penny-Brite or Copper-

Brite, rubbed in with a dry cloth or Stainless Steel pad . Always 

rub in the direction of the polished lines . Rinse thoroughly 

with fresh water and wipe dry .

Oven Interior

Aluminied Steel Surfaces 

Aluminied Steel Surfaces should be cleaned with a damp soft 

cloth and mild household detergent .

The oven deck and bottoms (Jet Plates) are removable . The 

deck should be kept as clean as possible . Heavy spills and 

carbon deposits, that are not easily removed with a soap and 

water solution, should be scraped loose and removed .

Periodic removal of the deck and “Jet Plates” is strongly 

recommended . This will enable you to remove any build-up 

of deposits on the “Jet Plates”, and access the oven bottoms . 

Particles may drop through the openings in the “Jet Plates” . 

The entire oven bottom should be cleaned at least once a 

year and more often under heavy usage conditions .

NOTE: Top “Jet Plates” are not removable . 

WARNING:  Failure to clean oven perforated deck surface and 

“Jet Plate” will degrade baking performance

CAUTION:  disconnect power supply before attempting 

cleaning or servicing .

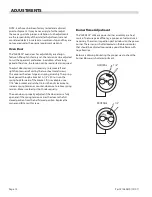
Bottom Jet Plate Installation

After periodic jet plate cleaning, they should be reinstalled 

in the following manner . Plate marked “R or “RHT” should be 

placed into unit on right hand side .

R

HT

Note:

 The short sided

end of the jet plate shown

should be installed in the center

of the unit with the short end down

(toward bottom of unit)

The jet plate marked “L” or “LHT” should be placed on the left 

side in the same manner as right plate (see note) .

Содержание Air-Deck G56PT

Страница 1: ...oad Mississauga Ontario L4W 1X4 CANADA Phone 905 624 0260 Fax 905 624 5669 Enodis UK LTD Swallowfield Way Hayes Middlesex UB3 1DQ ENGLAND Telephone 081 561 0433 Fax 081 848 0041 Part 1382670 12 07 200...

Страница 2: ...expose you to airborne particles of glass wool ceramic fibers Inhalation of airborne particles of glass wool ceramic fibers is known to the state of california to cause cancer Operation of this produ...

Страница 3: ...ble Unit 8 Concept Of Air Impingement Cooking 9 Operation 9 Possible Settings 10 Air Shutter Adjustments 10 Application Trouble Shooting 11 Adjustments 12 Oven Door 12 Burner flame Adjustment 12 Inter...

Страница 4: ...356mm 65 1 4 1657mm 63 1600mm 3 4 NPT REAR GAS INLET 3 4 NPT REAR GAS INLET MODEL INPUT BTU DECK AREA PIZZA CAPACITY MOTOR SHIPPING WT G56PB 80 000 14 0 Sq Ft 6 18 120V 1 60Hz 15 Amps 1 per deck 1000...

Страница 5: ...as Double Deck 2 3 4 NPT Gas Inlets 2 Line Cords Supplied Model Number Identification The model numbering system used indicates the input type deck size intended application and power module position...

Страница 6: ...iance of the installation with the manufacturer s specifications In addition compliance with the National Fuel Gas code ANSI Z 223 1 1988 NFPA and or Local Code is required to assure safe and efficien...

Страница 7: ...s from ridge More than 10 3 meters 3 90cm Min Direct Connection Instructions The G56P T B or double deck may be direct vented to the outside In order to accomplish direct venting and maintain proper o...

Страница 8: ...roperly grounded three pronged receptacle Do not cut or remove the grounding prong from this plug INSTALLATION Continued Unit Assembly 1 Before assembly and connection check gas supply and electrical...

Страница 9: ...the production of food products It is normal for the unit to smoke while burning off excess oil Washing the deck of the oven with a damp clean cloth and mild soap solution will remove some of the prot...

Страница 10: ...ly Closed Fully Open Pre Baked Party Pizza 16 00 20 00 475 500 250 260 Fully Closed Fully Open Air Shutter Adjustments To adjust the dampers loosen wing nut holding damper position with deck and dampe...

Страница 11: ...ght 1 Increase cooking time 2 Increase temperature Pizza bottom and Top Too Dark 1 Decrease cooking time 2 Decrease temperature Pizza Bottom Too Dark and Top too Light 1 Increase top air by adjusting...

Страница 12: ...ly The spring hook passed through a bracket A 1 4 x 20 nut is on the spring hook forward of the bracket If it is available use a 7 16 deep socket and ratchet to turn the nut clockwise to increase spri...

Страница 13: ...he reset or normal operating condition Safety Lockout Time S86 S86D Only The safety lockout timer circuit starts timing the moment the trial for pilot ignition starts When the timing period runs out t...

Страница 14: ...ich arcing stops CAUTION Do not touch either stripped end of jumper or stud terminal This is a very high voltage circuit and electrical shock can result Perform the test immediately upon energizing th...

Страница 15: ...PRESENT SYSTEM FAILS TO START 4 PILOT BURNER LIGHTS S86 SENSES FLAME CURRENT PILOT BURNER OPERATION OR PILOT BURNER DOES NOT LIGHT S86A OR B TRIAL FOR IGNITION CONTINUES S86C OR D GOES INTO LOCKOUT A...

Страница 16: ...COIL THERMOSTAT TRANSFORMER NEUT HOT MOTOR RELAY MOTOR EP SYSTEM HONEYWELL SWITCH CENTRIFUGAL TO ELECTRODE BLUE WHT RED GND PV MV PV MV SB6 HONEYWELL 24V RED RED YEL YEL MOTOR BLK BLK BLK MOTOR RELAY...

Страница 17: ...IF NO VOLTAGE REPLACE CONTROL REPLACE CHECK CONTINUITY OF IGNITION CABLE AND GROUND WIRE CHECK THAT PILOT FLAME COVERS BOTH ELECTRODES IF CHECKS ARE OKAY REPLACE MODULE CHECK FOR 24 V AT TERMINALS 3...

Страница 18: ...hould be scraped loose and removed Periodic removal of the deck and Jet Plates is strongly recommended This will enable you to remove any build up of deposits on the Jet Plates and access the oven bot...

Страница 19: ...Part 1382670 12 07 Page 19...

Страница 20: ......

Отзывы: