


GB
NL
DE
FR
8
If the motor fails to start, clean the ejector chute.
6.3 Practical tips
Be sure to observe the safety instructions (see
supplied booklet).
Wear work gloves, goggles and ear protection.
The material is drawn into the shredder automatic-
ally. CAUTION! Long pieces of material projecting
out of the funnel inlet may whiplash when it is
drawn in – keep a safe distance between yourself
and the machine.
Judge the quantity of material which you put into
the funnel inlet so that the funnel does not clog.
If you want to shred withered, damp material that
has been lying in the garden for several days,
alternate between putting in this material and
branches. This will help to prevent the loading
funnel becoming clogged with material.
Do not shred soft waste (e.g. kitchen waste) – put
it straight in the compost box.
Entangled branches and leaves should be tho
roughly shredded before loading any more materi-
al.
Do not allow the discharge opening to become
clogged with shredded material – risk of pile-ups.
Do not cover the ventilation slits.
Do not place heavy material or thick branches into
the machine continuously. This may cause the
blade to jam.
Use a plunger or hook to remove jammed objects
from the funnel or discharge openings.
6.4 Safety
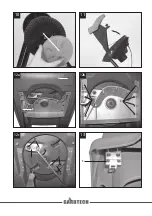
The shredder has a safety switch (Figure 12a/Item A)
in its interior on the motor housing. The control unit for
it (Figure 13/Item F) is located on the loading funnel.
If the loading hopping is not perfectly position or if it is
not pressed against the motor housing, the
SAFETY
SWITCH
will trip and prevent the motor from working. If
this situation occurs, open the loading funnel as
described above. Carefully clean the interior. Close
the loading funnel again as described above and
ensure that when you switch on the machine again
the loading funnel is correctly position and the safety
screw is screwed right in.
CAUTION! NEVER undo the release screw (Figure
1/Item 12) without first switching off the machine at
the ON/OFF switch (Figure 1/Item 11) and
disconnecting the coupling on the machine
connection cable (extension) from the machine plug.
6.5 Fitting the shredder debris bag (Fig. 14)
As an option you can fit the supplied shredder debris
bag to the equipment. To do so, hang the shredder
debris bag (Fig. 14 / Item 15) on the hooks provided
for the purpose (Fig. 14 / Item 16).
7.Replacing the power cable
If the power cable for this equipment is damaged, it
must be replaced by the manufacturer or its after-
sales service or similarly trained personnel to avoid
danger.
8. Cleaning, maintenance and ordering
of spare parts
Always pull out the mains power plug before starting
any cleaning work.
8.1 Maintenance and storage
Clean the machine regularly. This will help to
keep
the machine in good working order and is the
basis for a long working life.
Keep the vent slots clean while you work.
Clean the plastic body and other plastic parts with
a mild household cleaning agent and a damp
cloth. Do not use any aggressive agents or
solvents for cleaning purposes.
Never clean the shredder by spraying with water.
Prevent water getting inside the machine at all
cost.
Check the chassis securing screws from time to
time to ensure that they are tight.
If you do not intend to use the shredder for a
lengthy period, protect it from corrosion using
environmentally friendly oil.
Store the device in a dry room.
Store the device out of reach of children.
When you have finished your work, pull the
loading funnel forwards and clean the inside. Use
a brush to remove deposits from metal parts on
the inside. Apply a thin coating of oil to the
cleaned blade plate and blades.
When you close the loading funnel, make sure
that the safety switch and the release screw are
clean.
8.2 Replace, sharp and change blades
The blades on the blade plate are replaceable. If you
have to replace any blade, you must only use genuine
blades to ensure that they meet the relevant quality
and safety criteria.
Содержание GT40002
Страница 1: ...GB NL DE FR GT40002 6601 CUTTING SHREDDER ELECTRISCHE HAKSELAAR ELEKTRO H CKSLER BROYEUR LECTRIQUE...
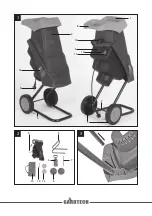
Страница 2: ...1 1 7 3 12 8 10 11 6 5 9 16 2 2 3 13 14 15 6 9 5 4 7...
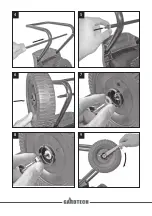
Страница 3: ...4 5 6 7 8 9...
Страница 4: ...10 11 12a B A 12b C 12c E D C E D 13 F...
Страница 5: ...5 15 14 16 15 16...