Introduction
• Construct and secure the base before assembling the greenhouse.
• The base must stand on a firm level surface.
• If mounted on earth, ensure the soil is well compacted and level. Secure the base using the
ground pegs provided: these need to be set into pockets of concrete.
• The base can be mounted on slabs provided they are level and are firmly laid.
• A concrete pad can also be used: ensure that it slopes off to the sides to prevent water ingress
around the edges.
Tools and equipment required:
• 10mm spanner.
• Spirit level.
• Tape measure.
• Cement and ballast for the fixing pockets.
• Drill, masonry bits, screws and plugs if securing to slabs or a concrete pad.
Section 1
Assembly:
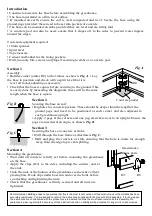
• Bolt the corner joints (H2) to the frames as shown. Fig A. • Lay
the base in position and check with a spirit level that it is
level all round, adjusting as necessary.
• Check that the base is square before securing to the ground. This
is easily done by measuring the diagonals: these will be the same
length when the base is square.
Section 2
Fig B
Securing the base on soil:
Fig A
H2
Concrete pocket
• Dig holes for concrete pockets. These should be deeper than the length of the
ground pegs and need to be positioned at each corner and also adjacent to
each greenhouse upright.
• Apply 2 pegs at the corners and one peg elsewhere next to an upright. Ensure the
pegs are inserted at an angle, as shown. Fig B.
Section 3
Fig C
Section 4
Securing the base on concrete or slabs:
• Drill through the base frame as illustrated. Fig C.
• Drill and plug the concrete or slab, ensuring that the hole is made far enough
away from the edge to prevent splitting.
Greenhouse
Mounting the greenhouse:
• Wait until all concrete is fully set before mounting the greenhouse
on the base.
• Apply the clips (H3) to the sides, including the corners, and at
the ends.
• Undo the nuts at the bottom of the greenhouse corners & vertical
glazing bars. Hook clips under base rim and over the bolts before
re-attaching and tightening the nuts.
• Check that the greenhouse is firmly secured and all nuts are
tightened.
frame parts
H1
H3
Summer Garden Buildings does not guarantee that this is the most recent version of these instructions or that all data has been
accurately reproduced. You are advised to refer to the instructions supplied with the product before assembly. If for any reason
the instructions are not delivered with the product you are advised to obtain the most recent version before assembly. No
guarantee is given regarding the accuracy of these instructions and no liability will be accepted for any errors or inaccuracies.


