background image

6

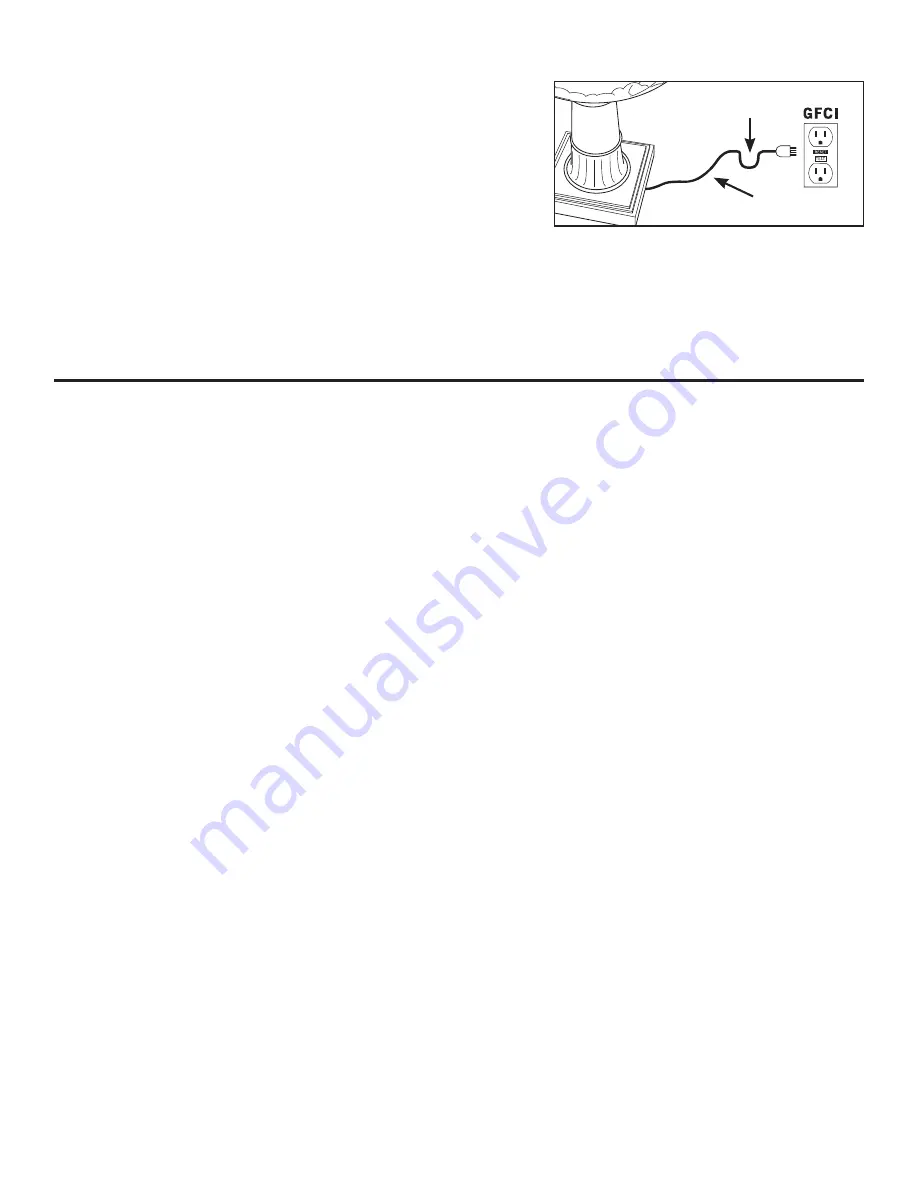
8.   To turn on the fountain, connect the electrical 

cord to a properly grounded outlet, following 

GFCI outlet regulations. A GFCI outlet must be 

used. Your fountain will begin to flow. (Fig. 8)


 Note: Ensure that the electrical cord loops below 

the electrical outlet to form a “Drip Loop”.

9.   Once the fountain is on and running, determine 

if it needs more or less water, or if the water flow 

control needs to be adjusted. Relax and enjoy  

your fountain!

MAINTENANCE

1.   Periodically change the water and clean according to the water condition. This will keep the water 

from becoming sticky, microorganisms from developing, and mineral deposits from building-up. 

Avoid placing the fountain underneath trees. This will help keep debris out of the fountain, ensuring 

proper functioning of the pump.

2.   Do not use harsh chemicals when cleaning the surface of the unit. Doing so will damage the finish. It 

is best to wipe clean with a damp cloth.

3.   Regularly check the water level to ensure it is above the pump. In hot or windy weather, the water 

will evaporate and splash out of the fountain at a faster rate. Check the water level more frequently in 

these conditions. The water must always be kept above 75% full.

4.   Splashing and/or dripping may occur when the fountain is running. Do not place the fountain where 

you are concerned about possible water damage. To prevent water from splashing unnecessarily, 

adjust the water flow control.

5.   The water flow may not function properly if the fountain is not level. You can use a level to help make 

this determination. If it is not level, use shims to level the fountain before operating.

6.   When the fountain will not be used for extended periods of time, disconnect the cord from the power 

supply and empty the water.

7.   Only use the correct power voltage, as indicated on the pump.
If your fountain is located in a freeze/frost climate (32° F and below), follow these steps to safeguard  

your fountain:
1.  Drain all water from the unit.
2.  Leave as assembled, or disassemble fountain and store indoors for the winter months.
3.  If you are unable to store inside, drain all water and dry the fountain.
4.  If possible, remove the pump and bring indoors.
5.  Fill the basins or reservoirs with an absorbent material, such as blankets or burlap.
6.  Wrap the unit with plastic for protection.


Fig. 8

Electrical Cord

“Drip Loop”

Содержание WISTERIA FOUNTAIN

Страница 1: ...1 OWNER S MANUAL WISTERIA FOUNTAIN Caution Carefully Read Instructions and Procedures for Safe Operation KSN 02413905 7 UPC code 0 3464824491 5 Date of purchase _____ _____ _____ ...

Страница 2: ...ntire pump if damaged Ensure that the electrical cord loops below the electrical outlet to form a Drip Loop Fig 1 This will prevent water from running down the cord into the electrical outlet CAUTION To reduce the risk of electric shock Always unplug the appliance from the electrical outlet immediately after using and before cleaning Do not connect to any voltage other than that shown on the pump ...

Страница 3: ...urchasing your Outdoor Fountain Please read the operation and safety instructions before assembly Finial Hose Tube Pump Basin 1 Pedestal 1 Notches Cord Notch Electrical Cord Pump Reservoir Electrical Cord Basin 2 Pedestal 2 Tube Notches ...

Страница 4: ... ASSEMBLY INSTRUCTIONS 1 Place the fountain on a flat level surface 2 Line up the notches on basin 1 with the notches in pedestal 1 Twist and lock clockwise to secure basin 1 into place Fig 2 3 Locate the pump and turn the water flow control to the Maximum setting Fig 3 4 Lead the pump s electrical cord through the tube and pull through underneath pedestal 1 secure in cord notch Set the pump next ...

Страница 5: ...ext to the tube as you lower pedestal 2 into the pump reservoir Line up the notches on pedestal 2 with the corresponding notches in the pump reservoir Twist and lock clockwise to secure into place Fig 6 7 Fill the basin with clean water to a minimum of 75 full completely submerging the pump The pump will not work if it is not completely submerged at all times Fig 7 NOTE To help prevent mineral bui...

Страница 6: ...e fountain at a faster rate Check the water level more frequently in these conditions The water must always be kept above 75 full 4 Splashing and or dripping may occur when the fountain is running Do not place the fountain where you are concerned about possible water damage To prevent water from splashing unnecessarily adjust the water flow control 5 The water flow may not function properly if the...

Страница 7: ...t parts call our customer service department at 1 800 501 7271 7 a m 5 30 p m EST Monday Friday ILLUSTRATION DESCRIPTION PART NUMBER Finial QTF1023BBFN 11 Pump PUMPP450 11 Hose HOSES19IN 11 Pedestal 2 QTF1023BBPD2 11 Basin 2 QTF1023BBBS2 11 ...

Страница 8: ...ol on the pump and adjust accordingly Fig 9 The pump is making abnormal noises 1 Check the water level to ensure the pump is completely submerged 2 Disconnect the pump and check the impeller assembly Fig 9 Remove the front cover and water leave seating from the pump body Grip the impeller and gently take it out of the pump Rinse the impeller and pump body to remove any debris If any damage is foun...

Страница 9: ...ng address Warranty Administrator Arden Companies 30400 Telegraph Road Suite 200 Bingham Farms Michigan 48025 This written statement must be accompanied with proof of purchase in the form of a sales receipt or invoice copy and must set forth at least the following information your name and address the date of purchase and a description of the claimed defect This Limited Warranty does not apply to ...

Страница 10: ...10 GUIDE D UTILISATION FONTAINE À GLYCINE Attention Lisez soigneusement les consignes d utilisation et de sécurité KSN 02413905 7 Code CUP 0 3464824491 5 Date d achat _____ _____ _____ ...

Страница 11: ... Remplacez complètement la pompe si elle est endommagée Assurez vous que le cordon électrique s enroule sous la prise électrique pour former un col de cygne Schéma 1 Ceci évitera que l eau ne coule le long du cordon jusque dans la prise de courant ATTENTION Pour réduire les risques de choc électrique Débranchez toujours l appareil de la prise électrique immédiatement après son utilisation et avant...

Страница 12: ...ntaine extérieure Veuillez lire les consignes d utilisation et de sécurité avant l assemblage Faîteau Tuyau Tube Pompe Bassin 1 Piédestal 1 Encoches Encoche du cordon Cordon électrique Réservoir de la pompe Cordon électrique Bassin 2 Piédestal 2 Tube Encoches ...

Страница 13: ... fontaine sur une surface plane et égale 2 Alignez les encoches du bassin 1 avec les encoches du piédestal 1 Verrouillez le bassin 1 en place en le tournant dans le sens des aiguilles d une montre Schéma 2 3 Trouvez la pompe et réglez de bouton de contrôle du débit de l eau au niveau Maximum Schéma 3 4 Faites passer le cordon électrique de la pompe par le tube et tirez le complètement pour le fair...

Страница 14: ...tandis que vous abaissez le piédestal 2 dans le réservoir de la pompe Alignez les encoches du piédestal 2 avec les encoches correspondantes du réservoir de la pompe Verrouillez en tournant dans le sens des aiguilles d une montre Schéma 6 7 Remplissez le bassin avec de l eau propre à 75 de sa capacité en immergeant entièrement la pompe La pompe ne fonctionnera pas si elle n est pas complètement imm...

Страница 15: ...en dehors de la fontaine plus rapidement Vérifiez le niveau de l eau plus fréquemment dans ces conditions Le niveau d eau doit toujours être maintenu au dessus de 75 de la capacité de la fontaine 4 Des éclaboussures et ou du ruissellement peuvent se produire lorsque la fontaine marche Ne placez pas la fontaine là où vous craignez des dégâts causés par l eau Pour éviter que l eau n éclabousse sans ...

Страница 16: ...ange communiquez avec notre service à la clientèle au 1 800 501 7271 de 7 h à 17 h 30 HNE du lundi au vendredi ILLUSTRATION DESCRIPTION NUMÉRO DE PIÈCE Faîteau QTF1023BBFN 11 Pompe PUMPP450 11 Tuyau HOSES19IN 11 Piédestal 2 QTF1023BBPD2 11 Bassin 2 QTF1023BBBS2 11 ...

Страница 17: ...et réglez selon les besoins Schéma 9 La pompe fait un bruit anormal 1 Vérifiez le niveau d eau afin de vous assurer que la pompe est complètement immergée 2 Débranchez la pompe et vérifiez l assemblage de la turbine Schéma 9 Retirez le couvercle avant et la bague d écoulement du corps de la pompe Empoignez la turbine et retirez la délicatement de la pompe Rincez la turbine et le corps de la pompe ...

Страница 18: ...t par écrit à l adresse suivante Warranty Administrator Arden Companies 30400 Telegraph Road Suite 200 Bingham Farms Michigan 48025 Cette déclaration écrite doit être accompagnée d une preuve d achat sous forme d un reçu de caisse ou copie d une facture et doit comporter au moins les informations suivantes votre nom adresse date d achat et une description du défaut faisant l objet de votre réclama...

Страница 19: ...ANUAL DEL USUARIO WISTERIA FUENTE Precaución Lee todas las instrucciones y procedimientos con cuidado para una operación segura KSN 02413905 7 Código de UPC 0 3464824491 5 Fecha de compra _____ _____ _____ ...

Страница 20: ... cable de alimentación no caiga en línea recta hacia el tomacorriente sino que cuelgue holgadamente por debajo de este esta conexión se conoce como Bucle de goteo Fig 1 Esto evitará que el agua corra por el cable directamente hacia el tomacorriente PRECAUCIÓN Para reducir el riesgo de descargas eléctricas Desenchufa siempre el artefacto del tomacorriente inmediatamente después de su uso y antes de...

Страница 21: ... para exteriores Lee las instrucciones de funcionamiento y seguridad antes de ensamblarla Remate Manguera Tubo Bomba Tina 1 Pedestal 1 Muescas Muesca del cable Cable de alimentación Depósito de la bomba Cable de alimentación Tina 2 Pedestal 2 Tubo Muescas ...

Страница 22: ...E ENSAMBLAJE 1 Coloca la fuente en una superficie plana y nivelada 2 Alinea las muescas de la tina 1 con las muescas del pedestal 1 Gira en sentido de las agujas del reloj para trabar la tina 1 y asegurarla su el lugar Fig 2 3 Inserta la bomba y coloca el control de flujo de agua en la configuración Máximo Fig 3 4 Pasa el cable de alimentación de la bomba a través del tubo y hálalo por debajo del ...

Страница 23: ...bo mientras bajas el pedestal 2 hacia el depósito de la bomba Alinea las muescas del pedestal 2 con las muescas correspondientes del depósito de la bomba Gíralos en sentido de las agujas del reloj para asegurarlos en su lugar Fig 6 7 Llena la tina de la cámara de la bomba con agua limpia hasta un mínimo de 75 de su capacidad sumergiendo la bomba por completo La bomba no funcionará si no está sumer...

Страница 24: ...viento el agua se evaporará o salpicará fuera de la fuente con más frecuencia Verifica el nivel de agua con mayor frecuencia en estas condiciones climáticas La bomba debe estar llena al menos un 75 4 La fuente puede salpicar o gotear agua cuando está en funcionamiento No la coloques en lugares donde el agua pueda causar daños Para evitar que el agua salpique innecesariamente ajusta el control de f...

Страница 25: ...lama al departamento de servicio al cliente al 1 800 501 7271 de 7 a m a 5 30 p m Hora del Este de lunes a viernes ILUSTRACIÓN DESCRIPCIÓN NÚMERO DE PIEZA Remate QTF1023BBFN 11 Bomba PUMPP450 11 Manguera HOSES19IN 11 Pedestal 2 QTF1023BBPD2 11 Tina 2 QTF1023BBBS2 11 ...

Страница 26: ...as salidas de agua Si los hay quítalos 5 Limpia los caños con un paño húmedo para eliminar cualquier acumulación que pueda impedir el flujo del agua Fig 9 SOLUCIÓN DE PROBLEMAS No seguir las instrucciones y advertencias de este manual podría causar daños en la bomba o lesiones Conserva este manual para referencias futuras Problema Causa posible y acción correctiva La bomba no bombea agua 1 Verific...

Страница 27: ...ción Warranty Administrator Arden Companies 30400 Telegraph Road Suite 200 Bingham Farms Michigan 48025 La notificación por escrito debe ser presentada junto a un comprobante de compra en forma de recibo de venta o copia de factura y debe expresar la siguiente información como mínimo tu nombre y dirección fecha de compra y descripción del defecto por el que se reclama Esta Garantía Limitada no se ...

Отзывы: