


www.DeubaXXL.de
www.DeubaXXL.de
20
21
www.Deuba24online.de
www.Deuba24online.de
20
21
WARNING: ALWAYS UNPLUG THE UNIT BEFORE
CHANGING GRINDING WHEELS, OR WHEN
MAKING ANY ADJUSTMENTS TO THE SHARPEN-
ER.
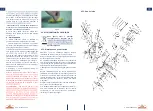
Refer to the Assembly Drawing on page 11 and
FIGTURE 5 and FIGTURE 6 below.
1. Raise the Top Housing(#4) and lock it in the up
2. Remove the two screws holding the Grinding
Wheel Cover(#11). Set the cover aside.
3. Unscrew the screw and Grinder Lock Cap(#9)
that holds the Grinding Wheel(#8) in place.
4. Install the new wheel on the Grinding Wheel
Base(#7), making sure it fits properly.
NOTE: DO NOT USE A GRINDING WHEEL IF IT IS
CHIPPED, CRACKED, OR WORN. YOU CAN CHECK
IF THE WHEEL HAS CRACK NOT VISIBLE TO THE
HUMAN EYE BY HANGING IT UP BY THE CENTRAL
HOLE AND TAPPING IT WITH A NON METAL
OBJECT(IE: SCREWDRIVER HANDLE). IF IT IS IN
GOOD CONDITION IT WILL PRODUCE A METALLIC
SOUND. A DULL SOUND INDICATES A CRACK OR
BREAK.
5. Replace the Grinder Lock Cap(#9).
6. Replace the Grinding Wheel Cover(#11).
7. Release the Lock Stop(#6) and lower the Top
Housing(#4).
8. Never operate tool without the Grinding Wheel
Cover in place.
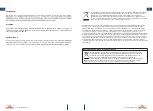
IV.OPERATION
WARNING: ALWAYS UNPLUG THE UNIT WHILE
ADJUSTING CHAIN TO BE SHARPENED.
Refer to the Assembly Drawing on page 11 and
the various photographs.
NOTE: RAISE THE TOP HOUSING(#4) WHILE
ADJUSTING THE CHAIN.
1. Clean the chain before sharpening. Wash it
with a non-
flammable
solvent. Do not use
gasoline. Dry the chain.
chain in the Sliding Guides(#31). See FIGTURE 8.
3. Lower the Chain Stop(#23) so that it is
with. See FIGTURE 7
Fig 4
FIG.5
FIG.6
Winkelmesser
unterer Knopf
Abb. 7
V. Maintenance
1.Keep the Sharpener clean and free of dust,
metal debris and dirt.
blockage of dust, chips or workpiece fragments.
2. Check the Grinding Wheel before each use to
make sure it isn’t damaged. Do not use a grinding
wheel if it is chipped, cracked, or worn. You can
check if the wheel has cracks not visible to the
human eye by hanging it up by the central hole
and tapping it with a non metal object(Ie:
will produce a metallic sound. A dull sound
indicates a crack or break.
3. Replace the Grinding Wheel when it grinds
down to a diameter of 3 inches.
Before Replace the Grinding Wheel , must
remove the guard in the right way . Please open
the guard without remove screws. Be careful and
stop screwing when you saw the screw thread
during unscrewing, or the screws will be dropped
missing of the
fixing
screws on the guard , please
guard have been removed. If you use electric/-
ful about it or you will easy to dismount the screw
ou can help protect the environment!
Please remember to respect the local
electrical equipment's to an appropri-
ate waste disposal centre .
VI. ENVIRONMENT FRIENDLY DISPOSAL
VII. Maintenance and Care
Fig . 13
Attention! When cleaning, always switch off the
saw chain sharpener and remove the mains
plug from the socket.
Clean your saw chain sharpener housing with a
slightly damp cloth. Then dry thoroughly.
Many detergents contain chemical substances
that can attack the plastic parts of the device.
Never use petrol, turpentine, thinner or similar
substances.
Store the saw chain sharpener in a dry room.
Always keep the saw blade sharpener air vents
clean. Protect the saw chain sharpener from
dust and dirt to avoid electric shock hazards. It
is normal for sparks to pop out of the air vents
from time to time.


