background image

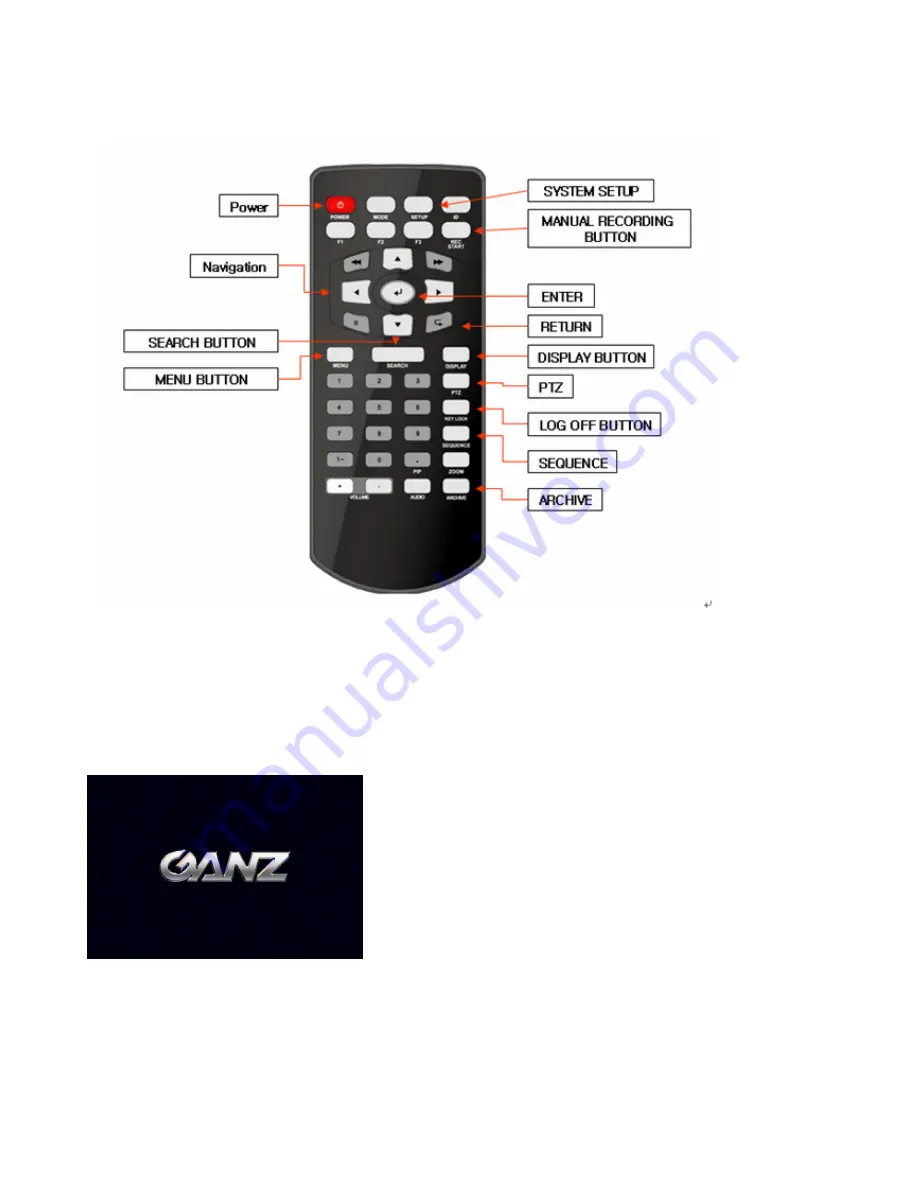
SYSTEM CONFIGURE – Remote Controller 


CONNECT & POWER ON 

• Connect up to 4 

CAMERA INPUTS 

as necessary.   

• Connect one or more monitors to the DVR using the 

COMPOSITE, VGA 

connections 

• Connect power to the DVR. The DVR checks for proper power connection and emits one beep. 

    Press the 

POWER BUTTON 

on the front panel of the DVR to begin operation. 


Содержание Digimaster DR4N-Lite

Страница 1: ......

Страница 2: ...o r d i n g 1 6 K e y L o c k F u n c t i o n 1 7 P T Z C a m e r a c o n t r o l 1 7 S Y S T E M S E T U P 1 8 D i s p l a y 1 8 O S D 1 8 M o n i t o r 1 9 C a m e r a 2 0 C a m e r a T i t l e 2 0...

Страница 3: ...z a t i o n 5 0 E x p l a n a t i o n o f F u n c t i o n k e y s 5 1 C r e a t e a c o n n e c t g r o u p 5 2 D e t a i l S e t u p 5 3 A d d i t i o n a l C o n f i g u r a t i o n 5 4 R E M O T E...

Страница 4: ...trol devices peripheral devices and the system setup instructions It is important to note here that some features figures pictures and references can only be applied to just one model CBC cannot be he...

Страница 5: ...f the following precautions before installing the DVR Avoid positioning the GANZ DIGIMASTER in any place where the unit may come into contact with moisture dust or soot Avoid placing in direct sunligh...

Страница 6: ...The following are warnings and cautions to ensure user safety and prevent property damage Please read the information below thoroughly...

Страница 7: ......

Страница 8: ......

Страница 9: ......

Страница 10: ...exit from the apparatus 11 Only use the attachments accessories specified by the manufacturer 12 Use only with a cart stand tripod bracket or table specified by the manufacturer or sold with the appar...

Страница 11: ...Composite BNC Audio inputs 4 x line in RCA socket Audio output 1 x line out RCA socket Resolution 352x240 704x240 704x480 NTSC 352x288 704x288 704x576 PAL Compression standard MPEG 4 Recording speed...

Страница 12: ...Please check if all the product contents are present after opening the package DR4N Lite 3 System Organization 12V Adaptor With ac cord Instruction Manual Remote Controller With Battery Remote Agent I...

Страница 13: ...NTSC PAL Switch Video Input Connect the coaxial cables from the video sources to the BNC video in Connectors Monitor Out Connect AV monitor for main system OSD Audio Input Output Connect Mic to Input...

Страница 14: ...4 CAMERA INPUTS as necessary Connect one or more monitors to the DVR using the COMPOSITE VGA connections Connect power to the DVR The DVR checks for proper power connection and emits one beep Press t...

Страница 15: ...shows current time and date and percentage of hard drive used A title for each channel is shown The red square and letter C in the top right of each channel display shows that the channel is recording...

Страница 16: ...e runs indefinitely until a different display mode is chosen Manual Recording Panic Recording REC START Click the right mouse button on the Live Display screen and click the REC START menu Manual reco...

Страница 17: ...Select the KEYLOCK button and YES PTZ Camera Control Click the right mouse button on the Live Display screen and click the PTZ menu Speed domes and other telemetry devices connected to the DVR can be...

Страница 18: ...the right mouse button on the Live Display screen and click the SETUP menu DISPLAY To setup the various display options highlight DISPLAY and press ENTER DISPLAY OSD Click the OSD menu and click the...

Страница 19: ...system will reboot and language will be changed DISPLAY MONITOR Click the MONITOR menu and click the ON OFF menu Then click the button for ON OFF SEQUENCE DWELL The time that each screen is displayed...

Страница 20: ...nu on the COVERT menu Then click the button for ON OFF Click the CAM No on the TITLE menu and change the camera name COVERT When it is set to ON the camera image is not displayed in live display but c...

Страница 21: ...and choose the desired channel Press RETURN when all changes are completed DISPLAY PTZ SETUP Click the PTZ SETUP menu and click the each value on the ADDRESS PROTOCOL and BAUD RATE menu Change the va...

Страница 22: ...Click the MOTION SENSOR menu and decide the value on the SENSITIVITY menu Change the value by button SENSITIVITY Between 1 Lowest and 10 Highest and determines the degree of motion required before rec...

Страница 23: ...grid Choose SELECT ALL or DESELECT ALL as appropriate Drag the grid by the left mouse To select or deselect specific areas press ENTER to bring up the yellow cursor square in the top left of the displ...

Страница 24: ...AUDIO INPUTS is routed to the AUDIO OUTPUT NETWORK AUDIO TX When it is set to ON live and playback audio is transmitted to a remote PC connection NETWORK AUDIO RX When set it is to ON allows a remote...

Страница 25: ...DATE FORMAT Determines how the date is displayed TIME FORMAT Determines how the time is displayed NETWORK TIME SERVER SETUP If the DVR is connected to the Internet the time and date can be accurately...

Страница 26: ...ddress can be manually set SUBNET MASK If DHCP is not being used the subnet mask can be manually set 1ST DNS SERVER If DHCP is not being used the first DNS server can be manually set 2ND DNS SERVER If...

Страница 27: ...messages PASSWORD If SECURITY is set to ON enter the password here TEST E MAIL Can test the E mail function Please note A USER must be entered for the mail function to operate correctly The username m...

Страница 28: ...oups MANAGER or USER The user nr of ADMIN group is only one E MAIL Enter the user s email address if email notification is required E MAIL NOTIFICATION Enable or disable email notifications for this p...

Страница 29: ...by recorded footage the second value shows the total hard drive capacity installed F W version Shows the firmware version of the DVR H W version Shows the hardware version of the DVR VIDEO SIGNAL TYPE...

Страница 30: ...iodically to enhance system performance and add extra features The operator can upgrade the firmware using a USB memory stick After finishing the upgrade system will be rebooted 1 Select the Press ico...

Страница 31: ...with below pop up window Press OK and system reboot again After finishing reboot F W upgrade is finished successfully FACTORY DEFAULT If settings have been changed which cause erratic behavior the fac...

Страница 32: ...d to be installed with the same settings After loading the configuration data system will be rebooted SYSTEM CONTROL DEVICE Click the CONTROL DEVICE menu and select the SYSTEM ID PTZ Protocol and came...

Страница 33: ...L EVENT If it sets to ON alarm output and buzzer are activated when HDD becomes full EVENT SENSOR ALARM INPUT Click the ALARM INPUT menu and click the OPERATION and TYPE value Then click the value by...

Страница 34: ...the output is active for a set period of time after a trigger DURATION In LATCHED mode the time that the alarm output remains active after it has been triggered Action settings ALARM Determines whethe...

Страница 35: ...hannels will sound the buzzer Remember to select APPLY and press ENTER to save all settings before exiting these menus EVENT SENSOR EMAIL NOTIFICATION Click the EMAIL NOTIFICATION menu and click the e...

Страница 36: ...me limit user can select the current data is remained or removed DELETE DATA OFF Only ADMIN can review all recorded data even though RECORD TIME LIMIT is ON DELETE DATA ON ADMIN and Manager can review...

Страница 37: ...ING SCHEDULE MODE Either DAILY one schedule will apply to every day of the week or WEEKLY each day of the week has its own schedule Please note When recording mode is simple mode this option cannot be...

Страница 38: ...g quality to Low Standard High or Highest for all cameras RECORD SIZE Sets the video capture size for all camera to 352X240 704X240 704X480 NTSC for all cameras FPS Sets the Frames per second for reco...

Страница 39: ...hannel can be defined across a 24 hour period in blocks for example between 09 00 and 18 00 or for each individual hour Note that when SCHEDULE MODE is set to WEEKLY each day of the week can also be s...

Страница 40: ...n a particular channel is selected in full screen the assigned audio channel will be played back at the same time Adjust values as desired and select OK to finish and return to the setting menu Other...

Страница 41: ...nd Alarm MANUAL RECORDING Panic Recording Click the MANUAL RECORDING Select the Size Frame Quality and audio During manual recording mode the DVR will override all other recording settings and record...

Страница 42: ...ayback footage To login as ADMIN enter the default password of 1234 and press ENTER SEARCH TIME SEARCH Click the date that user want The DVR uses a calendar and timeline search method for quick access...

Страница 43: ...to select the time segment required Each movement of the timeline cursor increases or decreases the time by 15 minutes The currently selected time is displayed above the calendar Select the PLAY to b...

Страница 44: ...event log screen select SEARCH BY EVENT Various filters can be used to limit the number of events displayed Using the CURSOR KEYS and ENTER button select the FROM and TO date time and the events and...

Страница 45: ...scheduled recording operations are displayed for the chosen date range MOTION When ticked all motion detection events are displayed for the chosen date range ETC When ticked all other events Video los...

Страница 46: ...ess ENTER to accept the value or RETURN to cancel To change a tick box setting press ENTER to toggle on or off FROM TO Start and end time to backup CHANNEL Video and audio for any channel can be inclu...

Страница 47: ...on the backup media the END TIME of the archive set is reduced accordingly The MODIFIED SIZE is the final file size of the archive set Select OK and press ENTER to begin the archive process Once extra...

Страница 48: ...of the DVR including control of PTZ cameras In addition playback remote setup audio talkback local backup and remote alarm triggering can all be achieved Client Software Installation Insert the CD sup...

Страница 49: ...Two icons are created on the PC desktop Remote Agent is the main software package Backup Player is the software to view archive footage from the DVR To begin using the remote client software double cl...

Страница 50: ...playback SETUP button to configure DVR connections DVR SETUP button to adjust DVR settings remotely DROP DOWN LIST to select a DVR connection CONNECT button DISCONNECT button DISPLAY button to choose...

Страница 51: ...e or check the setting DVR SETUP Button Entering the connected DVR to change or check the setting DROP DOWN LIST Select the group to connect CONNECT Button Connect DVR DISCONNECT Button Disconnect DVR...

Страница 52: ...s Each connection group can consist of up to 4 DVRs To create a connection group click the SETUP button to display the Local configuration screen In the Group window on the left right click Site and c...

Страница 53: ...tion To ignore certain channels leave the drop down as x In this case only channels 1 4 from the selected DVR will be displayed Note only one instance of each channel can be selected Each connection g...

Страница 54: ...roup simply repeat the steps from the previous page in Enter DVR details To create another connection group repeat the steps from the previous page in Create a connection group During operation only o...

Страница 55: ...Mode Define the sequence time between each channel when in sequence mode Also determines the full screen popup time when an alarm is triggered on the DVR Video Display For best results leave Quality...

Страница 56: ...s BACKUP PLAYER EXECUTE button Execute the backup player PRINT Button Can print current image EVENT VIEWER Button Can see all event records CAMERA SELECTION Button Can select camera number QUICK SEARC...

Страница 57: ...lar time segment whilst blue blocks indicate no footage Choose the required date by selecting and then adjusting the date value using the up and down arrows As different dates are selected the TIMELIN...

Страница 58: ...ect All will highlight all available channels including audio for archiving Click OK to begin archiving data to the PC hard drive STILL SHOT During playback a still image can be save to the local PC h...

Страница 59: ...nd End time Select which events to include in the search and click Search The event log for the selected time period is displayed Select an event click Go to timeline and then click OK Click to begin...

Страница 60: ...PRINT During playback a still image can be printed on the local PC printer by clicking the PRINT button The printed image is in the same style as the currently selected screen display for example qua...

Страница 61: ...Operations Schedule Mode Select Weekly or Daily Pre Event Recording Time Record image including setting time before event happened 0 5 Second Post Event Recording Time Record image including setting...

Страница 62: ...the PTZ camera address Protocol Baud rate and Properties for detail setup Motion Area Setup the motion sensitive and motion area SOUND Live Audio Setup Live Audio On Off Audio Monitoring Channel Selec...

Страница 63: ...en HDD got a problem Buzzer out Check the Buzzer out event Alarm Video loss Motion Operation Select the buzzer On Off for buzzer sound HDD Event Select Buzzer On Off for Buzzer when HDD happened any e...

Страница 64: ...ystem information Mail Type the SMTP server name information and user ID password to use E mail notification Users Add or delete any user Network Speed Select the network speed Disk Overwrite Select t...

Страница 65: ...URL of the DVR in the Internet Explorer Address Bar A dialog will appear to confirm download of an ActiveX control Please click Confirm or Continue Web Client Window will appear in Internet Explorer...

Страница 66: ......

Страница 67: ......

Страница 68: ......

Отзывы: