42
EN
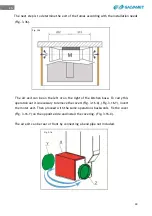
Before fixing the induction hob, glue the foam gasket included on the inferior part of the
glass.
Caution! It is forbidden to install the hob without the foam gasket!
Remove the protective film and glue the gasket at 2mm distance from the glass edge
(A=2mm), the gasket must be attached along the entire length and should not overlap at
the corners (Fig.3.10).
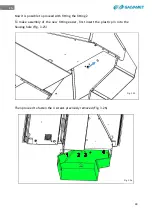
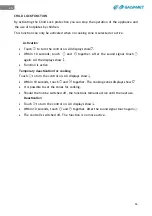
Lay in the silicone sealant flush at the hole (Fig. 3.11), place the induction hob (Fig.3.12)
Fig. 3.10
Fig. 3.11
Fig. 3.12
Содержание KompaKOne
Страница 1: ...IT KompaKOne ISTRUZIONI PER L USO E LA MANUTENZIONE 230 240Vac 50Hz 395 479 6 ...
Страница 2: ...2 IT ...
Страница 75: ...75 IT ...
Страница 77: ...EN KompaKOne INSTALLATION OPERATING AND MAINTENANCE GUIDE 230 240Vac 50Hz 395 480 6 ...
Страница 78: ...2 EN ...
Страница 153: ...DE KompaKOne BEDIENUNGS UND WARTUNGSANLEITUNG 230 240Vac 50Hz 395 481 6 ...
Страница 154: ...2 DE ...
Страница 227: ...75 DE ...
Страница 229: ...ES KompaKOne INSTRUCCIONES DE USO Y MANTENIMIENTO 230 240Vac 50Hz 395 482 6 ...
Страница 230: ...2 ES ...
Страница 256: ...28 ES Fig 3 19 ...
Страница 267: ...39 ES Luego proceda a apretar los 4 tornillos previamente extraídos Fig 3 26 Fig 3 26 Fig 3 25 ...
Страница 305: ...FR KompaKOne MANUEL D EMPLOI ET D ENTRETIEN 230 240Vac 50Hz 395 497 6 ...
Страница 306: ...2 FR ...
Страница 379: ...75 FR ...


