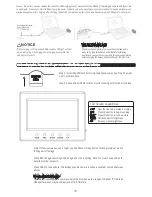
Galaxy SEEKER Скачать руководство пользователя страница 3

MICRO SD

CARD

LCD Screen Capabilities

VIEW

REC

SNAP

DOWN

UP

View the videos & pictures in memory

Press this button to begin recording

Press this button to take a picture

Decrease monitor brightness

Increase monitor brightness

USING THE ONBOARD CAMERA & LCD MONITOR • USE THE MONITOR FOR RECORDING VIDEO & TAKING PICTURES

NOTICE

The Galaxy Seeker battery comes partially charged and is 

ready to fly. Skip to Remote Control Battery Installation 

section and use your Seeker now. Use this charge completely 

before charging the Galaxy Seeker battery for the first time. 
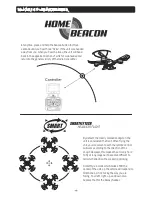
WE RECOMMEND!

When charging with the included USB cable the LED light will light 

up red, indicating it is charging. Once charging is complete, the 

LED light will turn off.

Step 3: While powered on and in flight, use the Photo or Video button to take pictures or create 

thrilling aerial footage. 

Press REC to begin recording and REC again to stop recording. Note: You must have an SD card 

installed in order to record. 

Press SNAP to take a photo. The Eclipse onboard camera requires a couple of seconds between 

photos.

Optimal Video Performance

The Galaxy Seeker’s built-in camera will provide live video up to a range of 164 feet (50 meters).

Video performance may become erratic after 50 meters. 

Step 1: Install MicroSD card by turning the Eclipse over and setting it down on 

a soft, stable surface. 

Step 2: Slide a MicroSD card into the monitor housing until it clicks into place. 

Connect the battery’s power cable to the end of the USB charging cable. Then connect the USB end of the charging cable to a USB port like 

on a computer. Please note: Not all USB ports provide power. Typically, only ports mounted on a computer and not through a peripheral will 

provide enough power for charging. After charging the battery, charge the monitor in the same manner using the USB cable for the monitor. 

Rechargeable Lithium 

Polymer Battery

3.7V / 700 mAh

Содержание SEEKER

Страница 1: ...WER SWITCH 1 360º FLIP Press once 2 INITIATE HOMEBEACON PRESS HOLD FOR 3 SECONDS see page 4 for details SIDE TRIM DIRECTION CONTROL STICK FORWARDS BACKWARDS TRIM THROTTLE STICK POWER LED 1 SPEED SETTING 2 INITIATE SMARTFLY PRESS HOLD FOR 3 SECONDS see page 4 for details Thank you for your purchase of the Galaxy Seeker Quadcopter You re just moments away from creating stunning aerial acrobatics ...

Страница 2: ...tic round tabs into the holes on each rotor arm Firmly tighten the screws in place making sure that the X Guards are facing out and that the center bar of the guard is lined up with the arm of the rotor 1 Locate the battery underneat the unit Carefully disconnect the power cable underneath the Galaxy Seeker as shown in the photo Do not pull the battery by the wires as the wires may break off of th...

Страница 3: ...otage Press REC to begin recording and REC again to stop recording Note You must have an SD card installed in order to record Press SNAP to take a photo The Eclipse onboard camera requires a couple of seconds between photos Optimal Video Performance The Galaxy Seeker s built in camera will provide live video up to a range of 164 feet 50 meters Video performance may become erratic after 50 meters S...

Страница 4: ...laxy Seeker go lower in altitude Use the right stick Directional Stick to turn left right move forward or backward Normally the Galaxy Seeker s front is the cockpit Pressing Right or Left on the Throttle stick will strafe in that direction according to the cockpit Up moves the Galaxy Seeker forward while Down moves it backwards 360º FLIP Press the 360 button once on the bottom right of the radio c...

Страница 5: ...ction the cockpit is pointing SmartFly is a mode which makes YOU the center of the unit so the vehicle will respond to directions as if it s facing the way you are facing Your left right up and down also become that for the Galaxy Seeker At anytime press and hold the beacon button for three seconds until you hear three Ticks If the unit was headed away from you when you hear the ticks the unit wil...

Страница 6: ...f there isn t any accurate control of the vehicle make sure of the following Make sure the radio control transmitter is set to the ON position Make sure the battery on the vehicle is installed correctly The vehicle may fly erratically if wind conditions are too strong Fly the vehicle under calm conditions Make sure the radio control transmitter has paired correctly with the vehicle If not power do...

Страница 7: ...be installed by an adult Manufacturers and dealers disclaim all responsibility for damage caused by misuse Keep hands hair and loose clothing away from rotors when powered on to to prevent damage to the vehicle or serious injury to oneself or others around The quadcopter should never be flown in high winds in excess of 5 MPH or near a pool Never leave the device unattended when being charged PREPA...

Страница 8: ...FL 33179 For Customer Service please email Care OdysseyToys com Please note the units model number and name in your email Extra Parts Available Visit Odyssey online to order Extra Batteries New rotor blades X Guard components Model no ODY 1810FPV Galaxy Seeker ...

Отзывы: