background image

 OPERATION OF AIR CONDITIONER 

12

Operation mode selection

1

1

6

6

When the unit is at standby state, press MODE button to change its operation modes 
in the order of:

Cooling

Dehumidifying 

Fan

Heating

Auto


Date/Time Setting

1

1

7

7

Timer Operation

1

1

8

8

At normal display page, press

TIME    

button to set the AUTO-ON timer and 

meanwhile the lamp           illuminates, while press

TIME    

button to set the 

AUTO-OFF timer and meanwhile the lamp           illuminates

At normal display page, press

TIME

button once to set the Date/Time and 

meanwhile the beeper raises Bi sound once; press the

TIME

button again to 

finish the setting and meanwhile the beeper raises Bi sound twice.

When setting the timers, press

TIME    

or

TIME    

to shift the setting items 

between timer parameter and timer date/time.          

When setting the timers, press

UP    

or

DOWN    

to change the values of  

timer parameter and timer date/time.          

Timer parameters: 
00: Invalid timer setting;   01: Valid single-timer;   02: Valid circulated timer.       

When setting the timers, press

TIME

button once to finish the timer setting, and 

meanwhile the beeper raises Bi sound twice.

Light Wave function selection

1

1

9

9

Содержание 18K

Страница 1: ...r Please read this OWNER S MANUAL carefully prior to using and keep it for further reference Safety Awareness Name of Parts Preparation Before Operation Operation of Air Conditioner Guide to Proper Us...

Страница 2: ...and understand thoroughly this safety awareness before use The items indicated here are very important safety precautions which must be followed SAFETY AWARENESS An earth leakage breaker with rated ca...

Страница 3: ...ck the air conditioner If you find one of the following symptoms please turn the breaker off quickly and call our authorised service centre for help The creepage switch always jumps to turn off The di...

Страница 4: ...HEAT A D E C F B The indoor display panel Emergency switch A Air inlet takes in the room air B Air outlet C Deflector adjust the outlet air direction D Filter E Panel F Remote controller SWING SWING...

Страница 5: ...it will be OK It sends signals to the indoor unit 1 2 3 4 5 Press it to change up down air flow direction and the deflector moves at a certain angle You can change the moving angle in the order of Sig...

Страница 6: ...metres directly in front of indoor unit If the remote controller does not work short the RESET pieces Handle remote controller carefully Do not drop throw and get it wet When the button is pressed ind...

Страница 7: ...controller The range of setting temperature is 16 31 Once the air conditioner starts operation it will sound beep once and the run indicator lamp is illuminated Air flow direction adjustment Air flow...

Страница 8: ...mote controller to cycle the mode in the following order In this mode press temperature adjustment button to set temperature press fan speed button to change the airflow speed of the indoor unit Press...

Страница 9: ...Meanwhile of starts to flash on the display Press button 3 Press button to set the AUTO ON OFF time The or will stop flashing on the remote controller display AUTO ON OFF timer operation cancellation...

Страница 10: ...ONTROLLER OPTIONAL LCD screen Remote signal receiving spot AUTO COOLING DEHUMIDIFYING FAN HEATING AUTO ON AUTO OFF MONTH DATE MINUTE HOUR LIGHT WAVE STERILIZATION ELECTRIC HEATER FAN SPEED SLEEP DEFRO...

Страница 11: ...ular shape sleeping between back cover and body turn wire controller into a certain angle then you can see it slot top click click LCD Screen Front Panel Put a flat screw driver into a slot unclench o...

Страница 12: ...Press FAN SPEED button to change the fan speed of indoor unit in the order of the grey part is flashing 1 1 1 2 2 3 3 1 4 4 Every press of UP button increases the setting temperature by 1 every press...

Страница 13: ...page press TIME button once to set the Date Time and meanwhile the beeper raises Bi sound once press the TIME button again to finish the setting and meanwhile the beeper raises Bi sound twice When set...

Страница 14: ...e if there are faults recorded At current fault inquiry page the lamp is flashing and the fault code is shown on the wire control At history fault inquiry page the lamp is on and the fault time fault...

Страница 15: ...the modification NO 10 11 12 13 09 14 02 01 15 Coil over heating protection in heating Compressor minimum standby time Compressor minimum running time Defrosting time Coil anti freezing protection in...

Страница 16: ...f the power supply and remove batteries from your remote control if the air conditioned is not being used for a period of time Once the power supply is switched on the air conditioner will consume ele...

Страница 17: ...e is twist or terminal lift up Check whether the air filters are appropriately mounted SERVICE AND MAINTENANCE 16 Cleaning of the indoor unit Wipe the indoor unit with a piece of dry clean cloth All t...

Страница 18: ...ce space of 50cm above 3 Obstacle 6 Panel Location of the outdoor unit Avoid direct sunshine Avoid strong wind Avoid places close to inflammable gas A place easy for conjunction with the power supply...

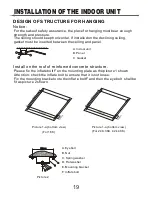
Страница 19: ...and its value may vary as the practical installation INSTALLATION OF THE INDOOR UNIT 18 Installing hanging hook 780 A 840 B 880 C 950 D 680 A 840 B 880 C 950 D 880 Ceiling Panel E 580 A 610 B 630 C 65...

Страница 20: ...Nut C Spring washer D Flat washer E Mounting bracket F Inflate bolt Notice For the sake of safety assurance the place for hanging must bear enough strength and pressure The ceiling should keep horizo...

Страница 21: ...iece A Eyebolt M10 B Ceiling inlaid board C Nut M10 D Insulation washer E Mounting piece F Washer H Screw tight after mounting I At least 30mm A A C C D D E E F F C C B B H H I I 110mm A A B B INSTALL...

Страница 22: ...indoor unit A The indoor unit B The ceiling inlaid board C Cardboard for measurement D Four screws with washer FIXATION OF THE INDOOR UNIT A A D D C C B B POSITION OF REFRIGERANT PIPE AND DRAIN PIPE...

Страница 23: ...with hands and then tighten it with a wrench When tightening the nuts with wrench apply torque according to the right list if it is not tightened enough leakage of refrigeration agent may happen but...

Страница 24: ...one way A B C D E F A 20M at most B Drain pipe C The indoor unit D Insulation material 9mm or above E Inclination angle of 1 100 or above F Electric cable slot tube PIPELINE INSTALLATION 23 Supplement...

Страница 25: ...ction setting Communication mode DIP1 DIP2 OFF ON OFF ON 1 2 Setting items Consequence ON No 1 2 Model Setting light wave generator or crankcase heater DIP1 DIP2 DIP3 DIP4 OFF 18K 24K 36K 42K 48K Equi...

Страница 26: ...unit and outdoor unit should be properly connected to earth Environment conditions should be taken into account ambient temperature direct sunshine The wire dimensions are minimum values for metal cor...

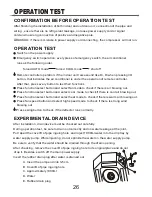
Страница 27: ...t button and select cool mode to check if there is cool air blowing out Press function select button and select heat mode to check if there is warm air blowing out Press fan speed button and select hi...

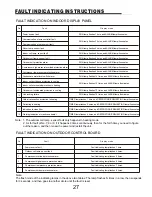
Страница 28: ...emp sensor fault Compressor high pressure overload protection alarm Compressor low pressure protection alarm Condensate water level switch alarm 6 7 8 9 10 Indoor coil anti freeze protection in coolin...

Страница 29: ...onnected Indoor unit and outdoor unit are out of communication Find the reason then correct the wiring Connect the wire control firmly Contact local service center Cut off power supply check whether t...

Страница 30: ...and then connect A section to the liquid pipe of the indoor unit and connect B section to the connecting pipe 2 After installing the throttle device and verifying there is no leakage then use a dampin...

Отзывы: