background image

Pub. 42004-456B 

Model 352-701 and 352-703 Division 1 VoIP Telephones 

Page 12 of 20 

e:\standard ioms - current release\42004 instr. manuals\42004-456b.doc 
01/14 

Attach the Front Cover 

After all adjustments have been completed, inspect and clean the machined flange joint surfaces of both 
the cover and box.  Surfaces must be smooth, free of nicks, scratches dirt or any foreign particle build-up 
that would prevent a proper seal.  Surfaces must seat fully against each other to provide a proper 
explosion-proof joint.  Clean surfaces by wiping with a clean lint-free cloth. 

Apply a light coat of Killark “LUBG” lubricant to flange surfaces and close the cover.  Install and tighten 
all cover bolts to 30 ft-lbs.  Make certain no cover bolts are omitted.  Use only those bolts supplied with 
the enclosure. 

N

OTE

:

  Refer to the Killark Installation, Operation, and Maintenance Data Sheet enclosed with the unit 

for additional information. 

External Controls 

Handset Receiver Volume Control 

A push-button switch has been provided on the front cover of the telephone for adjustment of the handset 
receiver volume.  The receiver volume adjustment operates as follows: 


The initial direction of the volume (increase or decrease) is determined by prior activity.  The initial 
direction will be opposite of the previous activity. 


Changing the direction is accomplished by allowing a period of inactivity (greater than 1 second). 

Example – Increasing Volume:  Depress the volume switch.  If the receiver volume begins to decrease, 
wait at least 1 second and depress the volume switch again.  The volume will begin to increase.  When the 
desired volume is achieved, do not depress the switch. 

Maximum (Handset Receiver) Level Remote Control 

The receiver volume level can be controlled remotely by changing the setting in the configuration file.  
Refer to the “Handset Volume Setting in the Audio Setting” section in Pub. 42004-396 for programming 
instructions. 

N

OTE

:

 The handset receiver volume setting using PB1 should be set for the maximum volume (factory 

default) prior to adjusting the volume remotely. 

Содержание 352-701

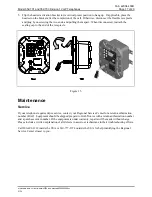
Страница 1: ...et and dial the desired telephone number GAI Tronics VoIP Telephones are designed for connection to a 10 100 BaseT Ethernet and operate from either Power over Ethernet or an external power source The...

Страница 2: ...ions about VoIP in general see http www fcc gov cgb consumerfacts voip html Features and Functions GAI Tronics VoIP telephones include the following features SIP compatible RFC3261 Real time alarm rep...

Страница 3: ...UBG lubricant to flange surfaces and close the cover Install and tighten all cover bolts to 30 ft lbs Make certain no cover bolts are omitted Use only those bolts supplied with the enclosure When inst...

Страница 4: ...tions Refer to Figure 2 The suggested mounting height is 48 inches to the bottom of the enclosure NOTE Refer to the Killark Installation Operation and Maintenance Data Sheet enclosed with the unit for...

Страница 5: ...01 contains a handset with an approved cable gland standard keypad volume control button and applicable approval labeling The handset rests on a cradle which has a magnetic reed switch to signal an of...

Страница 6: ...d ioms current release 42004 instr manuals 42004 456b doc 01 14 For the Model 352 703 Division 1 VoIP Telephone with the headset option the cradle and handset are replaced with a removable headset and...

Страница 7: ...ones Page 7 of 20 e standard ioms current release 42004 instr manuals 42004 456b doc 01 14 Internal All standard components are mounted to the rear of the front cover See Figure 6 for the parts layout...

Страница 8: ...e supporting the front cover remove the ten cover bolts on the enclosure flange Pull the front cover far enough away to expose the internal connections Place the front cover aside 2 Plug the incoming...

Страница 9: ...A removable terminal block P5 has been provided for connection of local power to the telephone Connect the positive conductor to the terminal and the negative conductor to the terminal of P5 Connecti...

Страница 10: ...utput 1 is a single pole single throw contact Output 2 is a single pole double throw contact The function of each output is configurable Outputs can be configured for one of the following modes On Off...

Страница 11: ...conductor No 22 AWG is typical Inputs Two conductor No 22 AWG is typical Output contacts Two or three conductor No 18 AWG is typical Speaker Two or three conductor No 18 AWG is typical Status Indicat...

Страница 12: ...nal Controls HandsetReceiverVolumeControl A push button switch has been provided on the front cover of the telephone for adjustment of the handset receiver volume The receiver volume adjustment operat...

Страница 13: ...tended location 5 Installation Provide telephone connections and cabling to the network at the intended location 6 Final configuration can also be done prior to installation Set the autodial numbers e...

Страница 14: ...pages held within the telephone can be accessed over the network using a browser such as Internet Explorer to view and change settings within a single unit Configuration files are ASCII text files co...

Страница 15: ...4 456b doc 01 14 Operation Model 352 701 Handset Operation 1 Lift the handset to place a call 2 The handset receiver volume control located on the front cover keypad can be adjusted to the desired lev...

Страница 16: ...See Figure 14 Figure 14 2 To place a call remove the headset from the headset activation bracket and flip the headset bracket forward to its preset position 3 The handset receiver volume control which...

Страница 17: ...nected reattach the sealing cap to the end of the receptacle Figure 15 Maintenance Service If your telephone requires depot service contact your Regional Service Center for a return authorization numb...

Страница 18: ...utton on the front panel NOTE There is no external speaker adjustment Front panel push buttons are not operational Verify the push buttons are properly configured Inputs not operational Check the inpu...

Страница 19: ...50 V ac 30 V dc resistive load Controls External Push button volume control Internal Mic bias reset switch handset enable Indicators Internal Power Heartbeat EACT LEDs Codecs and audio G 711 A Law G 7...

Страница 20: ...ed Hazardous locations Class I Division 1 Groups B C D USA and Canada Class II Division 1 Groups F G Class III Division 1 Type 4X T6 Gas T4A Dust User Instructions USA This equipment has been tested a...

Страница 21: ...of the Contractor s personnel from the work site Re performance of services shall be Buyer s sole and exclusive remedy and in no event shall GAI Tronics warranty obligations with respect to services e...

Отзывы: