


en
Home Connect
24
a
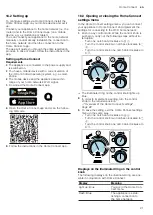
Once the illuminated ring around the control knob
lights up green, the appliance is available in the app
on the mobile device.
a
lights up.
a
If the illuminated ring around the control knob lights
up red, it was not possible to establish a connec-
tion.
4.
To save the connection, exit the Home Connect set-
tings menu.
→
"Opening or closing the Home Connect settings
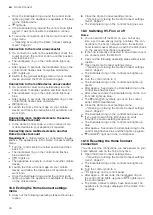
Connection to the router unsuccessful
1.
If a connection could not be established, check the
router and turn the control knob to another position
and then back to 1.
a
The illuminated ring on the control knob lights up
blue.
a
After approx. 5 seconds, the illuminated ring on the
control knob flashes blue and yellow alternately.
a
lights up.
2.
Switch to the general settings menu of your mobile
device and start the Wi-Fi connection again.
Connection to the mobile device unsuccessful
1.
If a connection could not be established, turn the
control knob to another position and then back to 1.
a
The illuminated ring on the control knob lights up
blue.
a
After approx. 5 seconds, the illuminated ring on the
control knob flashes blue and white.
a
lights up.
2.
Launch the Home Connect app on your mobile
device and follow the instructions for automatic net-
work login.
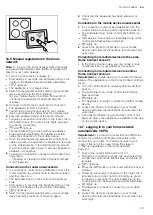
Connecting more mobile devices to the same
Home Connect account
▶
In the Home Connect app, you can connect more
mobile devices to your appliance if required.
Connecting more mobile devices to another
Home Connect account
Requirement:
A mobile device is connected to the ap-
pliance. The appliance is in the Home Connect settings
menu.
1.
Turn the control knob to another position and then
back to 1.
a
The illuminated ring on the control knob flashes
blue and white.
a
lights up.
a
The appliance is ready to connect to another mobile
device.
2.
Launch the Home Connect app on your mobile
device and follow the instructions for automatic net-
work login.
a
Once the illuminated ring around the control knob
lights up green, the appliance is available in the app
on the mobile device.
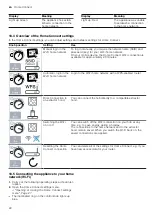
18.8 Exiting the Home Connect settings
menu
1.
Carry out the following operating steps without inter-
ruption.
2.
Close the Home Connect settings menu.
→
"Opening or closing the Home Connect settings
a
The illuminated ring on the control knob goes out.
18.9 Switching Wi-Fi on or off
Notes
¡
You can switch off the Wi-Fi on your hob at any
time, e.g. to save energy during a holiday. The con-
nections to the home network and to the extractor
hood remain saved. When you switch the Wi-Fi back
on, the saved connections are applied.
¡
If the hob is directly connected to an extractor hood,
you cannot switch the Wi-Fi off.
1.
Carry out the following operating steps without inter-
ruption.
2.
Open the Home Connect settings menu.
→
"Opening or closing the Home Connect settings
a
The illuminated ring on the control knob lights up
blue.
3.
Turn the control knob to 3.
a
The illuminated ring on the control knob lights up
green.
a
After approx. 5 seconds, the illuminated ring on the
control knob flashes blue.
a
After a few seconds, the illuminated ring on the con-
trol knob lights up blue.
a
The
and symbols go out on the control
panel. WiFi is deactivated.
4.
Close the Home Connect settings menu.
→
"Opening or closing the Home Connect settings
a
The illuminated ring on the control knob goes out.
5.
If you want to switch the Wi-Fi back on, work
through the same operating sequence.
a
The illuminated ring on the control knob lights up
blue.
a
After approx. 5 seconds, the illuminated ring on the
control knob flashes blue and then lights up green.
a
and light up on the control panel.
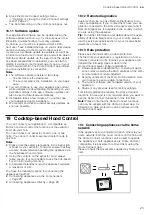
18.10 Resetting the Home Connect
connection
You can reset the connections you have saved on your
home network and on the hob at any time.
1.
Open the Home Connect settings menu.
→
"Opening or closing the Home Connect settings
a
The illuminated ring on the control knob lights up
blue.
2.
Turn the control knob to 4.
a
lights up on the control panel.
a
After approx. 30 seconds, the illuminated ring on
the control knob lights up green. lights up on
the control panel.
a
The Home Connect settings have been reset. The
appliance is no longer displayed in the Home Con-
nect app.
Содержание VI482105
Страница 1: ...en User manual and installation instructions VI482105 Induction hob Gaggenau...
Страница 2: ...2 A B 1 1 2200 W 3700 W 3300 W 3700 W 2600 W 3700 W 3300 W 3700 W 1 IEC 60335 2 6...
Страница 42: ......
Страница 43: ......