background image

Important Notes

Please observe the 

general safety notes

and the

important information

in chapter 1.

The

installing technician 

is responsible for

perfect functioning of the appliance at its installa -
tion location.
He must show the user how to switch off the
electricity and gas supply whenever required.

After unpacking, check the appliance for any
transportation damage and report this immediately
to the transportation company.

Note: Operation next to a downdraught
ventilator VL 430/431 is not allowed.

Caution:

before connecting the appliance, please check
whether the

local connection conditions

such as

gas type, gas pressure and mains voltage match the
appliance settings. This gas hob conforms to the
categories that are specified on the 

rating plate

.

The rating plate can be found on the appliance and
additionally on the quality control slip which is
included with these instructions. By replacing
nozzles, it is possible to set the appliance to any
gas listed on the rating plate.
If the data should not match, the appliance must 
be changed over to the required gas type and the
available pressure.
As this gas hob is not intended for connection to an
exhaust gas system, pay attention to the applicable
installation conditions.

The appliance may be installed in kitchen
combinations made of wood or similar combustible
materials without taking additional measures. 
The rear wall must consist of non-combustible
material. 

A minimum distance of 

100 mm

from heat-sensitive

items of furnishing or contact surfaces (cupboard
side panel) must be observed.

The hob conforms to appliance class 3 and must be
installed in the worktop as shown in the installation
sketch.

Do not install the appliance under a suspended
cupboard. For installation under a vapour extractor,
a minimum clearance of

650 mm 

from the top edge

of the pot stand to the bottom edge of the wall hood
must be observed. If several gas appliances are
installed, a larger distance from the extractor hood
might be needed. 
Observe the installation manual of the extractor
hood. Wall trims must be heat-resistant, and the
minimum distance between the hob and the wall
trim is at least 

35 mm

.

The appliance must be installed and connected by
an authorised gas installer. The installation must
conform with all current regulations of the gas
supply companies and the regional construction
regulations. 

Technical modifications reserved.

17

12. Installation Instructions

Содержание VG 441-110

Страница 1: ...Operation Maintenance and Installation Manual VG 441 110 110F VG 441 210 Gas Wok ...

Страница 2: ......

Страница 3: ... Page 7 5 Settings Table Page 8 6 Cookware Recommendations Page 9 7 Wok Cookware Recommendations Page 10 8 Cleaning and Care Page 11 12 9 Maintenance Page 13 10 Visual signals Page 14 11 Technical Data Nozzle Table Page 15 16 12 Installation Instructions Page 17 23 Important Notes on Installation Page 17 Connecting the Appliance Page 18 Preparing the Cabinet Page 19 Installing the Control Panel Pa...

Страница 4: ...ersonal safety and the lasting value of your appliance Keep the instruction manual near your appliance for further reference You will find notes on Page 3 that you ought to observe before operating the appliance for the first time The chapters entitled Features and Operation tell you all about what your appliance can do and how you operate it The chapter entitled Cleaning and Care gives tips on ho...

Страница 5: ...t supervision Technical modifications reserved Operating for the First Time Remove the packaging from the appliance and dispose of it according to local regulations Be careful to remove all accessories from the packaging Keep packaging elements and plastic bags away from children This appliance is labelled in accordance with the European Directive 2002 96 EG concerning used electrical and electron...

Страница 6: ...ldren to play with the appliance Do not let adults or children operate the appliance unsupervised if they are mentally or physically unable to use the appliance safely and correctly if they don t have the knowledge and experience to use the appliance safely and correctly Pots with a diameter of less than 160 mm or more than 320 mm should not be used When using large pots pay attention to keeping t...

Страница 7: ...g Cooking levels 1 12 1 Burner head cover 2 Burner ring 3 Burner head 4 Electrode for automatic ignition 4 Heat sensor for flame detection and flame control You can order the following special accessory VV 400 000 Connecting trim VD 400 000 Appliance cover the pot grid must be removed in order to close the appliance cover 5 2 Features 1 2 3 2 1 3 4 5 ...

Страница 8: ...G 441 210 6 0 kW referred to Hs gross calorific value 5 4 kW referred to Hi calorific value LPG propane VG441 110 110F 5 0 kW referred to Hs gross calorific value 4 5 kW referred to Hi calorific value The specified rated load is defined by installation of the fixed nozzles The gas hob is converted to a different gas type by nozzle replacement full burning nozzle see nozzle table on page 15 16 Simm...

Страница 9: ...tomatically after 10 seconds Turn the control knob to the OFF position After the appliance has cooled down sufficiently check if all the burner parts have been assembled correctly Check if the burner the heat sensor or the electrode have been soiled Switching off Fully turn the control knob to the OFF position The electronics of the appliance switch the gas supply off Safety Deactivation The appli...

Страница 10: ...bles soup casserole Thawing Frozen foods Braising Rolled beef steaks roasts Stewing Vegetables 2 4 Boiling with closed lid Soup vegetables Simmering 1 Slow cooking Rice milk rice cereal Simmering Melting Choccolate butter Keeping warm Switch to the high setting in order to reach the required temperature quickly Then switch back to a lower setting The values given above must be looked upon as recom...

Страница 11: ...handles Use pots and pans with a thick base because heat distribution is particularly improved in the low setting Using the correct size of pots and pans for the burner ensures improved cooking performance and energy efficiency To ensure an even distribution of heat center the pot above the burner The flames should be covered by the pot base Place the pot or pan securely and level on the pot grid ...

Страница 12: ... cut into small pieces are cooked as briefly as possible under strong heat and constant stirring In the large round pan everything can be stirred and turned faster and with greater ease than in a conventional frying pan Thanks to stirring ingredients do not burn onto the pan Surplus oil drains off towards the middle In next to no time you obtain delicious roasted foods the pores in meat close and ...

Страница 13: ... very little water to clean your cooktop Be careful that no water enters the burner base As the result of heat development slight dis coloration can appear on the stainless steel surface Do not attempt to scrape away such discoloration This damages the surface Distribute stainless steel care agents uniformly and thinly on the hob This will ensure an even surface and will keep your hob in a good co...

Страница 14: ...e direction shot blasted little detergent solution of the polish lines brushed After cleaning polish dry with a Light discolorations may form if the soft cloth to prevent water stains natural oxidation is removed together forming on the surface with the soiling Put some commercially For heavy soiling you can order available stainless steel polish on a cloth our stainless steel cleaner Order and po...

Страница 15: ...k whether the gas and electricity supplies are in proper working order The cooktop cannot be used during a power failure If the cooktop is being used when the power failure occurs the appliance automatically shuts off the gas supply The cooktop will not turn back on after a power failure A signal is sounded Turn the control knob to the OFF position Then you can operate the appliance as usual Befor...

Страница 16: ...to 0 Disconnect the appliance from the electricity for a few minutes Call after sales service if flashing persists after connecting the appliance again lights OFF although faulty installation Connecting cable between the appliance is switched appliance and the control panel on Appliance does is not plugged in Check that cable not function is plugged in firmly Note When connected or reconnected to ...

Страница 17: ...H CZ DK AT CH DE DE DK ES FI ES FI FR GB FR GB GR HU GR HU IE IS IE IS IT LU NL IT LU NO PL PL PT RU SE PT RU Gas family Natural gas Natural gas LPG Propane LPG Prop Gas type H E L G 20 25 LL G 25 3 G30 31 G30 31 Pressure 20 25 mbar 20 mbar 28 30 37 mbar 50 mbar Nozzle full burn outer 1 73 1 85 A 1 00 0 87 Nozzle full burn inner 0 58 0 63 0 37 0 33 DIP switch on control panel Air gap adjustm outer...

Страница 18: ...ncy 50 60 Hz Technical modifications reserved 16 Countries BE CH CZ DK AT CH DE ES FI FR GB GR HU IE IS IT LU NO PL PT RU Gas family LPG Propane LPG Prop Gas type 3 G30 31 G30 31 Pressure 28 30 37 mbar 50 mbar Nozzle full burn outer 1 00 0 87 Nozzle full burn inner 0 37 0 33 DIP switch on control panel Air gap adjustm outer mm 0 2 Air gap adjustm inner mm Total output 5 kW 5 kW Total consumption 3...

Страница 19: ...s gas hob is not intended for connection to an exhaust gas system pay attention to the applicable installation conditions The appliance may be installed in kitchen combinations made of wood or similar combustible materials without taking additional measures The rear wall must consist of non combustible material A minimum distance of 100 mm from heat sensitive items of furnishing or contact surface...

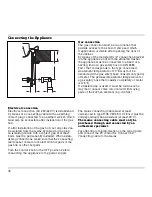
Страница 20: ...ble is visible after opening the door of the cabinet By means of the included R 1 2 connection bracket on the appliance end with the affiliated washer the appliance must be connected to a fixed con necting line or a gas safety hose to DIN 3383 Part 1 that corresponds to the type concerned An ambient temperature of 70 K must not be exceeded if the gas safety hose consists only partly of metal The p...

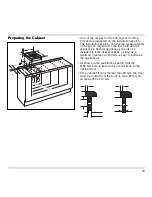
Страница 21: ... appliances can also be installed in individual recesses as long as a minimum clearance of 50 mm is kept to between the appliances As shown in the installation sketch drill the Ø 35 mm hole to secure the control knob in the cabinet front If the cabinet front is thicker than 26 mm the front must be routed from the back to max 26 mm on an area of 80 x 310 mm 19 1575 1170 360 45 380 490 min 50 min 35...

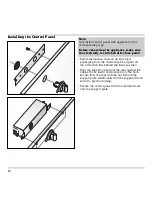
Страница 22: ...st the cabinet front insert control knob into the hole secure from the rear with the nut Secure the support plate additionally with the supplied wood screw to prevent turning Secure the control panel with the included nuts onto the support plate Note only install control panel with appliance of the corresponding type Before connecting the appliance make sure the electricity is switched off at fuse...

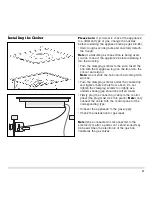
Страница 23: ... align it Note do not stick the hob onto the worktop with silicone Turn the clamping screws under the countertop and tighten them evenly from above Do not tighten the clamping screws too tightly as a uniform sealing gap should be left all round Firmly plug the connecting cable in the control panel the plug must lock into place Note only connect the cable with the control panel of the corresponding...

Страница 24: ...e set are available as a conversion kit Please specify the appliance type and the required gas type The nozzles can be changed on the installed appliance Loads for all gases For all gas types and pressures the rated load is achieved by installing the high setting nozzles for the required gas type The low setting is adjusted with the DIP switch on the bottom of the control panel Please refer to the...

Страница 25: ...upply lines Change the screw in nozzle and tighten it firmly Push the burners onto the supply lines Push the safety springs back on Screw the burner back on the trough Loosen the locking screw and adjust the air regulation bush according to the nozzle table Tighten the locking screw Fit the trough and tighten it firmly Checking functions The flames are adjusted correctly if no yellow tips are visi...

Страница 26: ......

Страница 27: ......

Страница 28: ...GAGGENAU HAUSGERÄTE GMBH CARL WERY STR 34 D 81739 MÜNCHEN Y 089 45 90 03 FAX 089 45 90 23 47 www gaggenau com 9000467381 en 9001 EB ...

Отзывы: