3
en-us
Before you begin
IMPORTANT:
The instructions in this document are for mounting the
control knobs only. A safe operation of the control knobs
is only possible, if the installation instructions are
followed exactly.
Before you install the control knobs you must read and
understand the Installation Instructions and Safety
Instructions for your gas cooktop.
9
WARNING
Risk of burns!
Do not install the control knobs behind the
cooktop. This might force you to reach over fire or
steam and cause injury.
9
WARNING
Risk of injury!
Follow the safety instructions in the manual for the
relevant appliance.
Tools and Parts Needed
▯
Phillips Head Screwdriver
▯
Pencil
▯
Drill with 2" (50 mm) bit
▯
Tape Measure
Note:
Additional materials may be necessary for
installation in solid surface countertops. Contact the
countertop manufacturer.
Parts included
Additional connection cables (optional)
Additional connection cables can be ordered if required.
▯
1 ft (0.3 m) D-Bus cable (article no. 12013604)
▯
3.2 ft (1 m) D-Bus cable (article no. 12013606)
▯
5 ft (1.5 m) D-Bus cable (article no. 12013607)
Содержание Vario 400 Series
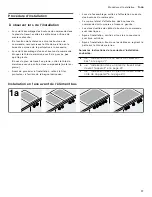
Страница 6: ...6 en us Installation Procedure D PLQ RSW PD 5 PP PLQ...
Страница 7: ...7 Installation Procedure en us D PP...
Страница 8: ...8 en us Installation Procedure Installation in the countertop in front of the appliance E...
Страница 9: ...9 Installation Procedure en us E PLQ RSW PD PP 5 PLQ PLQ PP...
Страница 10: ...10 en us Installation Procedure E PP...
Страница 11: ...11 Installation Procedure en us Installation in the countertop next to the appliance F...
Страница 12: ...12 en us Installation Procedure F PLQ RSW PD 0 250 PP PLQ PLQ 5 PP...
Страница 13: ...13 Installation Procedure en us F...
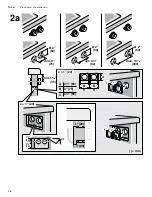
Страница 18: ...18 fr ca Proc dure d installation D PLQ RSW PD 5 PP PLQ...
Страница 19: ...19 Proc dure d installation fr ca D PP...
Страница 20: ...20 fr ca Proc dure d installation Installation dans un plan de travail situ devant l appareil E...
Страница 21: ...21 Proc dure d installation fr ca E PLQ RSW PD PP 5 PLQ PLQ PP...
Страница 22: ...22 fr ca Proc dure d installation E PP...
Страница 23: ...23 Proc dure d installation fr ca Installation dans un plan de travail situ c t de l appareil F...
Страница 24: ...24 fr ca Proc dure d installation F PLQ RSW PD 0 250 PP PLQ PLQ 5 PP...
Страница 25: ...25 Proc dure d installation fr ca F...
Страница 30: ...30 es mx Procedimiento de instalaci n D PLQ RSW PD 5 PP PLQ...
Страница 31: ...31 Procedimiento de instalaci n es mx D PP...
Страница 32: ...32 es mx Procedimiento de instalaci n Colocaci n en cubierta delante del electrodom stico E...
Страница 33: ...33 Procedimiento de instalaci n es mx E PLQ RSW PD PP 5 PLQ PLQ PP...
Страница 34: ...34 es mx Procedimiento de instalaci n E PP...
Страница 35: ...35 Procedimiento de instalaci n es mx Colocaci n en cubierta junto al electrodom stico F...
Страница 36: ...36 es mx Procedimiento de instalaci n F PLQ RSW PD 0 250 PP PLQ PLQ 5 PP...
Страница 37: ...37 Procedimiento de instalaci n es mx F...
Страница 38: ......
Страница 39: ......


