Gaggenau DI 230-130 Скачать руководство пользователя страница 13

aus

13

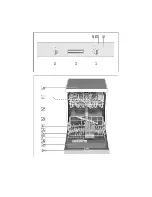
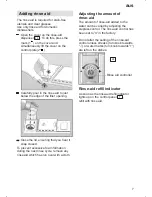
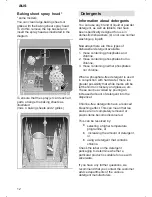
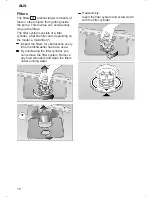
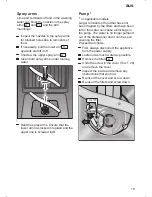
Detergent compartment with
measuring marks

The side of the detergent compartment is
marked with lines to help you determine
how much powder to add.
The capacity of the detergent container is
15 ml up to the bottom line and 25 ml up to
the middle line. When the compartment is
full it contains 40 ml.

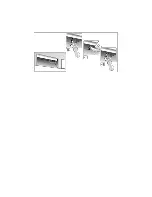
If the detergent dispenser 

29

 is still

closed, press the lock 

27

 to open the

detergent dispenser.

Adding detergent

Fill the dispenser 

29

 with detergent.

Please observe the manufacturer’s
instructions printed on the detergent
packaging when determining the
correct dosage.

Important

Due to the different solvency properties of
the detergent tablets supplied by various
manufacturers, the cleaning efficiency of
the detergent may not be fully utilised by
short programmes. It is recommended to
use washing powder for these
programmes.

If using the “Intensive” programme
(some models), also pour approx.
10–15 ml of detergent onto
the appliance door. If using tablets,
also place a tablet on the appliance
door.

 Reduce costs!

If your dishes are only moderately dirty,
you may be able to use less detergent
than recommended.

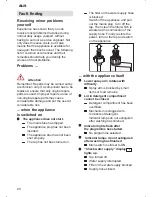
Close the lid on the detergent
compartment.
Press down the lid (1) until it clicks
shut (2).

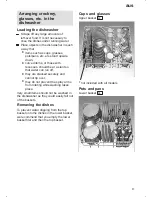
If you are using detergent in tablet form,
read the manufacturer’s
recommendations on the packaging in
order to 
determine where the tablets should be
placed inside the dishwasher (e.g. in
cutlery basket, detergent compartment,
etc.).
Make sure that the lid on the detergent
compartment is closed, even if you are
using tablets.

Содержание DI 230-130

Страница 1: ......

Страница 2: ......

Страница 3: ...dding rinse aid 7 Not suitable for the dishwasher 8 Arranging crockery glasses etc in the dishwasher 9 Detergents 12 Programme overview 15 Washing dishes 16 Maintenance and care 17 Fault finding 20 Cu...

Страница 4: ...always be installed under a continuous work surface which is attached to the adjacent cupboards in order to ensure that the appliance is entirely stable After the appliance has been installed the main...

Страница 5: ...e level ensure when opening and closing the door that children are not caught or crushed between the appliance door and the cupboard door situated below Child proof lock some models Comply with the dr...

Страница 6: ...ramme sequence display 6 End of programme display 7 Rinse aid refill indicator Appliance interior 20 Upper basket with 2 tiered cup rack 21 Additional cutlery basket for the top basket 22 Upper spray...

Страница 7: ...snap closed To prevent excessive foam formation during the next rinse cycle remove any rinse aid which has run over with a cloth Adjusting the amount of rinse aid The amount of rinse aid added to the...

Страница 8: ...d fade during the wash cycle Even some types of glass e g crystal glass objects may turn cloudy after many wash cycles Recommendation In future buy utensils which are identified as dishwasher proof Da...

Страница 9: ...hould be at a slant so that water can run off D they are stacked securely and cannot tip over D they do not prevent the spray arms from rotating while washing takes place Very small items should not b...

Страница 10: ...ll glasses and those with long stems against the shelf not against other items to be washed The cup shelf can be inserted into either position 1 or 2 as shown in diagram Note With the cup shelf in pos...

Страница 11: ...Remove the top basket and re attach it to the upper or lower rollers Top basket with side levers Rackmatic Pull out the top basket To lower the basket press in succession the two levers on the left a...

Страница 12: ...hates but no chlorine 3 those containing neither phosphates nor chlorine When a phosphate free detergent is used in conjunction with hard water there is a greater possibility that white marks will be...

Страница 13: ...d by various manufacturers the cleaning efficiency of the detergent may not be fully utilised by short programmes It is recommended to use washing powder for these programmes If using the Intensive pr...

Страница 14: ...desired effect with automatic programmes Products which eliminate the need for regeneration salt can only be used within a certain water hardness range If you wish to use these combined products plea...

Страница 15: ...s Electricity consumption in kWh Water consumption in litres with Aquasensor very little a little a lot stuck on hard loosely attached Drying Rinse aid 70_ First rinse Wash 65_ Pre rinse Second rinse...

Страница 16: ...gramme has ended Open the appliance door Wait until the dishes have cooled down and then remove When the programme has ended you can either switch off the appliance or restart it with the same or anot...

Страница 17: ...r Overall condition of the machine Check spray arm for grease and limescale deposits If you find such deposits Fill the detergent dispenser with detergent start the appliance without utensils in the p...

Страница 18: ...consists of a filter cylinder a flat fine filter and depending on the model a microfilter Inspect the filters for obstructions every time the dishwasher has been used By unscrewing the filter cylinder...

Страница 19: ...the upper one is screwed tight Pump on applicable models Larger remnants of food that have not been trapped by the filters and have been left in the water can cause a blockage in the pump The water i...

Страница 20: ...e appliance plug has not been inserted The appliance door has not been shut properly The tap has not been turned on The filter on the water supply hose is blocked Switch off the appliance and pull out...

Страница 21: ...ay the water pipes have been laid and it has no effect upon the way the appliance functions There is no remedy for this with the dishes cutlery etc Remnants of food are stuck to the dishes cutlery etc...

Страница 22: ...nd on glasses and cutlery glasses have acquired a metallic appearance Amount of rinse aid set too high Customer Service Please call your local service agent if you are not able to resolve any problem...

Страница 23: ...tructions Install the appliance in the following sequence Check the delivery Install the appliance Connect the waste water Connect the fresh water Connect the power supply Delivery Your dishwasher was...

Страница 24: ...m the mains electricity first of all Pull plug out of wall socket Turn off water supply Disconnect drain and water input hoses Remove screws in underside of work surface Detach base board if fitted Pu...

Страница 25: ...l in an environmentally friendly manner Keep children away from shipping carton and packaging components Danger of suffocation from folding cartons and plastic film D Corrugated cardboard consists mai...

Страница 26: ...aus 26 aus Subjekt to modification...

Страница 27: ......

Страница 28: ...1 1 1 0 1 1 1 1 1 0 1 1 1...

Отзывы: