background image

30

Flat ducts


The inner cross-section must correspond to the 
diameter of the round pipes.

150 mm diameter, approx. 177 cm

2

120 mm diameter, approx. 113 cm

2

Flat ducts should not have any sharp deflections.

Use sealing strips for different pipe diameters.

Electrical connection

m

Risk of electric shock!

Components inside the appliance may have sharp 
edges. These may damage the connecting cable. Do not 
kink or pinch the connecting cable during installation.

The required connection data can be found on the 
rating plate inside the appliance; to do this, remove the 
metal mesh grease filter.

Length of the cable: approx. 1.30 m

This appliance complies with the EC interference 
suppression regulations.

m

Risk of electric shock!

It must always be possible to disconnect the appliance 
from the electricity supply. The appliance must only be 
connected to a protective contact socket which has 
been correctly installed. If the plug is no longer 
accessible following installation of the appliance, or a 
fixed connection is required, an all-pole isolating switch 
must be present on the installation side with a contact 
gap of at least 3 mm. The fixed connection must only be 
installed by an electrician.

Preparing the units

The fitted unit must be level and have sufficient 
load-bearing capacity.

The max. weight of the extractor hood is 18 kg.

Appliance dimensions and safety clearances

Observe the appliance's dimensions.

Comply with the safety clearances.

If the installation instructions for the gas cooking 
appliances specify a different distance, the largest 
distance must always be provided for.

The fitted unit must be heat-resistant up to 90 °C.The 
fitted unit must still be sturdy after the cut-outs have 
been made.

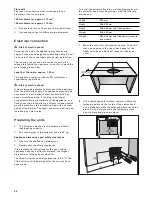
To install the extractor hood in a wall-hanging cupboard, 
the extractor hood must be provided with the following 
dimensions:

1

Make the cut-out for the exhaust air pipe. To do this, 
make an opening in the top or back panel of the 
fitted unit with an additional recess for the power 
cord.

2

If the cabinet base is in place, remove it. Mark the 
fastening points on the inside of the cabinet and 
use a bradawl to make indentations where the holes 
are to be. To help you mark the fastening points, 
use the mounting piece provided.

Width

600 mm

Depth

Min. 320 mm

Depth

Min. 350 mm with lowering frame

Height

Min. 420 mm

Height

Min. 600 mm with CleanAir air recircula-
tion module


PP

PP

PLQ

PP

Содержание AF210

Страница 1: ...e fr Notice d utilisation et de monta nl Gebruiksaanwijzing en installatievoorschrift it Istruzioni per l uso e il montaggio es Instrucciones de uso y montaje pt Instruções de utilização e montagem AF2 Dunstabzugshaube Extractor hood Hotte Afzuigkap Cappa aspirante Campana extractora Exaustor ...

Страница 2: ... zu einer Höhe von maximal 2000 Metern über dem Meer esspiegel bestimmt Dieses Gerät kann von Kindern ab 8 Jahren und Personen mit reduzierten physischen sensori schen oder mentalen Fähigkeiten oder Mangel an Erfahrung oder Wissen benutzt werden wenn sie von einer Person die für ihre Sicher heit verantwortlich ist beaufsichtigt oder von ihr bezüglich des sicheren Gebrauchs des Gerätes unterwiesen ...

Страница 3: ...ttablagerungen im Fettfilter können sich entzünden Fettfilter mindestens alle 2 Monate reinigen Gerät nie ohne Fettfilter betreiben Brandgefahr Die Fettablagerungen im Fettfilter können sich entzünden In der Nähe des Gerätes nie mit offener Flamme arbeiten z B flambie ren Gerät nur dann in der Nähe einer Feu erstätte für feste Brennstoffe z B Holz oder Kohle installieren wenn eine geschlossene nic...

Страница 4: ...etzstecker ziehen oder Sicherung im Sicherungskasten ausschalten Kunden dienst rufen Stromschlaggefahr Eindringende Feuchtigkeit kann einen Stromschlag verursachen Keinen Hoch druckreiniger oder Dampfreiniger verwen den Ursachen für Schäden Achtung Beschädigungsgefahr durch Korrosionsschäden Gerät beim Kochen immer einschalten um Kondenswasserbil dung zu vermeiden Kondenswasser kann zu Korrosions ...

Страница 5: ...rieb Hinweis Die Abluft darf weder in einen in Betrieb befindlichen Rauch oder Abgaskamin noch in einen Schacht welcher der Entlüftung von Aufstellungsräu men von Feuerstätten dient abgegeben werden Soll die Abluft in einen Rauch oder Abgaskamin geführt werden der nicht in Betrieb ist muss die Zustimmung des zuständigen Schornsteinfeger meisters eingeholt werden Wird die Abluft durch die Außenwand...

Страница 6: ...terstufe und dem Automatikbetrieb aktiviert werden kann Nach circa 6 Minuten schaltet der Lüfter auf die zuvor gewählte Lüftereinstellung zurück 3 Zum vorzeitigen Beenden der Intensivstufe drücken Sie die Taste ÿ oder die Taste einer anderen Lüf terstufe Lüfternachlauf Wenn Sie den Filterauszug einschieben solange die Dunstabzugshaube in Betrieb ist wird der Nachlauf aktiviert Nach circa 10 Minute...

Страница 7: ...eige Bei Sättigung der Metallfettfilter ertönt nach dem Aus schalten des Lüfters für circa 4 Sekunden ein Signal Zusätzlich leuchtet die Sättigungsanzeige œ Spätestens jetzt sollten die Metallfettfilter gereinigt werden Wie Sie die Metallfettfilter reinigen erfah ren Sie im Kapitel Reinigen und warten Während die Sättigungsanzeige leuchtet kann sie zurückgesetzt werden Dazu Taste œ drücken Beleuch...

Страница 8: ... dass einzelne Ausstattungsmerkmale beschrie ben sind die nicht auf Ihr Gerät zutreffen m Brandgefahr Die Fettablagerungen im Fettfilter können sich entzün den Fettfilter mindestens alle 2 Monate reinigen Gerät nie ohne Fettfilter betreiben Hinweise Verwenden Sie keine aggressiven säure oder lau genhaltigen Reinigungsmittel Bei Reinigung der Metallfettfilter auch die Halte rung der Metallfettfilte...

Страница 9: ...ocker in die Geschirrspülmaschine Die Metallfettfilter dürfen nicht eingeklemmt werden Metallfettfilter ausbauen 1 Verriegelung öffnen und den Metallfettfilter herun terklappen Dabei mit der anderen Hand unter den Metallfettfilter fassen 2 Metallfettfilter aus der Halterung herausnehmen Hinweise Fett kann sich unten im Metallfettfilter ansam meln Metallfettfilter waagerecht halten um ein Abtrop fe...

Страница 10: ...icht lange suchen müssen kön nen Sie hier die Daten Ihres Gerätes und die Telefon nummer des Kundendienstes eintragen Beachten Sie dass der Besuch des Kundendiensttech nikers im Falle einer Fehlbedienung auch während der Garantiezeit nicht kostenlos ist Die Kontaktdaten aller Länder für den nächstgelegenen Kundendienst finden Sie hier bzw im beiliegenden Kun dendienst Verzeichnis Reparaturauftrag ...

Страница 11: ...hrie ben sind die nicht auf Ihr Gerät zutreffen Dieses Gerät wird in einem Oberschrank installiert Für zusätzliche Sonderzubehörteile z B für Umluftbetrieb die dort beiliegende Installationsan leitung beachten Die Oberflächen des Gerätes sind empfindlich Bei der Installation Beschädigungen vermeiden Gerätebreite 60cm Gerätebreite 90cm PP PP ...

Страница 12: ...hängigen Feuerstätte verwendet wird Raumluftabhängige Feuerstätten z B gas öl holz oder kohlebetriebene Heizgeräte Durch lauferhitzer Warmwasserbereiter beziehen Ver brennungsluft aus dem Aufstellraum und führen die Abgase durch eine Abgasanlage z B Kamin ins Freie In Verbindung mit einer eingeschalteten Dunst abzugshaube wird der Küche und den benach barten Räumen Raumluft entzogen ohne ausreiche...

Страница 13: ...erlichen Festanschluss muss installationsseitig eine allpolige Trennvor richtung mit einem Kontaktabstand von mind 3 mm vorhanden sein Nur eine Elektrofachkraft darf den Festanschluss ausführen Erstickungsgefahr Verpackungsmaterial ist für Kinder gefährlich Kinder nie mit Verpackungsmaterial spielen las sen Allgemeine Hinweise Abluftbetrieb m Lebensgefahr Zurückgesaugte Verbrennungsgase können zu ...

Страница 14: ...aktabstand von mind 3 mm vorhanden sein Nur eine Elektrofach kraft darf den Festanschluss ausführen Möbel vorbereiten Das Einbaumöbel muss waagerecht ausgerichtet und ausreichend tragfähig sein Das max Gewicht der Dunstabzugshaube beträgt 18kg Gerätemaße und Sicherheitsabstände Gerätemaße beachten Sicherheitsabstände beachten Falls die Installationsanweisungen von Gaskochgeräten einen abweichenden...

Страница 15: ...pen 2 Befestigungsteile links und rechts am Korpus fest schrauben 3 Die Laschen unten an den Befestigungsteilen ent fernen ª Gerät vorbereiten Das beiliegende Netzanschlusskabel am Gerät einste cken Installation Gerät einhängen 1 Gerät einhängen und ausrichten 2 Abstand vom Gerät zur Wand messen und an der Wandabschlussleiste anzeichnen 3 Falls erforderlich die Wandabschlussleiste auf das benötigt...

Страница 16: ...t der Feder aus dem Gehäuse löst Dabei mit der anderen Hand das Gerät unten fas sen Achtung Befestigungsbolzen und Feder können sich ruckar tig lösen 3 Das Gerät vorsichtig abnehmen 4 Wandabschlussleiste festschrauben 5 Die Federn und Befestigungsbolzen wieder einset zen Hinweis Die Befestigungsteile links und rechts am Gerät müssen beweglich sein Endmontage 1 Gerät einhängen 2 Befestigungsbolzen ...

Страница 17: ...den seitlichen Oberschränken festschrauben Rohrverbindungen befestigen Hinweis Wird ein Aluminiumrohr verwendet den Anschlussbereich vorher glätten Abluftrohr Ø 150 mm empfohlene Größe Abluftrohr direkt am Luftstutzen befestigen und abdich ten Abluftrohr Ø 120 mm 1 Reduzierstutzen direkt am Luftstutzen befestigen 2 Abluftrohr am Reduzierstutzen befestigen 3 Beide Verbindungsstellen geeignet abdich...

Страница 18: ...to a maximum height of 2000 metres above sea level This appliance may be used by children over the age of 8 years old and by persons with reduced physical sensory or mental capabilities or by persons with a lack of experience or knowledge if they are supervised or are instructed by a person responsible for their safety how to use the appliance safely and have understood the associated hazards Chil...

Страница 19: ...of fire Grease deposits in the grease filter may catch fire Clean the grease filter at least every 2 months Never operate the appliance without the grease filter Risk of fire Grease deposits in the grease filter may catch fire Never work with naked flames close to the appliance e g flambéing Do not install the appliance near a heat producing appliance for solid fuel e g wood or coal unless a close...

Страница 20: ... unplug the appliance from the mains or switch off the circuit breaker in the fuse box Contact the after sales service Risk of electric shock Do not use any high pressure cleaners or steam cleaners which can result in an electric shock Causes of damage Caution Risk of damage due to corrosion Always switch on the appliance while cooking to avoid condensation Condensate can produce corrosion damage ...

Страница 21: ...irculating air mode Exhaust air mode Note The exhaust air must not be conveyed into a functioning smoke or exhaust gas flue or into a shaft which is used to ventilate installation rooms which contain heat producing appliances Before conveying the exhaust air into a non functioning smoke or exhaust gas flue obtain the consent of the heating engineer responsible If the exhaust air is conveyed throug...

Страница 22: ...e activated at any fan setting and in automatic mode After approx 6 minutes the fan resets to the previously selected fan setting 3 To end the intensive setting early press the ÿ button or the button for another fan setting Fan run on time If you slide in the filter pull out the run on time will be activated for as long as the extractor hood is operating After approx 10 minutes the fan switches of...

Страница 23: ...ton for approx 4 seconds Saturation display When the metal grease filters are saturated a signal sounds for approx 4 seconds after the fan is switched off The œ saturation indicator also lights up If you have not yet done so the metal grease filters should be cleaned now For instructions on how to clean the metal grease filters please refer to the section Cleaning and maintenance While the saturat...

Страница 24: ...res are described which do not apply to your appliance m Risk of fire Grease deposits in the grease filter may catch fire Clean the grease filter at least every 2 months Never operate the appliance without the grease filter Notes Do not use any aggressive acidic or alkaline cleaning agents When cleaning the metal mesh grease filters also clean the holder for the metal mesh grease filters in the ap...

Страница 25: ...etal mesh grease filters must not be wedged in Removing metal grease filter 1 Open the lock and fold down the metal grease filter While doing this place your other hand under the metal grease filter 2 Take the metal grease filter out of the holder Notes Fat may accumulate in the bottom of the metal grease filter Hold the metal grease filter level to prevent grease from dripping out 3 Clean the met...

Страница 26: ...e after sales service in the space below to save time should it be required Please be aware that a visit by an after sales engineer will be charged if a problem turns out to be the result of operator error even during the warranty period Please find the contact data of all countries in the enclosed customer service list To book an engineer visit and product advice Trust the expertise of the manufa...

Страница 27: ...ures are described which do not apply to your appliance This appliance is installed in a upper cabinet Follow the enclosed installation instructions for additional special accessories e g for circulating air mode The surfaces of the appliance are sensitive Avoid damaging them during installation Appliance width 60 cm Appliance width 90 cm PP PP ...

Страница 28: ... is being operated Room air dependent heat producing appliances e g gas oil wood or coal operated heaters continuous flow heaters or water heaters obtain combustion air from the room in which they are installed and discharge the exhaust gases into the open air through an exhaust gas system e g a chimney In combination with an activated vapour extractor hood room air is extracted from the kitchen a...

Страница 29: ...lation of the appliance or a fixed connection is required an all pole isolating switch must be present on the installation side with a contact gap of at least 3 mm The fixed connection must only be installed by an electrician Danger of suffocation Packaging material is dangerous to children Never allow children to play with packaging material General information Exhaust air mode m Risk of death Ri...

Страница 30: ...h a contact gap of at least 3 mm The fixed connection must only be installed by an electrician Preparing the units The fitted unit must be level and have sufficient load bearing capacity The max weight of the extractor hood is 18 kg Appliance dimensions and safety clearances Observe the appliance s dimensions Comply with the safety clearances If the installation instructions for the gas cooking ap...

Страница 31: ...o the body on the left and right 3 Remove the tabs from the bottom of the mounting pieces ª Preparing the appliance Connect the power cord provided to the appliance Installation Sliding the appliance up into place 1 Slide the appliance up into place and make sure it is positioned correctly 2 Measure the distance between the appliance and the wall and mark this on the filler strip 3 If required sho...

Страница 32: ...his grip the bottom of the appliance with the other hand Caution Push in the fastening bolt gently with your fingers and turn it until it comes out of the housing with the spring 3 Carefully remove the appliance 4 Screw in the filler strip fully 5 Reinsert the springs and fastening bolts Note The mounting pieces on the left and right of the appliance must be able to move Final fitting stage 1 Slid...

Страница 33: ... pipes Note If an aluminium pipe is used smooth the area where it is to be connected before you connect it Exhaust air pipe dia 150 mm recommended size Fit the exhaust air pipe directly to the air pipe connector and seal the joint Exhaust air pipe dia 120 mm 1 Fit the reducing connector directly to the air pipe connector 2 Attach the exhaust air pipe to the reducing connector 3 Seal both joints ap...

Страница 34: ...oqués par une utilisation inexperte ou des erreurs de manipulation Cet appareil est conçu pour une utilisation jusqu à une altitude maximale de 2 000 m Cet appareil peut être utilisé par des enfants de 8 ans ou plus et par des personnes dotées de capacités physiques sensorielles ou mentales réduites ou disposant de connaissances ou d expérience insuffisantes sous la surveillance d un tiers respons...

Страница 35: ...s d admission évacuation de l air à travers la maçonnerie ou par d autres mesures techniques permettant à l air d affluer pour assurer la combustion Demandez toujours conseil au maître ramoneur compétent qui pourra évaluer l ensemble du réseau de ventilation de la maison et vous proposer le moyen le mieux adapté pour l aération Si la hotte aspirante est utilisée exclusivement en mode recyclage le ...

Страница 36: ...r le fusible dans le boîtier à fusibles Appeler le service après vente Risque de choc électrique Tenter de réparer vous même l appareil est dangereux Seul un technicien du service après vente formé par nos soins est habilité à effectuer des réparations et à remplacer des câbles d alimentation défectueux Si l appareil est défectueux débrancher la fiche secteur ou enlever le fusible dans le boîtier ...

Страница 37: ...r Remarque L air sortant ne doit pénétrer ni dans une cheminée en service destinée à évacuer la fumée ou des gaz brûlés ni dans une gaine servant à aérer les locaux où sont installés des foyers à combustion Si l air sortant circule par une cheminée non en service destinée à évacuer la fumée ou des gaz brûlés il faudra vous procurer l accord du ramoneur compétent dans votre quartier Si l air sortan...

Страница 38: ...e du ventilateur et en mode automatique Au bout d env 6 minutes le ventilateur se remet au réglage précédent sélectionné 3 Pour arrêter prématurément l aspiration intensive appuyez sur la touche ÿ ou sur la touche d un autre niveau de puissance du ventilateur Poursuite ventilateur Quand vous repoussez le tiroir filtre à l intérieur alors que la hotte aspirante est en service la poursuite est activ...

Страница 39: ... saturés un signal sonore retentit pendant env 4 secondes après l arrêt du ventilateur L indicateur de saturation œ s allume en plus Au plus tard à ce moment là il faudrait nettoyer les filtres à graisse métalliques Pour savoir comment nettoyer les filtres à graisse métalliques consultez le chapitre Nettoyage et entretien L indicateur de saturation peut être réinitialisé pendant qu il est allumé P...

Страница 40: ...peuvent y être décrits m Risque d incendie Les dépôts de graisse dans le filtre à graisse peuvent s enflammer Nettoyer le filtre à graisse au moins tous les 2 mois Ne jamais faire fonctionner l appareil sans filtre à graisse Remarques N utilisez jamais de détergents agressifs contenant de l acide ou fortement alcalins Pendant le nettoyage des filtres métalliques à graisse nettoyez également leur f...

Страница 41: ...es filtres métalliques à graisse Retirer le filtre métallique à graisse 1 Ouvrez le verrouillage puis abaissez le filtre à graisse métallique Avec l autre main sous le filtre à graisse métallique interceptez ce dernier 2 Sortez le filtre métallique à graisse de sa fixation Remarques La graisse peut s accumuler en bas dans le filtre à graisse métallique Pour éviter tout égouttement de graisse tenez...

Страница 42: ...r éviter d avoir à les rechercher en cas de besoin vous pouvez inscrire ici les données de votre appareil et le numéro de téléphone du service après vente Tenez compte du fait que la visite d un technicien du SAV n est pas gratuite en cas de manipulation incorrecte même pendant la période de garantie Vous trouverez les données de contact pour tous les pays dans l annuaire ci joint du service après...

Страница 43: ...e appareil peuvent y être décrits Cet appareil s installe dans le meuble supérieur Accessoires spéciaux p ex pour le mode Recyclage de l air tenez compte de la notice d installation les accompagnant Les surfaces de l appareil craignent Lors de l installation évitez de les endommager Largeur de l appareil 60 cm Largeur de l appareil 90 cm PP PP ...

Страница 44: ...apport d air soit suffisant Les foyers à combustion alimentés en air ambiant par exemple appareils de chauffage au gaz au bois au fioul ou au charbon les chauffe eau chauffe eau accumulateurs prélèvent l air de combustion dans la pièce où ils sont installés et rejettent les gaz de fumée à l extérieur par le biais d un système spécifique cheminée par exemple Lorsque la hotte aspirante est en marche...

Страница 45: ...près montage ou si un raccordement en fixe est indispensable il faut prévoir côté secteur un dispositif de coupure omnipolaire avec un écartement des contacts d au moins 3 mm Le raccordement est exclusivement réservé à un électricien qualifié Risque d asphyxie Le matériel d emballage est dangereux pour les enfants Ne permettez jamais aux enfants de jouer avec les matériaux d emballage Consignes gé...

Страница 46: ...nipolaire avec un écartement des contacts d au moins 3 mm Le raccordement est exclusivement réservé à un électricien qualifié Préparation du meuble Le meuble d encastrement doit être aligné à l horizontale et être d une capacité de charge suffisante Le poids max de la hotte aspirante est de 18 kg Dimensions de l appareil et distances de sécurité Tenez compte des dimensions de l appareil Respectez ...

Страница 47: ...ents de fixation 2 Vissez les éléments de fixation à gauche et à droite sur le corps 3 Retirez les pattes sous les éléments de fixation ª Préparer l appareil Branchez le câble secteur fourni à l appareil Installation Accrocher l appareil 1 Accrochez et nivelez l appareil 2 Mesurez la distance entre l appareil et le mur et reportez la sur la baguette murale 3 Si nécessaire raccourcissez la baguette...

Страница 48: ...s ressorts Placez ce faisant l autre main en dessous du boîtier Attention Les boulons de fixation et les ressorts peuvent se détacher par à coups 3 Retirez l appareil avec précaution 4 Vissez fermement la baguette murale 5 Remettez en place les ressorts et les boulons de fixation Remarque Les éléments de fixation à gauche et à droite de l appareil doivent être mobiles Montage final 1 Accrochez l a...

Страница 49: ...ts Remarque En cas d utilisation d un tuyau en aluminium lissez au préalable la zone de raccordement Tuyau d évacuation Ø 150 mm diamètre recommandé Fixez le tuyau d évacuation directement contre le manchon d évacuation puis étanchez Conduit d évacuation Ø 120 mm 1 Fixez le manchon réducteur directement contre le manchon d évacuation 2 Fixez le conduit d évacuation contre le manchon réducteur 3 Ét...

Страница 50: ...ebruik of onjuiste bediening Dit apparaat is bestemd voor gebruik tot op hoogten van maximaal 2 000 meter boven zeeniveau Dit toestel kan worden gebruikt door kinderen vanaf 8 jaar en door personen met beperkte fysieke sensorische of geestelijke vermogens of personen die gebrek aan kennis of ervaring hebben wanneer zij onder toezicht staan van een persoon die verantwoordelijk is voor hun veilighei...

Страница 51: ...jk Brandgevaar De vetafzettingen in het vetfilter kunnen ontbranden Vetfilter minstens om de 2 maanden reinigen Apparaat niet zonder vetfilter gebruiken Brandgevaar De vetafzettingen in het vetfilter kunnen ontbranden In de buurt van het apparaat nooit werken met een open vlam bijv flamberen Het apparaat alleen in de buurt van een vuurbron voor vaste brandstoffen bijv hout of kolen installeren wan...

Страница 52: ...het stopcontact of schakel de zekering in de meterkast uit Contact opnemen met de klantenservice Kans op een elektrische schok Binnendringend vocht kan een schok veroorzaken Geen hogedrukreiniger of stoomreiniger gebruiken Oorzaken van schade Attentie Risico van beschadiging door corrosie Schakel het apparaat wanneer u kookt altijd in om condensvorming te voorkomen Condenswater kan leiden tot corr...

Страница 53: ...tielucht Gebruik met afvoerlucht Aanwijzing De afvoerlucht mag niet worden afgevoerd via een in gebruik zijnde rook of gasafvoer noch via een schacht die dient voor de ontluchting van ruimtes met vuurbronnen Komt de afvoerlucht terecht in een rook of gasafvoer die niet in gebruik is dan dient u een vakbekwame schoorsteenveger te raadplegen Wordt de afvoerlucht door de buitenmuur geleid dan raden w...

Страница 54: ...odus geactiveerd kan worden Na ca 6 minuten schakelt de ventilator terug naar de eerder gekozen ventilatorstand 3 Om de intensiefstand voortijdig te beëindigen drukt u op de toets ÿ of de toets van een andere ventilatorstand Naloop ventilator Wanneer u het uitschuifbare filterdeel naar binnen schuift blijft de naloop geactiveerd zolang de afzuigkap werkt Na ca 10 minuten schakelt de ventilator aut...

Страница 55: ...icatie Wanneer de metalen vetfilter verzadigd is klinkt na uitschakeling van de ventilator gedurende 4 seconden een signaal Daarnaast is de verzadigingsindicatie œ verlicht Uiterlijk op dit moment dienen de metalen vetfilters schoongemaakt te worden In het hoofdstuk Reinigen en verzorgen kunt u lezen hoe u de metalen vetfilter schoonmaakt Terwijl de verzadigingsindicatie knippert kan hij worden ge...

Страница 56: ...nmerken worden beschreven die niet van toepassing zijn op uw apparaat m Brandgevaar De vetafzettingen in het vetfilter kunnen ontbranden Vetfilter minstens om de 2 maanden reinigen Apparaat niet zonder vetfilter gebruiken Aanwijzingen Geen agressieve zuur of looghoudende reinigingsmiddelen gebruiken Bij het reinigen van de metalen vetfilters ook de houder van de vetfilters in het apparaat reinigen...

Страница 57: ...rs mogen niet worden vastgeklemd Metalen vetfilter demonteren 1 Vergrendeling openen en de metalen vetfilter omlaag klappen Daarbij de metalen vetfilter met de andere hand ondersteunen 2 Metalen vetfilter uit de houder nemen Aanwijzingen Op de bodem van de metalen vetfilter kan zich vet verzamelen Metalen vetfilter recht houden om te voorkomen dat er vet vanaf druipt 3 Metalen vetfilter reinigen B...

Страница 58: ...eer u de klantenservice nodig heeft kunt u hier direct de gegevens van uw apparaat en het telefoonnummer van de servicedienst invullen Let erop dat het bezoek van een technicus van de servicedienst in het geval van een verkeerde bediening ook tijdens de garantieperiode kosten met zich meebrengt De contactgegevens in alle landen vindt u in de bijgesloten lijst met Servicedienstadressen Verzoek om r...

Страница 59: ...iet van toepassing zijn op uw apparaat Dit apparaat wordt in een bovenkast geïnstalleerd Voor aanvullende speciale toebehoren bijv voor gebruik met circulatielucht dient men de hierbij geleverde installatiehandleiding in acht te nemen De oppervlakken van het apparaat zijn gevoelig Voorkom beschadiging tijdens de installatie Apparaatbreedte 60cm Apparaatbreedte 90cm PP PP ...

Страница 60: ...de aanwezige lucht Vuurbronnen die de lucht in de ruimte verbruiken bijv apparaten die op gas olie hout of kolen worden gestookt geisers warmwatertoestellen trekken de verbrandingslucht uit de opstellingsruimte en voeren de gassen via een afvoer bijv schoorsteen af naar buiten In combinatie met een ingeschakelde afzuigkap wordt aan de keuken en aan de ruimtes ernaast lucht onttrokken zonder voldoe...

Страница 61: ...ar is of indien een vaste aansluiting is vereist moet de installatie worden voorzien van een stroomonderbreker met een contactopening van minstens 3 mm De vaste aansluiting mag alleen door een elektricien worden aangelegd Verstikkingsgevaar Verpakkingsmateriaal is gevaarlijk voor kinderen Kinderen nooit met verpakkingsmateriaal laten spelen Algemene aanwijzingen Gebruik met afvoerlucht m Levensgev...

Страница 62: ...n contactopening van minstens 3 mm De vaste aansluiting mag alleen door een elektricien worden aangelegd Meubel voorbereiden Het inbouwmeubel moet horizontaal afgesteld zijn en voldoende draagvermogen hebben Het max gewicht van de afzuigkap bedraagt 18 kg Apparaatafmetingen en veiligheidsafstanden Afmetingen van het apparaat in acht nemen Veiligheidsafstanden in acht nemen Wanneer er in de install...

Страница 63: ...delen uitklappen 2 Bevestigingsdelen links en rechts op het corpus vastschroeven 3 De lipjes aan de onderkant van de bevestigingsdelen verwijderen ª Apparaat voorbereiden De bijgevoegde voedingskabel in het apparaat steken Installatie Apparaat plaatsen 1 Apparaat inhangen en uitlijnen 2 Afstand van het apparaat tot de wand meten en bij de kantlijsten aantekenen 3 De kantlijsten zo nodig tot de gew...

Страница 64: ... de veer uit de behuizing komt Daarbij dient u het apparaat met de andere hand te ondersteunen Attentie Bevestigingsbout en veer kunnen met een schok loskomen 3 Het apparaat voorzichtig afnemen 4 Kantlijst vastschroeven 5 De veren en bevestigingsbout weer inbrengen Aanwijzing De bevestigingsdelen links en rechts op het apparaat moeten beweeglijk zijn Eindmontage 1 Apparaat plaatsen 2 Bevestigingsb...

Страница 65: ...isverbindingen bevestigen Aanwijzing Bij gebruik van een aluminium buis moet het aansluitgedeelte eerst worden gladgemaakt Luchtafvoerbuis Ø 150 mm aanbevolen diameter Luchtafvoerbuis rechtstreeks op het luchtafvoeraansluitstuk bevestigen en afdichten Luchtafvoerbuis Ø 120 mm 1 Verloopstuk rechtstreeks op het luchtafvoeraansluitstuk bevestigen 2 Luchtafvoerbuis bevestigen aan het verloopstuk 3 Bei...

Страница 66: ...rato Questo apparecchio è progettato solo per l utilizzo fino ad un altezza di massimo 2000 metri sul livello del mare Questo apparecchio può essere utilizzato da bambini di età pari o superiore a 8 anni e da persone con ridotte facoltà fisiche sensoriali o mentali nonché da persone prive di sufficiente esperienza o conoscenza dello stesso se sorvegliate da una persona responsabile della loro sicu...

Страница 67: ... mettere mai in funzione l apparecchio senza filtro per grassi Pericolo di incendio I depositi di grasso presenti nel filtro per grassi possono incendiarsi Non lavorare mai nelle vicinanze dell apparecchio con fiamme libere ad es fiammeggiare L installazione dell apparecchio nelle vicinanze di un focolare per combustibili solidi ad es legno o carbone è consentita solo se questo è dotato di copertu...

Страница 68: ...tecnica Se l apparecchio è difettoso staccare la spina o il fusibile nella scatola dei fusibili Rivolgersi al servizio di assistenza clienti Pericolo di scariche elettriche L infiltrazione di liquido può provocare una scarica elettrica Non utilizzare detergenti ad alta pressione o dispositivi a getto di vapore Cause dei danni Attenzione Pericolo di danni da corrosione Accendere sempre l apparecchi...

Страница 69: ...ircolo Modalità aspirazione Avvertenza L aria esausta non deve essere immessa né in un camino per il fumo o per i gas di scarico funzionante né in un pozzo di aerazione dei locali di installazione di focolari Se l aria esausta viene immessa in un camino per fumo o gas di scarico non in funzione è necessario ottenere l autorizzazione di un tecnico specializzato Se l aria esausta viene condotta attr...

Страница 70: ...namento automatico Dopo circa 6 minuti la ventola torna all impostazione selezionata in precedenza 3 Per terminare anticipatamente il livello intensivo premere il tasto ÿ oppure il tasto di un altro livello ventola Ritardo di funzionamento della ventola Se si inserisce il filtro estraibile quando la cappa di aspirazione è in funzione viene attivato il post funzionamento La ventola si spegna automa...

Страница 71: ...ro grassi metallico dopo lo spegnimento della ventola viene emesso un segnale acustico per circa 4 secondi Inoltre si accende l indicazione di saturazione œ È assolutamente necessario pulire il filtro grassi metallico Le istruzioni per la pulizia del filtro grassi metallico sono disponibili al capitolo Pulizia e manutenzione Mentre l indicazione di saturazione lampeggia è possibile resettarla A ta...

Страница 72: ...itte non siano presenti nel proprio apparecchio m Pericolo di incendio I depositi di grasso presenti nel filtro per grassi possono incendiarsi Pulire il filtro per grassi almeno ogni 2 mesi Non mettere mai in funzione l apparecchio senza filtro per grassi Avvertenze Non utilizzare detergenti aggressivi acidi o contenenti alcali Nella pulizia del filtro metallico antigrasso pulire anche il supporto...

Страница 73: ...filtri metallici antigrasso non devono essere stretti o serrati Rimuovere il filtro metallico per grassi 1 Sbloccare la chiusura e abbassare il filtro grassi metallico Con l altra mano afferrare il filtro grassi metallico da sotto 2 Rimuovere il filtro grassi metallico dal suo supporto Avvertenze Il grasso può raccogliersi nella parte inferiore del filtro grassi metallico Non inclinare il filtro g...

Страница 74: ...mazioni utili in caso di necessità si consiglia di riportare subito qui i dati relativi all apparecchio e il numero di telefono del servizio di assistenza tecnica Prestare attenzione al fatto che in caso di utilizzo improprio l intervento del tecnico del servizio di assistenza non è gratuito anche se effettuato durante il periodo di garanzia Trovate i dati di contatto di tutti i paesi nell accluso...

Страница 75: ...impianto descritte non siano presenti nel proprio apparecchio Questo apparecchio viene installato in un mobile a pensile Per altri componenti accessori speciali ad es per esercizio di ricircolo consultare le istruzioni di installazione allegate Le superfici dell apparecchio sono delicate Evitare danni durante l installazione Larghezza apparecchio 60 cm Larghezza apparecchio 90 cm PP PP ...

Страница 76: ... un alimentazione di aria sufficiente quando l apparecchio in modalità aspirazione viene utilizzato contemporaneamente a un focolare dipendente dall aria ambiente I focolari che dipendono dall aria ambiente peres a gas olio legna o carbone scaldabagno caldaie elettriche ricavano l aria per la combustione dalla stanza ed eliminano i gas di scarico all esterno attraverso un impianto peres camino In ...

Страница 77: ...on risulta più accessibile o in caso di allacciamento fisso occorre predisporre al momento dell installazione un dispositivo di separazione universale con una distanza di contatto di almeno 3 mm L allacciamento fisso deve essere eseguito esclusivamente da un tecnico specializzato Pericolo di soffocamento Il materiale d imballaggio è pericoloso per i bambini Non lasciare mai che i bambini giochino ...

Страница 78: ...distanza di contatto di almeno 3 mm L allacciamento fisso deve essere eseguito esclusivamente da un tecnico specializzato Preparazione del mobile Il mobile da incasso deve essere posto in posizione orizzontale ed essere abbastanza resistente Il peso max della cappa di aspirazione è pari a 18 kg Dimensioni dell apparecchio e distanze di sicurezza Osservare le dimensioni dell apparecchio Osservare l...

Страница 79: ...enti di fissaggio a sinistra e a destra sul corpo 3 Rimuovere le linguette poste in basso sugli elementi di fissaggio ª Preparazione dell apparecchio Inserire il cavo di collegamento rete in dotazione nell apparecchio Installazione Agganciare l apparecchio 1 Aggancio e regolazione dell apparecchio 2 Misurare la distanza dell apparecchio dalla parete e segnarla sul listello di chiusura 3 Se necessa...

Страница 80: ...loggiamento Con l altra mano afferrare l apparecchio da sotto Attenzione Il bullone di fissaggio e la molla possono allentarsi bruscamente 3 Rimuovere con cautela l apparecchio 4 Fissare il listello di chiusura 5 Rimettere in posizione le molle e i bulloni di fissaggio Avvertenza Gli elementi di fissaggio a sinistra e a destra dell apparecchio devono essere mobili Montaggio finale 1 Agganciare l a...

Страница 81: ...sile Fissare i raccordi Avvertenza Se si utilizza un tubo in alluminio levigare prima la zona di raccordo Tubo di scarico Ø 150 mm dimensione consigliata Fissare il tubo di scarico direttamente al manicotto dell aria e sigillarlo ermeticamente Tubo di scarico Ø 120 mm 1 Fissare il manicotto di riduzione direttamente al manicotto dell aria 2 Fissare il tubo di scarico al manicotto di riduzione 3 Si...

Страница 82: ... o un manejo incorrecto Este aparato está previsto para ser utilizado a una altura máxima de 2 000 metros sobre el nivel del mar Este aparato puede ser utilizado por niños a partir de 8 años y por personas con limitaciones físicas sensoriales o psíquicas o que carezcan de experiencia y conocimientos siempre y cuando sea bajo la supervisión de una persona responsable de su seguridad o que le haya i...

Страница 83: ...hacer recircular el aire necesario para la combustión Pedir siempre asesoramiento al técnico competente de su región que estará en condiciones de evaluar todo el sistema de ventilación de su hogar y recomendarle las medidas adecuadas en materia de ventilación Si la campana extractora se utiliza exclusivamente en funcionamiento en recirculación no hay limitaciones para el funcionamiento Peligro de ...

Страница 84: ...ro de descarga eléctrica Las reparaciones inadecuadas son peligrosas Las reparaciones y la sustitución de cables de conexión defectuosos solo pueden ser efectuadas por personal del Servicio de Asistencia Técnica debidamente instruido Si el aparato está averiado desenchufarlo de la red o desconectar el fusible de la caja de fusibles Avisar al Servicio de Asistencia Técnica Peligro de descarga eléct...

Страница 85: ...ni a un hueco que sirva como ventilación de los recintos de instalación de equipos calefactores Si la salida de aire se va a evacuar en una chimenea de humos o gases de escape que no está en servicio será necesario contar previamente con la aprobación correspondiente del técnico competente de la zona Si la salida de aire se evacua mediante la pared exterior se deberá utilizar un pasamuros telescóp...

Страница 86: ... de unos 6 minutos el ventilador vuelve al ajuste previamente seleccionado 3 Para finalizar el nivel intensivo antes de tiempo pulsar la tecla ÿ o la tecla de otro nivel de ventilador Desconexión automática Si inserta el cajón del filtro mientras la campana extractora está en funcionamiento se activa el funcionamiento por inercia El ventilador se apaga automáticamente transcurridos 10 minutos apro...

Страница 87: ...so de saturación de los filtros metálicos antigrasa suena una señal durante 4 segundos aproximadamente tras apagar el ventilador También se ilumina el indicador de saturación œ En ese momento se deben limpiar los filtros metálicos antigrasa La limpieza del filtro metálico antigrasa se explica en el capítulo Limpieza y mantenimiento Mientras el indicador de saturación esté iluminado se pueden resta...

Страница 88: ... que no aludan a su aparato m Peligro de incendio Los depósitos de grasa del filtro de grasas pueden prenderse Los filtros de grasa deben limpiarse por lo menos cada 2 meses No usar nunca el aparato sin filtro de grasa Notas No utilizar productos de limpieza agresivos a base de ácidos o lejía Al limpiar los filtros de metal antigrasa limpiar también el soporte de los filtros de metal antigrasa en ...

Страница 89: ...s filtros de metal antigrasa no deben quedar aprisionados Desmontar el filtro de metal antigrasa 1 Quitar el bloqueo y abatir el filtro de metal antigrasa Agarrar por debajo el filtro de metal antigrasa con la otra mano 2 Extraer el filtro de metal antigrasa del soporte Notas La grasa puede acumularse en la parte inferior del filtro de metal antigrasa Sujetar el filtro de metal antigrasa en posici...

Страница 90: ...e recomendamos anotar los datos de su aparato así como el número de teléfono del Servicio de Asistencia Técnica en el siguiente apartado Recuerde que en caso de manejo incorrecto la asistencia del personal del Servicio de Asistencia Técnica no es gratuita incluso si todavía está dentro del período de garantía Las señas de las delegaciones internacionales figuran en la lista adjunta de centros y de...

Страница 91: ... a su aparato Este aparato está diseñado para su instalación en un armario superior Para accesorios especiales adicionales p ej para el funcionamiento en recirculación se han de tener en cuenta las instrucciones de instalación correspondientes Las superficies del aparato son sensibles Evitar daños durante la instalación Anchura del aparato 60 cm Anchura del aparato 90 cm PP PP ...

Страница 92: ... dependiente del aire del recinto de instalación Los equipos calefactores que dependen del aire del recinto de instalación p ej calefactores de gas aceite madera o carbón calentadores de salida libre calentadores de agua adquieren aire de combustión del recinto de instalación y evacuan los gases de escape al exterior a través de un sistema extractor p ej una chimenea En combinación con una campana...

Страница 93: ...ositivo de separación omnipolar con una distancia de contacto mínima de 3 mm Encomendar la ejecución de la conexión fija exclusivamente a personal electrotécnico Peligro de asfixia El material de embalaje es peligroso para los niños No dejar que los niños jueguen con el material de embalaje Consejos y advertencias generales Funcionamiento en salida de aire al exterior m Peligro de muerte Los gases...

Страница 94: ...istancia de contacto mínima de 3 mm Encomendar la ejecución de la conexión fija exclusivamente a personal electrotécnico Preparación de los muebles El mueble empotrado debe orientarse horizontalmente y debe ser suficientemente resistente El peso máximo de la campana extractora es de 18 kg Dimensiones del aparato y distancias de seguridad Tener en cuenta las dimensiones del aparato Tener en cuenta ...

Страница 95: ...ezas de fijación 2 Fijar con tornillos las piezas de fijación situadas a la izquierda y derecha del cuerpo 3 Extraer las lengüetas inferiores de las piezas de fijación ª Preparar el aparato Conectar el cable de alimentación incluido al aparato Instalación Colocar el aparato 1 Colocar y nivelar el aparato 2 Medir la distancia del aparato a la pared y marcarla en el listón terminal de la pared 3 En ...

Страница 96: ...Al hacerlo sujetar el aparato por debajo con la otra mano Atención El perno de fijación y el resorte pueden soltarse de manera brusca 3 Retirar el aparato con cuidado 4 Atornillar el listón terminal de la pared 5 Volver a colocar los resortes y los pernos de fijación Nota Las piezas de fijación de la izquierda y derecha del aparato deben poder moverse Montaje final 1 Colocar el aparato 2 Asegurar ...

Страница 97: ...ubo Nota Si se utiliza un tubo de aluminio pulir previamente la zona de conexión Diámetro del tubo de salida de aire 150 mm tamaño recomendado Fijar y obturar el conducto de salida de aire directamente en la salida de aire de la campana Diámetro del tubo de salida de aire 120 mm 1 Fijar la pieza reductora directamente en la salida de aire de la campana 2 Fijar el tubo de salida de aire en la pieza...

Страница 98: ...rovocados pela utilização inadequada ou por manuseamento errado O aparelho foi concebido para ser utilizado até a uma altitude de 2000 metros acima do nível do mar no máximo Este aparelho pode ser usado por crianças com mais de 8 anos e por pessoas com limitações físicas sensoriais ou mentais ou com pouca experiência ou conhecimentos se estiverem sob vigilância de uma pessoa responsável pela sua s...

Страница 99: ... de incêndio A gordura acumulada no filtro pode incendiar se Limpar o filtro de gorduras pelo menos de 2 em 2 meses Nunca utilizar o aparelho sem filtro de gorduras Perigo de incêndio A gordura acumulada no filtro pode incendiar se Nunca trabalhe com uma chama aberta perto do aparelho p ex flambear Instalar o aparelho perto de um fogão para combustíveis sólidos p ex madeira ou carvão somente se ex...

Страница 100: ...acte o Serviço de Assistência Técnica Perigo de choque eléctrico A humidade que se infiltra no aparelho pode dar origem a um choque eléctrico Não utilize aparelhos de limpeza a alta pressão ou de limpeza a vapor Causas de danos Atenção Perigo de danificação devido a danos provocados por corrosão Ligar sempre o aparelho quando se cozinha para evitar a formação de água de condensação A água de conde...

Страница 101: ...eimados em funcionamento nem por uma caixa de ar que sirva de ventilação de locais com lareiras instaladas Caso o ar evacuado tenha de ser encaminhado por uma chaminé de exaustão de fumos ou de gases queimados que não esteja em funcionamento é necessária uma autorização da entidade supervisora da instalação dos aparelhos de queima Se o ar evacuado for encaminhado através da parede exterior deve se...

Страница 102: ... aprox 6 minutos o ventilador comuta para a regulação anteriormente selecionada 3 Para terminar precocemente a fase intensiva prima a tecla ÿ ou a tecla de uma outra fase do ventilador Paragem do ventilador Se inserir a extração de filtros enquanto o exaustor estiver em funcionamento a função de avanço é ativada Após cerca de 10 minutos o ventilador desliga se automaticamente Funcionamento automát...

Страница 103: ... metálicos de gorduras estão saturados ouve se um sinal sonoro durante aprox 4 segundos depois de desligar o ventilador A indicação de saturação œ acende adicionalmente O mais tardar agora deve proceder se à limpeza dos filtros metálicos de gorduras Para saber como limpar os filtros metálicos de gorduras consulte o capítulo Limpeza e manutenção Enquanto a indicação de saturação estiver acesa pode ...

Страница 104: ...de equipamento individuais que não se aplicam ao seu aparelho m Perigo de incêndio A gordura acumulada no filtro pode incendiar se Limpar o filtro de gorduras pelo menos de 2 em 2 meses Nunca utilizar o aparelho sem filtro de gorduras Notas Evitar produtos de limpeza agressivos com teor de acidez ou de lixívia Na limpeza dos filtros metálicos de gorduras limpar também o seu dispositivo de fixação ...

Страница 105: ...s soltos na máquina de lavar loiça Eles não podem ficar apertados Desmontar o filtro metálico de gorduras 1 Abra o bloqueio e vire o filtro metálico de gorduras para baixo Depois com a outra mão pegue por baixo do filtro metálico de gorduras 2 Desmontar o filtro metálico de gorduras do dispositivo de fixação Notas Pode acumular se gordura em baixo no filtro metálico de gorduras Segure o filtro met...

Страница 106: ...ro metálico de gorduras Para que em caso de necessidade não tenha de procurar poderá introduzir aqui os dados do seu aparelho e o número de telefone do serviço de assistência técnica Tenha em atenção que a visita do técnico da assistência ao cliente não é gratuita em caso de uma utilização incorreta mesmo durante o período de garantia Os dados para contacto com todos os países encontram se no índi...

Страница 107: ...equipamento individuais que não se aplicam ao seu aparelho Este aparelho é instalado num armário superior Para acessórios especiais adicionais p ex para a função com recirculação de ar observar as instruções de instalação anexas As superfícies do aparelho são sensíveis Evitar danos durante a instalação Largura do aparelho 60 cm Largura do aparelho 90 cm PP PP ...

Страница 108: ...elho é utilizado no modo de exaustão em conjunto com equipamentos de aquecimento que consomem o ar ambiente Os equipamentos de aquecimento que consomem o ar ambiente p ex sistemas de aquecimento a gás óleo lenha ou carvão esquentadores cilindros utilizam para a combustão o ar do local de montagem e transportam os gases de combustão para o exterior através de um sistema de exaustão p ex uma chaminé...

Страница 109: ...ligação fixa deixar de estar acessível tem que existir na instalação um dispositivo de corte multipolar com uma abertura de contactos de pelo menos 3mm A ligação fixa só pode ser efetuada por um eletricista credenciado Perigo de asfixia O material de embalagem é perigoso para as crianças Nunca deixe as crianças brincarem com o material de embalagem Indicações gerais Função com exaustão de ar m Per...

Страница 110: ...sitivo de corte multipolar com uma abertura de contactos de pelo menos 3mm A ligação fixa só pode ser efetuada por um eletricista credenciado Preparar o móvel O móvel para encastrar deve estar alinhado na horizontal e possuir uma capacidade de carga suficiente O peso máx do exaustor é de 18 kg Medidas do aparelho e distâncias de segurança Respeite as medidas do aparelho Respeite as distâncias de s...

Страница 111: ...ixação para fora 2 Aparafuse as peças de fixação do lado esquerdo e direito no corpo 3 Remova as talas por baixo das peças de fixação ª Preparar o aparelho Ligue o cabo de alimentação fornecido ao aparelho Instalação Pendurar o aparelho 1 Pendure e alinhe o aparelho 2 Meça a distância do aparelho à parede e marque a no friso terminal da parede 3 Se necessário reduza o friso terminal da parede para...

Страница 112: ...ara tal pegue no aparelho por baixo com a outra mão Atenção O perno de fixação e a mola podem soltar se de forma brusca 3 Retire o aparelho com cuidado 4 Aparafuse o friso terminal da parede 5 Coloque novamente as molas e os pernos de fixação Nota As fixações do lado esquerdo e direito no aparelho têm de ser móveis Montagem final 1 Pendure o aparelho 2 Bloqueie os pernos de fixação do lado esquerd...

Страница 113: ...s Fixar as ligações dos tubos Nota Se for utilizado um tubo de alumínio alise primeiro a área de ligação Tubo de exaustão Ø 150 mm tamanho recomendado Fixe e vede o tubo de exaustão do ar no bocal de admissão Tubo de exaustão Ø 120 mm 1 Fixe o bocal de redução diretamente no bocal de admissão 2 Fixe o tubo de exaustão do ar no bocal de redução 3 Vede convenientemente ambos os pontos de ligação Des...

Страница 114: ...Gaggenau ...

Страница 115: ...Gaggenau ...

Страница 116: ...Gaggenau Hausgeräte GmbH Carl Wery Straße 34 81739 München GERMANY www gaggenau com 9001091142 9001091142 de en fr nl it es pt 951015 ...

Отзывы: