


B
B
X
X
/
/
B
B
X
X
G
G
-
-
1
1
0
0
0
0
0
0
S
S
e
e
r
r
i
i
e
e
s
s
G
G
r
r
o
o
o
o
v
v
e
e
M
M
e
e
a
a
s
s
u
u
r
r
e
e
m
m
e
e
n
n
t
t
G
G
a
a
g
g
e
e
O
O
p
p
e
e
r
r
a
a
t
t
i
i
o
o
n
n
M
M
a
a
n
n
u
u
a
a
l
l
23
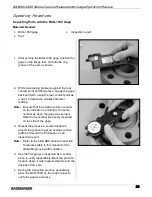
Zeroing the BXG-1000 Gage Using Gage Blocks
Materials Needed:
•
BXG-1000 gage
•
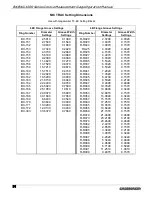
MIC Over Ball Setting Dimensions Table
•
Gage blocks
To ensure consistent and accurate readings, the BXG-1000 gage should be zeroed on gage
blocks once during each shift, at a minimum.
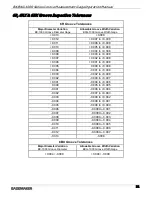
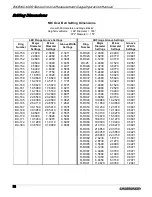
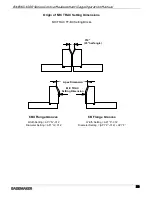
1. Locate the dimension for the type of groove
you are measuring in the MIC Over Ball
Setting Dimensions table in this manual.
2. Stack the gage blocks to the proper
measurement.
3. Turn the rear contact point lock knob, located
on the top of the gage, to loosen the contact
point holder.
4. Turn the contact point adjustment knob,
located at the rear of the gage, to adjust the
location of the rear contact point.
5. Continue turning the adjustment knob until the
contact points fit between the gage blocks.
6. Lock the rear contact point lock knob.