


13
REV. 5/22
GB734
INSTALLATION TOOL.
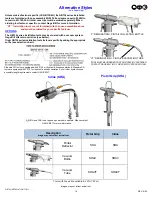
Part No.
Description
704149
Piston Rod Wrench Assembly
704151
Power Cylinder Tool Assembly
704150
Packing Plug Wrench Assembly
704152
Seal Guide
704153
Air Bleeder Assembly
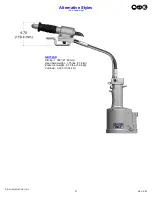
744251
Valve Spring Installation Tool
744152
Valve Sleeve Removal Tool
S1178
Valve Extractor
GB740TK Service Tool Kit Includes:
OVERHAUL
WARNING
:
Only qualified and trained personnel shall perform overhaul.
WARNING
:
Personnel must read and understand all warnings and cautions.
WARNING
:
Tool must be maintained in a safe working condition at all times and examined on a daily basis for damage or
wear. Any repair must be done by qualified personnel trained on Gage Bilt procedures.
WARNING
:
Disconnect tool from its power source before performing overhaul. Severe personal injury may occur if power
source is not disconnected.
WARNING
:
Excessive contact with hydraulic oil and lubricants must be avoided. (See safety data sheet documents for all
applicable materials).
WARNING
:
When operating, repairing or overhauling tool, wear approved eye protection. Do not look in front of tool or rear
of tool when installing fastener.
WARNING:
Ensure air hose is securely connected to avoid possible hose whipping (Air Actuated Tools only).
WARNING:
Depress actuator assembly
-
air (704130) and disconnect from air, with the piston in the rear position, before overhaul.
Severe personal injury may occur if air hose is not disconnected.
USE CAUTION
when forcing piston rod assembly
downward with head cylinder removed. Hydraulic oil will eject forcibly from handle assembly.
Perform overhaul in a clean, well lit area using care not to scratch or nick any smooth surface that comes in contact with an o'ring. Use
of Lubriplate® (Gage Bilt part no. 402723) or other lubricant is recommended during reassembly to prevent tearing or distorting of o'rings.
The disassembly and re
-
assembly procedure can be accomplished by utilizing the instructions and parts lists on pgs. 13
-
15. Use extreme care
during disassembly and re
-
assembly not to mar or nick any smooth surface that comes in contact with seals. Before installing seals, always
apply a good lubricant, such as Lubriplate®, to the surfaces.
Clean parts in mineral spirits or other o'ring compatible solvent being sure to clean o'ring grooves. Inspect components for scoring,
excessive wear or damage.
TOOL DISPOSAL
1.
When tool life is met, drain hydraulic oil from tool and dispose of the hydraulic oil in accordance with the safety datasheet.
2.
Disassemble tool and remove all rubber o
’
rings, seals, wipers and hydraulic hoses. All tool materials are recyclable except rubber
o
’
rings, seals, wipers and hydraulic hoses. Dispose of rubber materials in accordance with the material safety datasheet.
Note:
•
Dispose of hydraulic oil in accordance with manufacture safety datasheet.
•
All tool materials are recyclable except rubber o
’
rings, seals and wipers.
•
It is recommended that service tool kit (GB740TK) (see below) be used to facilitate overhaul.
•
Use of SERVICE KIT (734004), which contains a complete set of o
’
rings, back
-
up rings, screws, washers and
gasket, can achieve a complete overhaul.


