background image

7

   Governors America Corp. © 2021 Copyright All Rights Reserved

Enhanced Electronic Governor EEG7000 with GAConfig Tool 8-2021-D6


PIB1009 

7

INSTAllING ThE GAC

onfig

 TOOl 


 inStallinG Gac

onfig

 tool anD connectinG to eeG7000 

The EEG7000 speed controller uses the GAConfig


Tool to update parameter values on the EEG7000, adjust performance settings for 

the engine and view engine information.  This PC tool uses a menu-driven 

user-friendly interface for configuration, tuning, and trouble

-

shooting.  The tool also allows you to set up multiple scenarios and save them for use later or to import and export settings to share 

with other EEG7000 users.

The GAConfig Tool is downloaded from 

GAC’s website

. A PC with at least Windows 7, one USB port and an internet connection is 

required.   A 14 pin connector (GAC EC1502) or cable harness assembly (CH1520) is also required. 

Older EEG7000 controller hardware may have firmware that is not able to fully utilize the GAConfig Tool features. 

1. 

Download the EEG7000 GAConfig Tool from the 

GAC Software Download 

page

. Depending on your workplace the download installer may request 

additional information. After the software is installed the PC must be re-

started. 

2. 

The download file is saved in the PCs default download folder area, unless 

you tell it otherwise. Once downloaded, double-click the file name to start 

the installation.  If you have any issues installing the file please cal your 

GAC representative. The default installation is in the Program Files (x86) /

Governors America Corporation file area. 

3. 

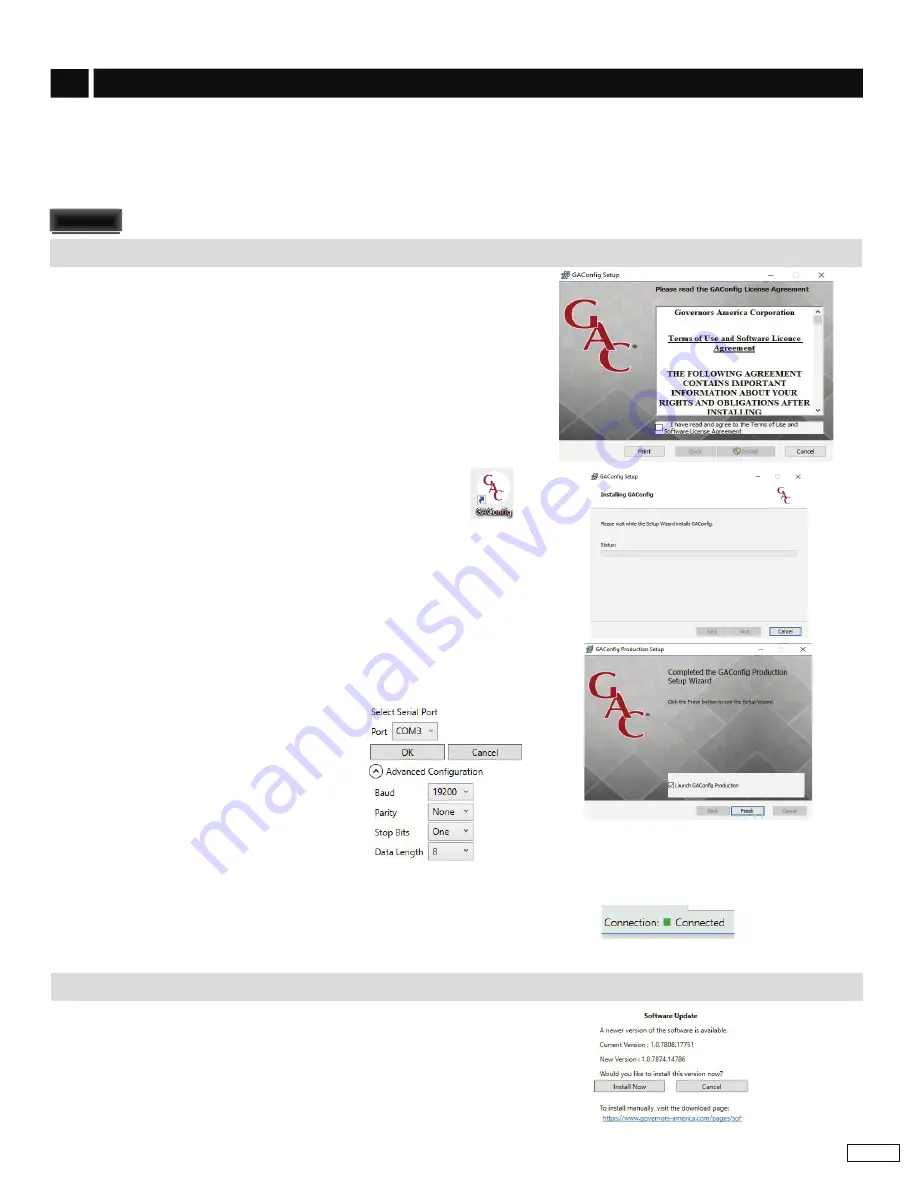
The GAConfig Setup screen displays. Click Install.  The Installing GACon

-

fig screen displays, showing a progress bar. 

4. 

Click Finish when complete.  The GAConfig icon is placed 

on the desktop. On first use a prompt will ask you to select a 

device. Select EEG7000 from the drop-down list.  

5.  Connect the EEG7000 to the PC using a USB-A port and connect the 

USB-B port on the EEG7000. Power for the controller comes from the 

engine battery. A green LED displays on the EEG7000 when power is 

successful. 

6.  Do not start the engine

.

7. 

Double-click the GAConfig Tool icon on your desktop. 

8. 

Connect the GAConfig Tool to the EEG7000 by clicking the Connect icon 

on the top left of the GAConfig window. 

9.  A pop-up dialogue window displays a drop-

down list of available serial port connections.  

Select the appropriate port and click OK.  If you 

are unsure of the port, 

use the Windows Device 

manager

 to locate what device is plugged in to 

which USB port. 

10.  The Connection Status indicator on the 

lower left corner of GAConfig Tool flashes yellow then turns green as 

the connection is completed. The status bar displays Connected. If the 

connection does not complete, a red Disconnected message displays. 

Check your connections and note any error messages on the PC and try 

again. 

If you already have the GAConfig Tool software on your system, an automatic 

upgrade with the latest version will be offered.  It is always good practice to save 

your settings.  

 inStallinG an UPDate 

NOTE

NOTE

Содержание EEG7000

Страница 1: ...off road mobile equipment GAConfig Tool adds the ability to monitor and set parameters from your PC With CAN J1939 capabilities allow it to accept TSC1 messages over USB as a mini engine control modul...

Страница 2: ...cause personal injury or equipment damage Do not rely exclusively on the governor system electric actuator to prevent overspeed A secondary shutoff device such as a fuel solenoid must be used LED DEFI...

Страница 3: ...C or 4 20 mA selectable polarity 10 Battery Ground 16 Battery ground 11 Battery Power 16 A 10 A fuse must be installed in the positive battery lead to protect against any overload or short circuit or...

Страница 4: ...cable shield must only be connected to the case The shield should be insulated to ensure that no other part of it comes into contact with engine ground otherwise stray signals may be introduced into t...

Страница 5: ...lue and click Calibrate Minimum button To calibrate the maximum percent set the potentiometer to the highest end value and click Calibrate Maximum button The difference between the analog minimum spee...

Страница 6: ...ntiometer CW all the way and click Calibrate Maximum d Note the Input Actual result Variable Speed can be used as another fixed speed setting if both Speed Minimum and Speed Maximum parameters are set...

Страница 7: ...e please cal your GAC representative The default installation is in the Program Files x86 Governors America Corporation file area 3 The GAConfig Setup screen displays Click Install The Installing GACo...

Страница 8: ...RED warning boxes error information yellow cautions and other pop up information Setting some parameter values impact other parameter values often displaying a caution The GAConfig Tool windows autom...

Страница 9: ...NG Engine Tuning is the basic menu used to store your engine startup and tuning information Flywheel teeth overspeed fuel limit Start fuel rate Fuel ramp rate starter cutoff acceleration and decelerat...

Страница 10: ...uning improves performance Before you start your engine Install the GAConfig Tool on a PC and connect the PC to the EEG7000 with the USB cable Provide power to the EEG7000 from the battery Install an...

Страница 11: ...until instability develops Gradually decrease Stability value until stability returns Decrease the value by one to ensure it is stable If there is no instability leave set at 50 c Set the DEADTIME to...

Страница 12: ...speed while in variable speed Speed Maximum 150 6000 rpm 1500 Maximum speed setting Variable Speed End Gain 1 100 50 Gain to use when at the maximum speed while in variable speed Input Minimum Calibra...

Страница 13: ...y adding settings or use the automatic calibration buttons a To set calibration automatically Turn potentiometer fully CCW and click Calibrate Minimum Turn potentiometer fully CW and click Calibrate M...

Страница 14: ...le speed as needed The No Load Current value must be set to less than Full Load Current and the difference between the two must be at least 0 5 A If an invalid combination is entered a warning message...

Страница 15: ...econds 3 Click Start The data displays similar to shown below Note the time and rpm display when you move your cursor over the green timeline 4 To save the data click Save The file is saved as a print...

Страница 16: ...1500 1500 Set engine speeds Variable Speed Variable Speed Input Mode 4 20 mA or 0 5 V DC 0 5 V DC Sets variable speed input signal to 0 5 V DC or 4 20 mA Speed Minimum Speed Maximum 150 6000 150 6000...

Страница 17: ...orporate while in variable speed mode SAE J1939 Configuration J1939 Address 0 253 0 Sets the CAN address for J1939 communication Engine Requested Torque Speed 0 6000 rpm 1500 The value the controller...

Страница 18: ...39 compatible After initial configuration the CAN data is available on the J1939 Diagnostics Messages view on the GAConfig Tool or using a compatible controller Sample PGN transmit and receive codes a...

Страница 19: ...d diagnostics CONTINUED 15 PGN NAME VALID SPN s NOTES 0 Torque Speed Control 1 TSC1 SPN695 Engine Override Control Mode SPN898 Engine Requested Speed Speed Limit SPN3349 TSC1 Transmission Rate SPN4206...

Страница 20: ...0 offers a number of GAC specific capabilities as well as helpful tools The GAConfig Tool allows settings in the tool to be stored shared and imported back into the tool for use on multiple EEG7000 co...

Страница 21: ...tic Engine Behavior Increasing Stability reduces instability but does not totally correct it If this is the case there is most likely a problem with the engine itself Check for engine mis firings erra...

Страница 22: ...sure the voltage at the battery while cranking If the voltage is less than 7 V DC for a 12 V DC system or 14 V DC for a 24 V DC sys tem check or replace battery Momentarily connect Pins 1 and 11 The a...

Отзывы: