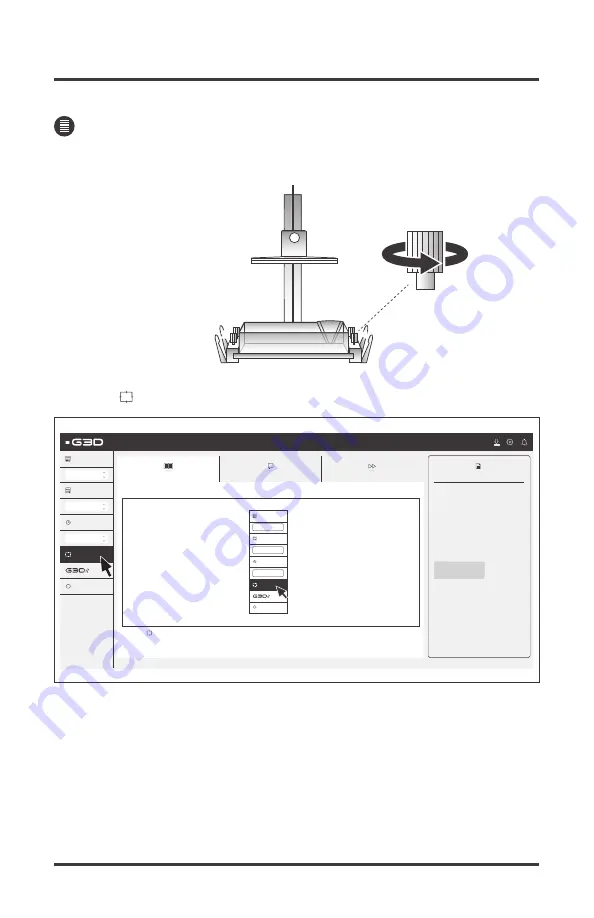
You must always position the build plate before printing.
1. Untighten all vat lock screws.
2. Press < Position Build Plate> button.
T-1000
33
POSITIONING THE BUILD PLATE
PRINTING WITH T-1000
Tutorial
Beginner
Advanced
?
6. Press < Position Build Plate> button.
Initial Layer Cure Time
No. of Initial Layer
Layers Cure Time
70
+
3
7
#
Cancel
Information
Sphere.g3d
Filename
175
XY Resolution (µm)
120
Z Layer Thickness (µm)
Estimated Time (hh:mm)
589
Total Layers to Print
38
Total Print Volume (ml)
01:39:00
Initial Layer Cure Time
No. of Initial Layer
Layers Cure Time
70
+
3
7
#
Cancel
Position Build Plate
Position Build Plate
VAT LOCK SCREW
2
3
11
44
Содержание T-1000
Страница 11: ...8 T 1000 GETTING TO KNOW THE T 1000 14 12 13 Fuse holder Lifting handle Main switch 15 Power cable 13 14 15 12 ...
Страница 35: ...CALIBRATING THE VAT 7 Tighten all vat lock screws 32 T 1000 PRINTING WITH T 1000 VAT LOCK SCREW 2 3 1 1 4 4 ...
Страница 51: ...2 Remove the build plate from bracket 48 T 1000 REMOVING THE BUILD PLATE CLEANING GUIDE ...
Страница 63: ......
Страница 64: ......


