background image

G-TOOLS SMART BOX

G-TOOLS SMART BOX

4

PROGRAMMEREN

PROGRAMMING

PROGRAMMIERUNG 

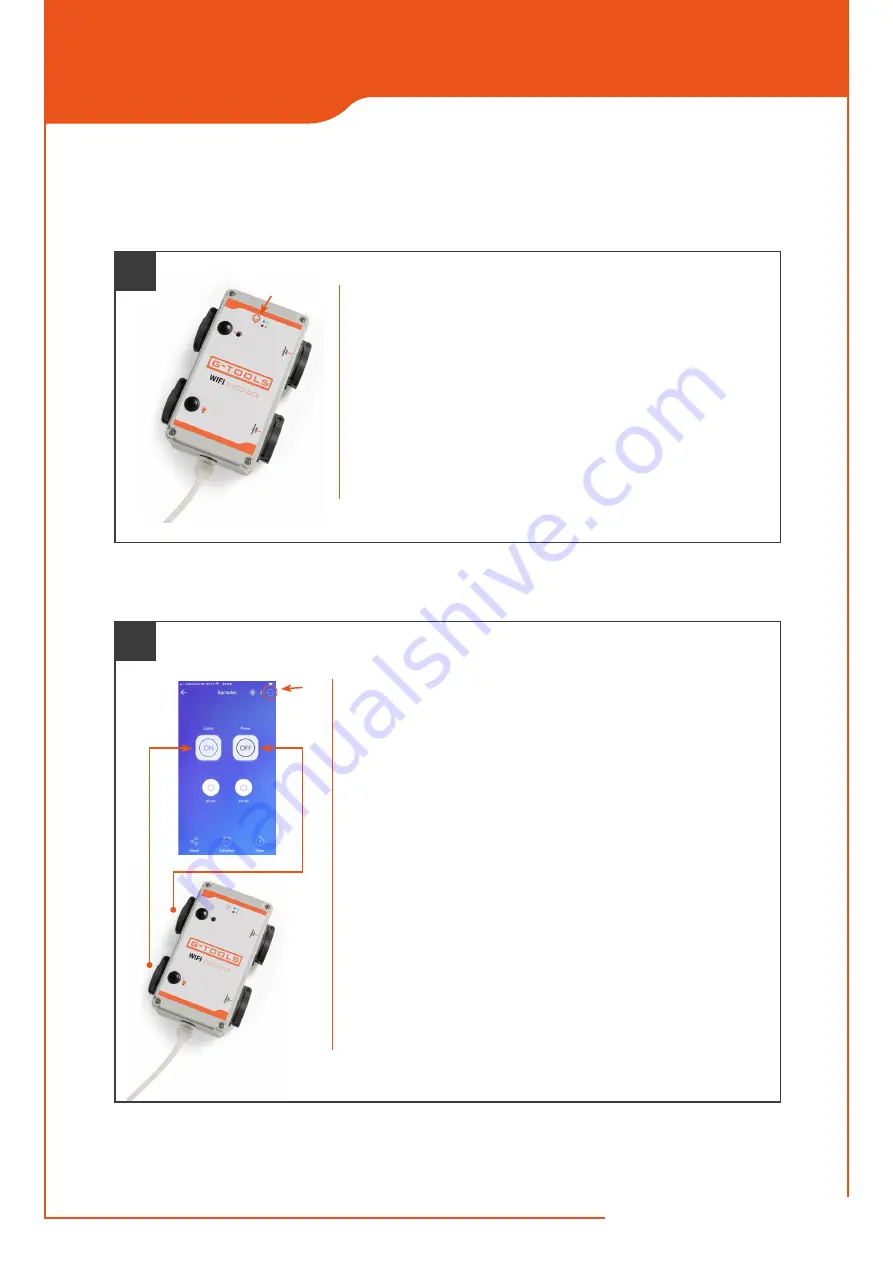
Houd de 

pairing

 knop op de Wifi Smart Box 

7 seconden

 ingedrukt  

totdat het 

groene ledlampje 3 x snel knippert en 1 x lang

.

Het apparaat zoekt nu naar uw Wifi netwerk.

Afhankelijk van de sterkte van het Wifisignaal moeten er soms meerdere pogin-

gen worden ondernomen voor de Smart Box verbinding maakt met de app.

Press and hold the 

pairing

 button on the Smart Box for 

7 seconds


until the 

green led light  flashes 3 x fast and 1 x long

.

The device now starts to connect to your Wifi network through the app.

You might need to try several times before the Smart Box connects to the app.

Halten Sie die 

Pairing

-Taste an der Wifi Smart Box 

7 Sekunden

 lang gedrückt, 

bis die 

grüne LED  3 x schnell blinkt und dann 1 x läng

.

Das Gerät sucht nun nach Ihrem WLAN-Netzwerk.

Je nach Stärke des WLAN-Signals müssen möglicherweise mehrere Versuche 

unternommen werden, bevor sich die Smart Box mit der App verbindet.

Als de Smart Box contact heeft gemaakt met uw netwerk verschijnen de twee 

kanalen in het scherm. Onder de knop met de 

3 horizontale puntjes

 vindt u het 

gedeelte waar de namen van de kanalen kunnen worden ingevoerd.

Een kanaal bedient het contact op de Smart Box met het gloeilamp symbool. 

Hier kunt u de belichtingstijden instellen. Dit kanaal kunt u 

lights

 noemen.  

Met het andere kanaal bedient u het stopcontact met het gieter symbool.  

Hier stelt u het aantal bewateringsmomenten in. Deze kunt u 

pump

 noemen.

When the Wifibox has made contact with your network, the two channels will  

appear on the screen. The button with the 

3 horizontal dots

 gets you to the 

section where the names of the channels can be entered.  

One channel operates the contact on the Smart Box with the light bulb symbol. 

Here you can set the light ON times. You can call this channel 

lights

. With the 

other channel you operate the socket with the watering can symbol.  

Here you set the number of watering times. You can call this 

pump

.


Wenn die Smart Box verbunden ist mit Ihrem Netzwerk erscheinen die  

beiden Kanäle auf dem Bildschirm. Unterhalb der Schaltfläche mit den  

3 waagerechten Punkten

 finden Sie den Bereich, in dem die Namen  

der Kanäle eingegeben werden können.


Ein Kanal steuert den Kontakt an der Smart Box mit dem Glühbirnensymbol.  

Hier können Sie die Belichtungszeiten einstellen. Sie können diesen Kanal 

Lichts


nennen. Mit dem anderen Kanal bedienen Sie die Steckdose mit dem  

Gießkannensymbol. Hier stellen Sie die Anzahl der Bewässerungszeiten ein.  

Das kann man 

Pumpe

 nennen.

6

7

pairing

Содержание Smart Box

Страница 1: ...Smart Box Handleiding Manual Handleitung WIFI SWITCHBOX ...

Страница 2: ...mount of light and water your plants get Anytime anywhere In addition the Smart box has 2 contacts with continuous voltage These can be used to connect devices that need to be switched on continuously such as air extractors etc The Smart box can be used immediately after programming the app Specificaties Umax 250 V 50 Hz VA Max kanaal 10A 2300W VA Max 13A 3000W IP Klasse 20 Spezifikationen Umax 25...

Страница 3: ...WeLink app in de telefoon en druk op het symbool onder in het scherm Open the eWeLink app in your phone and press the symbol at the bottom of the screen Öffnen Sie die eWeLink App im Telefon und drücken Sie das Symbol am unteren Bildschirmrand Selecteer de quick pairing modus Select the quick pairing modus Wählen Sie den Modus Quick Pairing Voer de naam van het Wifi netwerk en het password in Indi...

Страница 4: ...nnen worden ingevoerd Een kanaal bedient het contact op de Smart Box met het gloeilamp symbool Hier kunt u de belichtingstijden instellen Dit kanaal kunt u lights noemen Met het andere kanaal bedient u het stopcontact met het gieter symbool Hier stelt u het aantal bewateringsmomenten in Deze kunt u pump noemen When the Wifibox has made contact with your network the two channels will appear on the ...

Страница 5: ...ck Add at the bottom of the screen to set the time when you want the light to switch ON Klicken Sie unten auf dem Bildschirm auf Add um die gewünschte Licht EIN Zeit einzustellen Onder repeat vinkt u repeat aan en alle dagen van de week Druk daarna op save Under repeat you tick repeat and all days of the week Then press save Aktivieren Sie unter repeat das Häkchen und alle Tage Drücken Sie dann au...

Страница 6: ...ch OFF Now you ve set the times when the grow light will switch on and off You can repeat the same process for the pump Drücken Sie erneut das Symbol und geben Sie nun die gewünschte Licht AUS Zeit ein Sie haben nun die Zeiten eingestellt zu denen die Beleuchtung ein und ausschaltet Wiederholen Sie den gleichen Vorgang für die Pumpe Voor meer info zie onze de demonstratie op youtube For more info ...

Страница 7: ...ed in household waste There are free collection points for the return of WEEE available nearby Please inquire at your city or municipality about the addresses You can also contact us regarding other options to return old equipment By separate collection of WEEE the reuse and recycling of old equipment are made possible and any negative impact on the environment and human health due to hazardous su...

Отзывы: