background image

p.12

Using Your Drive on Mac

Use with Time Machine

G-DRIVE works perfectly and easily with Time Machine™. Time Machine is an  
application that ships with your Mac and provides automatic backup for your files. 
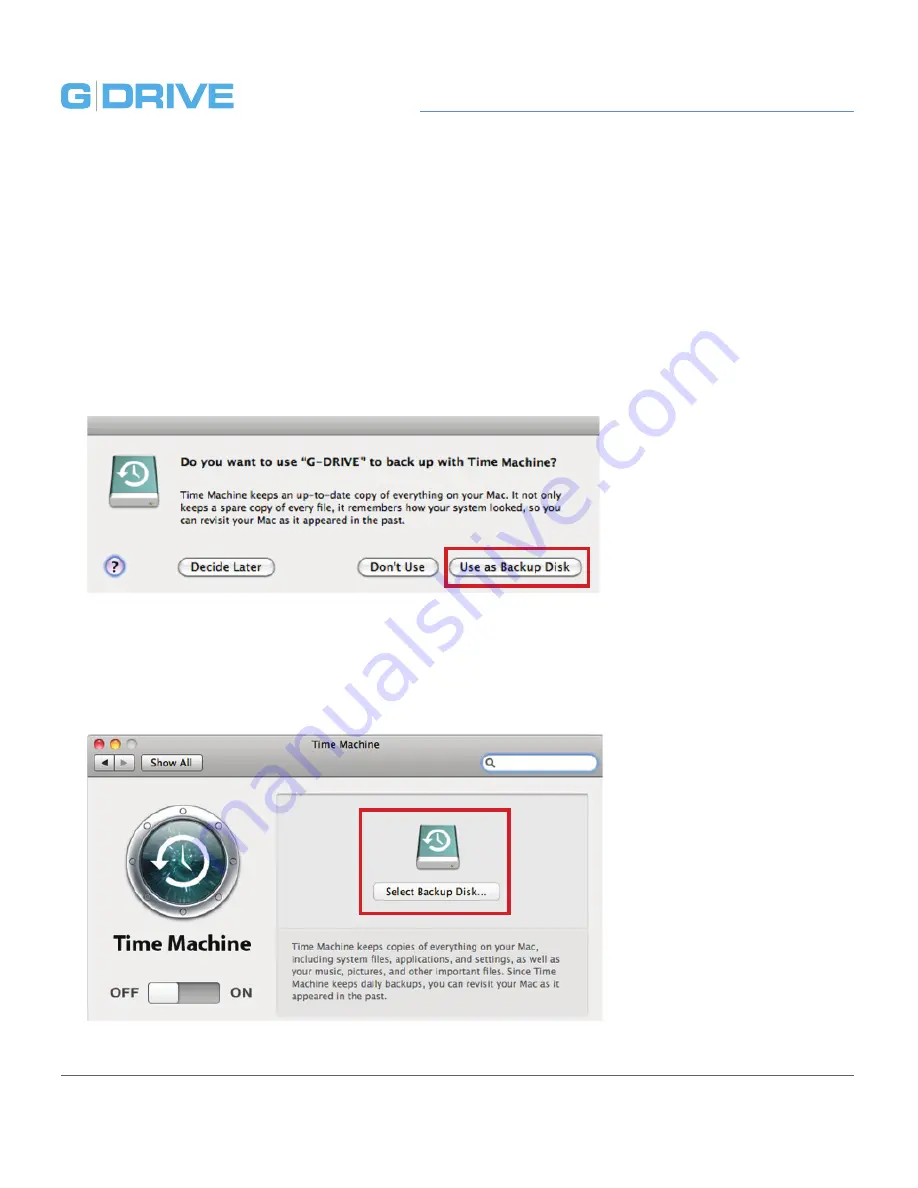
The following steps will quickly set up G-DRIVE with Time Machine.

1.  When you attach G-DRIVE for the first time, the Time Machine dialog box 

should automatically appear. Click the Use as Backup Disk button.


2.  If the Time Machine dialog box did not launch, go to the Apple Menu> System 

Preferences. Click on the Time Machine icon. The Time Machine Preference 
panel will open. Click the Select Backup Disk button.

timemach

Содержание G DRIVE

Страница 1: ...Professional external hard drive Macworld Best Consumer Storage 2010 Welcome to G...

Страница 2: ...rview of the Drive 9 Using Your Drive on Mac Easy Installation for Mac 11 Optimize Performance 11 Use with Time Machine 12 Disconnect the Drive 14 Maintenance for Your Drive Initialize Drive for Mac 1...

Страница 3: ...Safety General Use Safety Precautions p 4 Backup Your Data p 5...

Страница 4: ...moisture or liquids To reduce the risk of damage do not expose this drive to rain or moisture Do not use it in damp or wet conditions Never place objects containing liquids on the drive as they may s...

Страница 5: ...the recovery or restoration of lost data Any loss corruption or destruction of data while using a G Tech drive is the sole responsibility of the user Make two backups To help prevent the loss of your...

Страница 6: ...About Your G DRIVE Introduction p 7 What s in the Box p 8 System Requirements p 9 Overview of the Drive p 9...

Страница 7: ...ect high performance solution for storage intensive applications including audio video editing digital photography MP3 libraries and high speed data back up You will love how G DRIVE looks and sounds...

Страница 8: ...e box G DRIVE hard drive eSATA FW800 FW400 USB 2 0 eSATA cable FireWire 800 cable 9 Pin to 9 Pin FireWire 800 to 400 cable 9 Pin to 6 Pin USB 2 0 cable AC Power Unit and cables If any items are missin...

Страница 9: ...r of the unit is a Kensington security slot an eSATA port 2 FireWire 800 ports a USB 2 0 port a DC Power In and an On Off Switch overview System Requirements G DRIVE supports the folllowing Operating...

Страница 10: ...Using Your Drive on Mac Easy Installation for Mac p 11 Optimize Performance p 11 Use with Time Machine p 12 Disconnect the Drive p 14...

Страница 11: ...nnect G DRIVE with the matching supplied cable Connect the power cord to the unit and plug the other end into a surge protector or wall outlet Turn on the power switch The drive will automatically mou...

Страница 12: ...following steps will quickly set up G DRIVE with Time Machine 1 When you attach G DRIVE for the first time the Time Machine dialog box should automatically appear Click the Use as Backup Disk button...

Страница 13: ...e Use for Backup button 4 Make sure the Time Machine switch is set to ON You can set its options by clicking the Options button Do this to choose volumes folders or files you do NOT want to backup G D...

Страница 14: ...he drive from your computer 1 Before powering down and disconnecting the G DRIVE unmount the drive by simply dragging the G DRIVE icon to the trash located in the dock Keyboard shortcut Select the dri...

Страница 15: ...Maintenance for Your Drive Initialize Drive for Mac p 16 Restore the Drive Icon p 19 Reformat with Partitions p 21...

Страница 16: ...is application is located on your hard drive under Applications Utilities Disk Utility The window below will appear Your G DRIVE will be displayed in the left hand column 2 Select the G DRIVE by click...

Страница 17: ...Time Machine or to create a separate bootable installation of OS X Mac OS Extended Use this format for best performance and media storage To select click the Format pop up and its option to Mac OS Ext...

Страница 18: ...you should automatically see the Time Machine dialog box Click the Use as Backup Disk button if you want to use the drive with Time Machine For more info using the drive with Time Machine go here Cli...

Страница 19: ...earance on the computer desktop look nicer and more accurate 1 To get the G Tech icon package go to www g technology com support and navigate to your product There will be a link to download the icons...

Страница 20: ...ns its Get Info window below left 5 Select the default icon in the Get Info window below left 6 Press Command V to paste the custom G DRIVE icon into the Get Info window below right The icon for your...

Страница 21: ...rent purposes For instance segment user data from backup data set up a multi boot environment with different Operating Systems or create a dedicated capture scratch disk for programs like Final Cut Pr...

Страница 22: ...icon not the G Tech drive icon by clicking it in the left side column 3 Click on the Partition button in the main window 4 Select the number of partitions you would like from the Volume Scheme menu B...

Страница 23: ...it is recommended to use Mac OS Extended or Mac OS Extended Journaled For info about formats go here In the Size field type in a size for the partition Alternately you can drag the bar in between each...

Страница 24: ...tiple partitions will be displayed in the left hand panel of Disk Utility 10 Quit the Disk Utility program After reinitializing the drive the custom icon for the G Tech drive has been erased You can o...

Страница 25: ...Using Your Drive on Windows Windows Use p 26 Cross Platform Use p 27...

Страница 26: ...the factory for use with Mac OS X systems A simple initializa tion will prepare your drive for use with Windows XP Vista and Windows 7 systems For helpful information on configuring and using your dr...

Страница 27: ...program This application is located on your hard drive under Applications Utilities Disk Utility The window below will appear Your G DRIVE will be displayed in the left hand column 2 Select the G DRI...

Страница 28: ...AT32 NOTE You may need to rename the drive because FAT32 does not support more than 11 letters in the drive name 5 Click the Erase button in the lower right corner of the window A dialog box will appe...

Страница 29: ...2 With this format you will be able to read write on Windows XP Vista and Windows 7 and on Mac OS X machines Limitations with FAT32 There are some limitations when using FAT32 The MS DOS File System c...

Страница 30: ...Support Warranty Technical Support p 31 Limited Warranty p 32 Copyright p 33...

Страница 31: ...ng or using G DRIVE please contact G Tech Technical Support in one of the following ways Telephone 888 426 5214 Fax 408 717 9007 E mail support g technology com Internet www g technology com support H...

Страница 32: ...be measured from the date of sale from Hitachi GST to the authorized distributor What does this limited warranty not cover The limited warranty does not cover damage resulting from commercial use misu...

Страница 33: ...hipping point You are responsible for importation of the repaired or replaced product if applicable These limited warranty terms apply to the repaired or replaced product except the limited warranty p...

Страница 34: ...se market and advertise the brands The Travelstar trademark is authorized for use in the Americas EMEA and the following Asia Pacific countries and jurisdictions Australia Hong Kong Japan New Zealand...

Отзывы: