


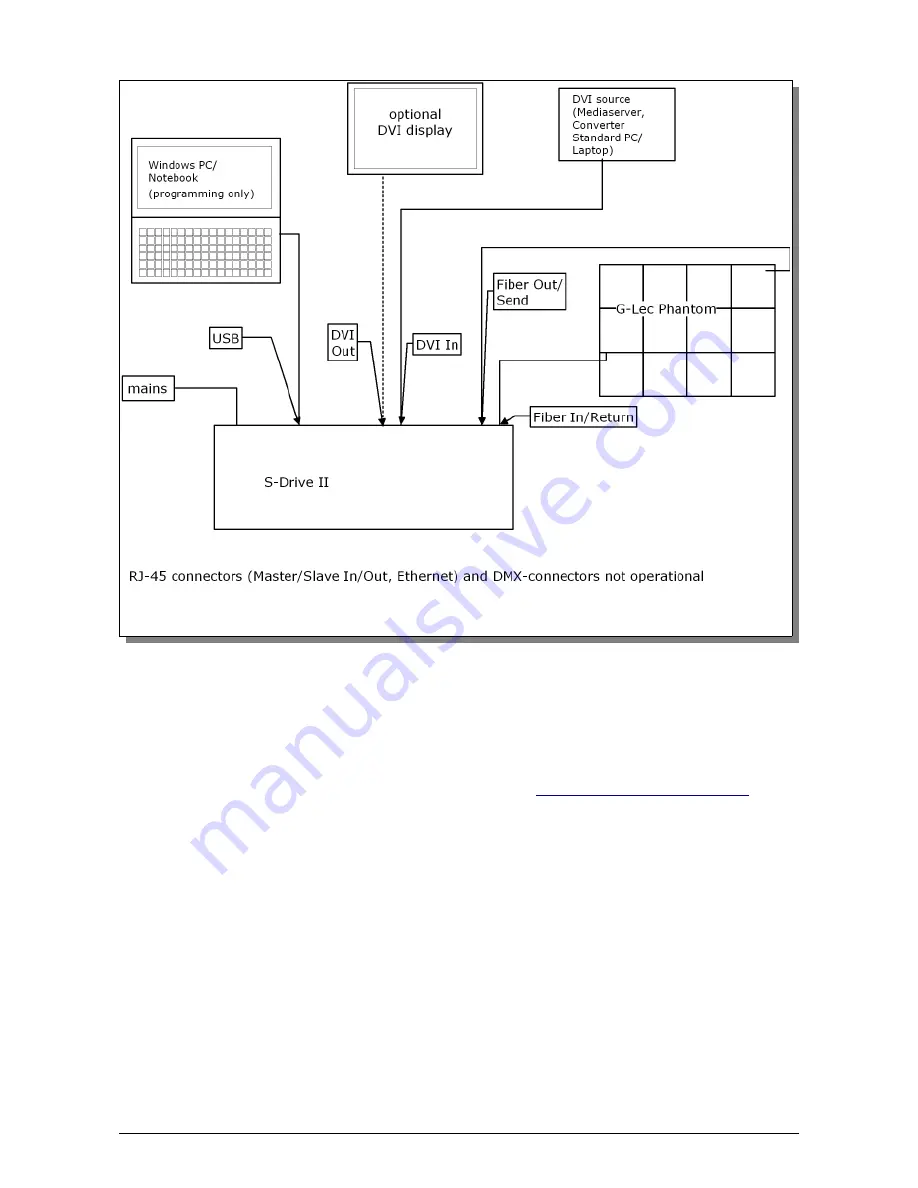
Installation
(1) Hook-up the components as shown in above diagram:
- Mains power supply
- Fiber cables to/from G-Lec Phantom Frames
- DVI-D from appropriate DVI video source
(2) On your control PC, install the latest G-Lec software (from
http://g-lec.com/en/software.html
). It's
recommended to install software and drivers prior to connecting the USB cable (however, if
Windows doesn't find the drivers later, you might point it manually to [G-Lec program folder]\drv –
in standard XP installations: c:\program files\G-Lec Phantom II\drv). Connect USB cable.
(3) Make sure DVI is properly recognized by the S-Drive (DVI LED lit, and resolution properly displayed)
(4) Power up everything, make sure the Sync LED is On
(5) If everything is properly set up, now, the red indicator LEDs at the panels should be off, and the
panels are supposed to show some random parts of the DVI input signal
DVI is used as time base for the entire system, and is therefore required for ALL operations. Even
showing the serial numbers, or programming the frames or S-Drive, will not succeed without a DVI source
Make sure you have the latest G-Lec software running (AboutUs, Version 3.5.1/9, Nov. 2009, or later).
The 'Variable Cropping' feature is required for the S-Drive II
Whilst officially DVI is plug'n'play, it's strongly recommended to switch the S-Drive and the DVI source
off prior to connecting the DVI cable, to avoid possible damage. Furthermore, many computers scan for
connected peripherals (like displays) at startup time only. Hence, if the computer doesn't find the display
'S-Drive2', reboot the system.
G-Lec Vision GmbH
S-Drive II Quick Setup Guide
Page 6
Fig. 4: Setup Diagram


