background image

DAILY SNOOZE AND ALARM CLOCK FUNCTION:

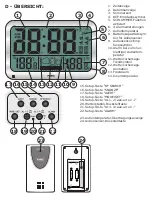
The weather station offers 4 alarm clock functions. The alarm clock is activated when the alarm 

clock functions with a number appears in the display. The alarm clock function will start flashing 

while the snooze function is enabled. Every 5 minutes an alarm signal will sound.

To set the wake-up time:

• 

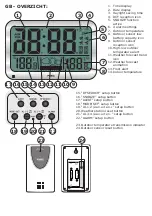
Repeatedly press the “ALARM”(22) button to select the wake-up time. Choose 

from wake-up time 1 through 4. Each wake-up time may be set individually.

• 

Go to the desired wake-up time (icon 1, 2, 3 or 4 and AL is visible).

• 

Press and hold the “ALARM” button for 2 seconds until the wake-up time hours 

start flashing. Press the

 +(19) and -(21) buttons to set the desired hour.

• 

Press the “ALARM”, 

button again; the wake-up time minutes start flashing. Press the

 +(19) 

and -(21) buttons to set the desired minutes.

• 

Press the “ALARM” button again or wait 10 seconds to save your settings.

• 

Use the “AL 1-2”(19) button to select the desired wake-up time 1 and 2, use the “AL 

3-4”(21) button to select the desired wake-up time 3 and 4. This wake-up time is active 

when the icon appears in the display. All 4 wake-up times or a combination of them may be 

selected.


To disable the alarm signal:

As soon as an active wake-up time is reached, the weather station will sound an alarm signal.

Press any button (except the “SNOOZE” button) to stop the alarm signal. If no button is 

pressed, the alarm signal will stop automatically after ± 2 minutes.

After 24 hours the alarm signal, connected to the set wake-up time, will sound again..

Snooze function:

During an alarm, press the “SNOOZE” (16), button to temporarily stop the alarm signal and 

enter the snooze mode; the 

 icon starts flashing. Upon activating the snooze mode, the alarm 

signal will sound again after 5 minutes. This may be repeated for up to 7 times.

To cancel the snooze function during snoozing:

While snoozing, press the “ALERT”(17) button to cancel the snooze function.

The   icon disappears.

THERMOMETER:

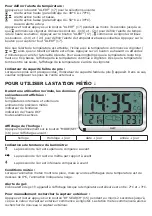
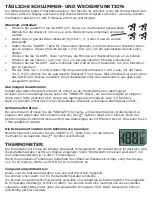
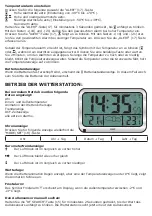
The temperature is shown at the left side in the display. Provided that the 

outdoor sensor is registered, the outdoor temperature is shown at the right 

side in the display. See “To manually set the weather station” to have the 

temperature display shown in °C or °F.

When the measured temperature is outside the effective measuring range, 

the display will show LL.L for values that are too low and HH.H for values that are too high.

Temperature alert function:


You may only set an alert for the outdoor temperature. You may set the desired temperature 

and as soon as the outdoor temperature exceeds the set temperature an alert will sound. You 

may also set a lower limit for an alert as soon as the outdoor temperature falls below the set 

temperature. Both thresholds can be enabled simultaneously. 

To set the temperature alert:

Press the “ALERT”(17) button for the following selection:


High alert active (setting from -49°C to +70°C).

    High and low alert active.


Low alert active (setting from -50°C to +39°C).


No alert active.

Press and hold the “ALERT”(17) button for at least 3 seconds until 

 starts flashing. Use the


+(19) and -(21) buttons to set the desired high temperature alert. Press the “ALERT”(17),but-

ton; 

 starts flashing. Use the

 +(19) and -(21) buttons to set the desired low temperature alert. 

Press button “ALERT”(17) to capture everything.

D S T

Содержание FKW-2200

Страница 1: ...GEBRUIKSAANWIJZING MODE D EMPLOI GEBRAUCHANLEITUNG USER MANUAL D S T 433 Mhz REMOTE SENSOR FKW 2200 Klok weerstation Wetterstation mit Uhr Horloge Station M t o Clock weather station...

Страница 2: ...batterij capa citeitsicoon buiten sensor 9 ontvangsticoon buitensensor 10 hoog laag buiten temperatuur alarm 11 tendens icoon weersverwachting 12 animatie weersver wachting 13 waarschuwing ijzel 14 b...

Страница 3: ...de actuele weersconditie te worden ingesteld door middel van het juiste icoon te kiezen De weersanimatie zal knipperen Met toetsen 19 en 21 kan het juiste icoon worden gekozen Bevestig de keuze met t...

Страница 4: ...r RCC on off tijdzone uren minuten seconden jaar maand datum taal C of F weericonen animatie 12 24 uur Stel hier de weergave van de klok in op 12 uursweergave of 24 uursweergave RCC Radio Controlled C...

Страница 5: ...een alarm op de toets SNOOZE 16 het alarmsignaal zal stoppen en in sluimer modus komen Het icoon knippert Nadat de sluimermodus is in gezet zal het alarmsignaal na 5 minuten weer klinken Dit herhaalt...

Страница 6: ...is hoger ten opzichte van eerder De luchtdruk is gelijk ten opzichte van eerder De luchtdruk is lager ten opzichte van eerder Weercondities Als de weer animatie regen aangeeft maar n van de temperatu...

Страница 7: ...ft bestaan Monteer daarna de buitensensor De afstand tussen het weerstation en de buitensensor mag niet meer dan 30 meter bedragen MONTAGE In geval van wandmontage kunnen de binnen en buitenunit aan e...

Страница 8: ...r 10 Alerte de temp rature ext rieure haute basse 11 Ic ne de tendances de pr vision m t o 12 Animation de pr vision m t o 13 Alerte gel 14 Temp rature int rieure 15 Bouton de configuration RF SEARCH...

Страница 9: ...es conditions m t o actuelles doivent tre d finies en choisissant l ic ne qui convient le mieux L animation m t o commencera clignoter Appuyez sur les boutons 19 et 21 pour s lectionner la bonne ic ne...

Страница 10: ...ures minutes secondes ann e mois date langue C ou F Animation Ic nes m t o 12 24 heures Pour r gler l affichage de l horloge au format 12 heures ou 24 heures RCC Horloge radio contr l e marche arr t P...

Страница 11: ...nte la station m t o fera retentir un signal d alarme Appuyez sur n importe quel bouton except le bouton SNOOZE pour arr ter le signal d alarme Si aucun bouton n est press le signal d alarme s arr ter...

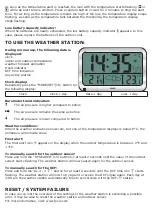
Страница 12: ...de pile Lorsque les piles sont presque vides l indicateur de capacit faible de pile appara t Dans ce cas veuillez remplacer les piles de l unit ext rieure POUR UTILISER LA STATION M T O Durant une uti...

Страница 13: ...lourd tel qu un r frig rateur ou machine laver certaines exp rimentations peuvent tre n cessaires Selon les circonstances locales la port e effective entre le capteur ext rieur et la station m t o peu...

Страница 14: ...ssym bol f r Au ensensor 9 Au ensensor Emp fangssymbol 10 Alarm bei zu hoher niedriger Au entem peratur 11 Wettervorhersage Trendsymbol 12 Wettervorhersage Animation 13 Frostalarm 14 Innentemperatur 1...

Страница 15: ...ge durch Auswahl des passenden Symbols eingerichtet werden Die Wetteranimation f ngt an zu blinken Dr cken Sie die Tasten 19 und 21 um das richtige Symbol auszuw hlen und best tigen Sie Ihre Auswahl d...

Страница 16: ...aus Zeitzone Stunden Minuten Sekunden Jahr Monat Datum Sprache C oder F Animation der Wettersymbole 12 24 Stunden Die Uhranzeige im 12 oder 24 Stundenformat einstellen RCC Funkgesteuerte Uhr ein aus D...

Страница 17: ...cken Sie eine beliebige Taste au er der SNOOZE Taste um das Alarmsignal zu stoppen Wenn keine Taste gedr ckt wird stoppt das Alarmsignal automatisch nach 2 Minuten Nach 24 Stunden ert nt das mit der...

Страница 18: ...unter die Grenzwerte f llt h rt die Temperaturanzeige auf zu blinken Batteriestandanzeige Wenn die Batterien fast ersch pft sind erscheint die Batteriestandanzeitge In diesem Fall wech seln Sie bitte...

Страница 19: ...ie m ssen m glicherweise experimentieren Je nach den rtlichen Gegebenheiten kann die effektive Reichweite zwischen dem Au ensensor und der Wetterstation variieren Vor der eigentlichen Befestigung des...

Страница 20: ...battery capacity icon 9 Outdoor sensor reception icon 10 High low outdoor temperature alert 11 Weather forecast trend icon 12 Weather forecast animation 13 Frost alert 14 Indoor temperature 15 RF SEAR...

Страница 21: ...11 Upon inserting the batteries the actual weather conditions must be set by choosing the most suitable icon The weather animation will start flashing Press the 19 and 21 buttons to select the correc...

Страница 22: ...sing any buttons 12 24 Hr RCC on off time zone hours minutes seconds year month date language C or F weather icons animation 12 24 hour To set the clock display to 12 hours or 24 hours format RCC Radi...

Страница 23: ...n During an alarm press the SNOOZE 16 button to temporarily stop the alarm signal and enter the snooze mode the icon starts flashing Upon activating the snooze mode the alarm signal will sound again a...

Страница 24: ...igher compared to before The air pressure remains the same as before The air pressure is lower compared to before Weather conditions When the weather animation shows rain but one of the temperature di...

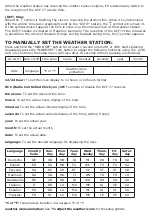
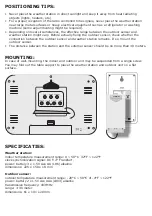
Страница 25: ...ation remains If so mount the outdoor sensor The distance between the station and the external sensor should be no more than 30 meters MOUNTING In case of wall mounting the indoor and outdoor unit may...

Страница 26: ......

Страница 27: ......

Страница 28: ...ef Tarif local DE 0180 503 0085 Lokale Festnetzkosten Hesdo Australi laan 1 5232 BB s Hertogenbosch The Netherlands WWW FYSIC COM SERVICE FYSIC NL NL 073 6411 355 BE 03 238 5666 DE 0180 503 0085 Hesdo...

Отзывы: