9
5) BATTERY TOOL USE AND CARE
a) Recharge only with the charger specified by the
manufacturer. A charger that is suitable for one
type of battery pack may create a risk of fire when
used with another battery pack.
b) Use power tools only with specifically designated
battery packs. Use of any other battery packs may
create a risk of injury and fire.
c) When battery pack is not in use, keep it away from
other metal objects, like paper clips, coins, keys,
nails, screws or other small metal objects, that can
make a connection from one terminal to another.
Shorting the battery terminals together may cause
burns or a fire.
d) Under abusive conditions, liquid may be ejected
from the battery; avoid contact. If contact
accidentally occurs, flush with water. If liquid
contacts eyes, additionally seek medical help.
Liquid ejected from the battery may cause irritation
or burns.
6) SERVICE
a) Have your power tool serviced by a qualified repair
person using only identical replacement parts. This
will ensure that the safety of the power tool is
maintained.
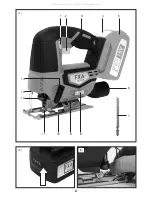
COMPONENTS & CONTROLS (FIG.1)
UNPACKING
Caution!
This packaging contains sharp objects. Take
care when unpacking. Remove the machine, together
with the accessories supplied, from the packaging.
Check carefully to ensure that the machine is in good
condition and account for all the accessories listed in
this manual.
Also make sure that all the accessories are complete.
If any parts are found to be missing, the machine and
its accessories should be returned together in their
original packaging to the retailer.
Do not throw the packaging away, keep it safe
throughout the guarantee period, then recycle if
possible, otherwise dispose of it by the proper means.
Do not let children play with empty plastic bags due
to the risk of suffocation.
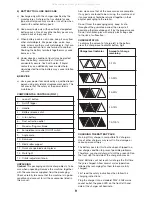
ChARGE STATUS
To display the amount of charge left in the battery,
press the charge level indicator button, Fig.2.
ChARGING ThE BATTERY PACK
Warning! Only charge in compatible 18V chargers.
Use of other chargers may result in fire, damage or
serious personal injury.
The battery pack for this tool has been shipped in a
low charge condition to prevent possible problems.
Therefore, you should charge it until the green LED on
the front right hand side of the charger comes on.
Note: Batteries will not reach full charge the first time
they are charged. Allow several cycles (operation
followed by recharging) for them to become fully
charged.
First read the safety instructions then follow the
charging instructions.
Plug the charger into a standard 230V~50Hz mains
socket outlet, the green LED on the front left hand
side of the charger will illuminate.
1.
Lock-off button
2.
On/Off trigger
3.
Handle
4.
Battery release catch
5.
Li-ion battery
6.
Dust extraction outlet
7.
Wood cutting saw blade
8.
Forward/rear air outlet On/Off switch
9.
Angle scale
10. Saw base
11. Blade roller support
12. Quick change blade clamp lever
13. Work light
14. Orbital adjustment knob
Charge level indicator
Amount of charge
remaining
0-10%
10-25%
25-50%
50-75%
75-100%
All manuals and user guides at all-guides.com


