Charging the lights:
Front.
1. The battery should be fully charged before first use.
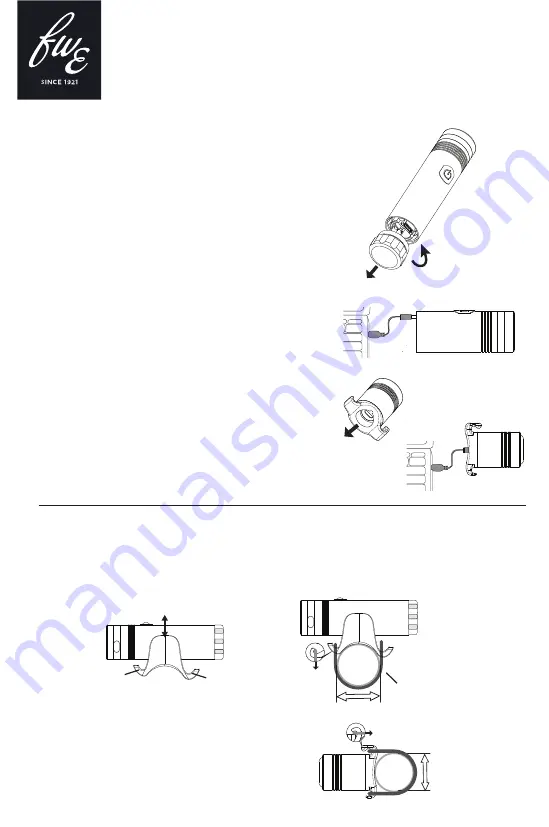
2. Undo the bezel end cap anti-clockwise (fig.1) & plug in
the micro USB cable provided, then connect to a USB
port (fig.2)
3. The power button will emit a red light to indicate that
the light is charging.
4. If the power button flashes whilst charging this means
that an error has occurred, remove & re-insert the USB
cable and begin the recharging process again.
5. The battery charges to 80% after approx. 5 hours, the
power button will go blue when the light is fully charged.
6. Disconnect the light from the charging source once fully
charged, replace the end cap & firmly tighten to ensure a
waterproof seal.
7. BATTERY INDICATOR - when the light is off, press and hold the
power button for 3 secs to enter battery indicator mode. 10 flashes
means the light is fully charged, 1 flash means empty. To exit out of
battery indicator mode, double tap the power button.
Rear.
1. The battery should be fully charged before first use.
2. Unplug the rubber cover on the back of the light (fig.3) &
plug in the USB cable provided, then connect to a USB port
(fig.4).
3. A steady green light will be ommitted from the lens whilst
charging, once the light is fully charged a red LED will flash.
4. The USB cable should be removed from the light and the
rubber cover replaced securely to prevent water ingress.
- Charging & burn times are approximate values & will vary
dependent on environment and charging source.
- During use the power button will emit a red light when there
is below 20% battery life left.
- Do not allow the light to completely lose charge as this will
greatly reduce the number of recharge cycles and reduce the life
span of the battery.
USB RECHARGEABLE LIGHT SET
450 LUMENS FRONT / 50 LUMENS REAR
(fig.4)
Ø
19
~Ø32
Rear.
Position the light at the required height on your seat
post, attach the strap to the hook with the bulge first
and then pull the strap around the seat post and locate
securely on the opposite hook.
(fig.2)
(fig.1)
Installing the light to your bike:
1. Position the cradle mount on to your handlebars with the shorter hook facing forward, locate the rubber
strap on to the front hook and whilst stretching the rubber strap pull it under the bar and locate on to the
longer hook at the back of the mount.
2. Once the mount is securely in place on the bars you can then install the light in to the cradle by pushing
down until it is firmly engaged.
Remove
Install
Front hook(short)
Back hook (long)
Strap
Ø19~Ø32


