7
14
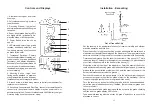
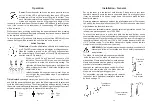
Installation - Grading
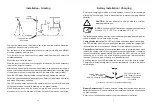
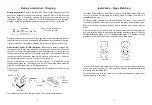
Position the machine so the blade is set to the desired finished elevation,
typically on a benchmark or hub stake.
Set the laser up in an appropriate location for receiver visibility and efficient
machine operation and turn it on.
Turn the receiver on, select center on-grade (grading mode) and select the
smallest deadband.
Mount the receiver to the mast.
Slide the receiver up or down until on-grade is indicated. It may be necessary
to adjust the height of the laser.
Alternatively, if the height of instrument (laser beam) to finished elevation length is
known, the receiver can be set by measuring this distance from the cutting edge
of the blade to the center on-grade mark on the back of the receiver label.
Face the LED grade display toward the operator and tighten the clamps.
Select the desired deadband and brightness. Select optional blade tilt display
and blade tilt accuracy if desired.
The LED grade display will direct the operator which way to move the blade
using the machine's controls to maintain an "on-grade" reading.
Make a sample pass with the blade "on-grade" and check to ensure the
elevation is correct. Check blade tilt also if blade tilt indication is selected.
Laser
Center
On-grade
Finished Elevation
Benchmark
Battery Installation / Charging
Built-in overcharging protection prevents damage if the unit is left on charge
after being fully charged. There is also protection to prevent charging alkaline
batteries.
CAUTION:
Do not attempt to charge alkaline or other
disposable batteries.
NOTE:
Do not charge Ni-MH batteries when ambient temperature
exceeds 113° F (45° C) or is less than 32° F (0° C).
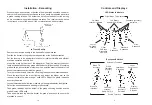
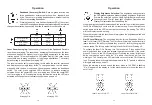
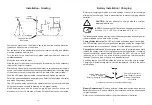
The rechargeable battery electronics include a charge status and charge error
indicator located on the back of the housing.
Charge Status Indicator:
The LED will remain solid when the unit is charging.
The LED will blink when fully charged. When charged, unplug the charger from
the outlet and remove the cannon adapter from the accessory connector.
Charge Error Indicator:
If the batteries seem to be in a totally drained state
initially, the charge circuit will try to gradually charge the batteries. If charging
is unsuccessful after approximately 20 minutes, the LED will turn on solid
indicating an error with the internal battery connection, improper battery
insertion, the wrong type of battery, or a dead battery cell.
A blinking charge error LED indicates the unit is too hot or too cold to charge.
Charging will automatically start when the temperature is within the above
noted ranges.
Battery Replacement
- Remove dust cap, loosen thumbscrews, and remove
battery access cover. Remove old batteries. Install new batteries as described
on previous page.
Refer to your local requirements for the proper disposal of batteries.
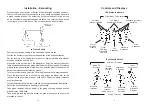
(Located on lower rear of polycarbonate housing)
Charge Status Indicator
Solid - Charging
Blinking - Charging Complete
Charge Error Indicator
Solid - Battery Problems
Blinking - Temperature
out of limits


