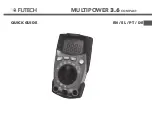
Futech MULTIPOWER 3.6 COMPACT Скачать руководство пользователя страница 13

MULTIPOWER 

3.6 

COMPACT


 ∙Odčitajte frekvenco

 ∙Ponovno pritisnite gumb 

“MODE”, da označite “%”.

 ∙Na zaslonu preberite % obrato-

valnega ciklusa.

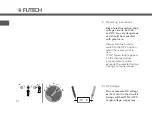
5.3 Meritev enosmernega toka 

(DC)

  Ne izvajajte meritve toka 

10A dlje kot 30 sekund. 

Če presežete 30 sekund 

lahko to povzroči poškodbe 

merilnika in/ali preskusne 

svinčnice.

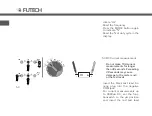
 ∙V  negativno  vtičnico  COM 

vtaknite  testni  črni  banana 

kabel.

 ∙Za meritve toka do 4000µA DC, 

postavite  funkcijsko  stikalo  v 

položaj µA in testni rdeči bana-

 ∙Pressione o botão MODE para 

indicar “Hz”.

 ∙Leia a frequência

 ∙Pressione o botão MODE no-

vamente para indicar “%”.

 ∙Leia a % do ciclo de serviço 

no ecrã.

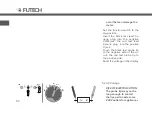
5.3 Medição de corrente CC
 

Não faça medições de 

corrente de 10A por mais 

de 30 segundos. Exceder os 

30 segundos poderá causar 

danos no medidor e/ou 

terminais de teste.

 ∙Introduza a banana da ponta 

de teste preta na entrada COM 

negativa.

 ∙Para medições de corrente até 

4000 µA CC, coloque o inter-

ruptor de função na aposição 

µA e introduza a banana da 

Seite mit der roten Prüfson-

denspitze.

 ∙Lesen Sie die Spannung im 

Display ab.

 ∙Drücken Sie die MODE-Taste, 

um „Hz“ anzuzeigen.

 ∙Lesen Sie die Frequenz ab.

 ∙Drücken Sie die MODE-Taste 

erneut, um „%“ anzuzeigen.

 ∙Lesen Sie den Prozentsatz (%) 

des Betriebszyklus im Display 

ab.

5.3 Gleichstrom-Strommessung
 

Führen Sie eine 10-A-Strom-

messung nicht länger als 30 

Sekunden durch. Andern-

falls kann es zu Schäden am 

Messgerät und/oder den 

Prüfleitungen kommen.

 ∙Stecken Sie den Bananenstec-

ker  der  schwarzen  Prüfleitung 

in den negativen COM-An-

schluss.

 ∙Für Strommessungen bis 4.000 

µA Gleichstrom schalten Sie 

den Funktionsschalter in die 

Содержание MULTIPOWER 3.6 COMPACT

Страница 1: ...MULTIPOWER 3 6 COMPACT EN SL PT DE QUICK GUIDE...

Страница 2: ...3 Controls and Jacks 1 Display 2 Mode Backlight button 3 Range button 4 MAX MIN button 5 Hold Flashlight button 6 Function switch 7 10A input jack 8 COM input jack 9 Positive mA A input jack 10 LED f...

Страница 3: ...gliche Ver packungen und Schutzfolien und setzen Sie die Batterie ein 3 Bedienelemente und Anschl sse 1 Display 2 Modus Hintergrundbe lichtungstaste 3 Bereichstaste 4 MAX MIN Taste 5 Hold Taschenlampe...

Страница 4: ...status nano 10 9 capacitance micro 10 6 amps cap milli 10 3 volts amps Amp re current kilo 103 ohms Farads capacitance mega 106 ohms Ohm resistance Hertz frequency Volt tension Percent duty ratio Alte...

Страница 5: ...Estado da bateria nano 10 9 capacit ncia micro 10 6 amperes cap milli 10 3 volts amperes Amperes atual kilo 103 ohms Farads capacit ncia mega 106 ohms Ohm resist ncia Hertz frequ ncia Volt tens o Perc...

Страница 6: ...the fucntion switch to the OFF position when the meter is not in use If OL open loop appears on the display during a measurement value exceeds the selected range Change to higher range 5 1 DC Voltage...

Страница 7: ...s sen werden Schalten Sie den Funkti onsschalter immer in die OFF Position wenn das Messger t nicht verwendet wird Wenn w hrend der Mes sung OL offene Schleife im Display angezeigt wird bersteigt der...

Страница 8: ...plug into the positive V jack Touch the black test probe tip to the negative side of the cir cuit the red test probe tip to the positive side Read the voltage in the display 5 2 AC Voltage RISK OF EL...

Страница 9: ...a ponta da sonda de teste preta no lado nega tivo do circuito e a ponta da sonda de teste vermelha no lado positivo Leia a tens o no ecr 5 2 Tens o CA RISCO DE ELETROCUSS O As pontas de teste poder o...

Страница 10: ...ccur that can damage the meter Set the function switch to the V Hz position Insert the black test lead ba nana plug into the negative COM jack the red test lead banana plug into the positive V jack To...

Страница 11: ...orrer grandes pi cos de tens o que poder o danificar o medidor Coloque o interruptor de fun o na posi o V Hz Introduza a banana da ponta de teste preta na entrada COM negativa e a banana da ponta de t...

Страница 12: ...easurements for longer than 30 seconds Exceeding 30 seconds may cause damage to the meter and or the test leads Insert the black test lead ba nana plug into the negative COM jack For current measureme...

Страница 13: ...undos Exceder os 30 segundos poder causar danos no medidor e ou terminais de teste Introduza a banana da ponta de teste preta na entrada COM negativa Para medi es de corrente at 4000 A CC coloque o in...

Страница 14: ...to the 10A position and insert the red test lead banana plug into the 10A jack Press the MODE button to indi cate DC on the display Remove power from the circuit under test then open up the circuit a...

Страница 15: ...entrada 10A Pressione o bot o MODE para indicar DC CC no ecr Remova a alimenta o do cir cuito em teste e depois abra o circuito no ponto onde deseja medir a corrente Toque com a ponta da sonda de tes...

Страница 16: ...to the negative COM jack For current measurements up to 4000 A AC set the function switch to the A position and insert the red test lead banana plug into the mA jack For current measurements up to 400...

Страница 17: ...a a banana da ponta de teste preta na entrada COM negativa Para medi es de corrente at 4000 A CC coloque o inter ruptor de fun o na aposi o A e introduza a banana da ponta de teste vermelha na entrada...

Страница 18: ...utton to indi cate AC on the display Remove power from the circuit under test then open up the circuit at the point where you wish to measure current Touch the black test probe tip to the neutral side...

Страница 19: ...dir a corrente Toque com a ponta da sonda de teste preta no lado neutro do circuito e com a ponta da sonda de teste vermelha no lado quente do circuito Forne a alimenta o ao cir cuito Leia a corrente...

Страница 20: ...on Insert the black test lead ba nana plug into the negative COM jack the red test lead bananaplug into the positive jack Press the MODE button to indi cate on the display Touch the test probe tips ac...

Страница 21: ...ue o inter ruptor de fun o na posi o CAP Introduza a banana da ponta de teste preta na entrada COM negativa e a banana da ponta de teste vermelha na entrada positiva Pressione o bot o MODE para indica...

Страница 22: ...d banana plug into the negative COM jack the red test lead banana plug into the positive jack Press the MODE button to indi cate and on the display Touch the test probe tips to the circuit or wire you...

Страница 23: ...o interruptor de fun o na posi o CAP Introduza a banana da ponta de teste preta na entrada COM negativa e a banana da ponta de teste vermelha na entrada positiva Pressione o bot o MODE para indicar e...

Страница 24: ...o the positive V jack Press the MODE button to indi cate and V on the display Touch the test probes to the diode under test Forward volt age will typically indicate 0 400 to 0 700V Reverse voltage wil...

Страница 25: ...na entrada V positiva Pressione o bot o MODE para indicar e V no ecr Toque com as pontas de sonda de teste no d odo em teste A tens o direta indicar geralmente 0 400 a 0 700 V A tens o inversa indicar...

Страница 26: ...move the batteries and unplug the line cords Set the functionswitch to the CAP position Insert the black test lead ba nana plug into the negative COM jack and the red test lead banana plug into the po...

Страница 27: ...capacit ncia Remova as baterias e desligue os cabos de alimenta o Coloque o interruptor de fun o na posi o CAP Introduza a banana da ponta de teste preta na entrada COM negativa e a banana da ponta d...

Страница 28: ...ue in the display 6 Autoranging Manual range selection When the meter is first turned on it automatically goes into Autoranging This automati cally selects the best range for the measurements being ma...

Страница 29: ...gado pela primeira vez vai auto maticamente para Sele o autom tica de intervalo Auto ranging Esta fun o seleciona automaticamente o melhor in tervalo para as medi es a fazer e geralmente o melhor modo...

Страница 30: ...nge you want To exit the manual Ranging mode and return to Autorang ing press and hold the RANGE key for 2 seconds Note manual ranging does not apply for the Capacitance and Frequency functions MAX MI...

Страница 31: ...modo de interva lo manual e voltar ao modo de intervalo autom tico Au toRanging pressione e man tenha o bot o RANGE durante 2 segundos Observa o o intervalo manual n o se aplica s fun es de Ca pacit n...

Страница 32: ...x min recording mode The display icon MAX will appear The meter will dis play and hold the maximum reading and will update only when a new MAX occurs Press the MAX MIN key again and the display icon M...

Страница 33: ...o ecr O medidor mostrar e manter a leitura m xima e ser atualizado ap enas quando ocorrer um novo MAX Pressione o bot o MAX MIN novamente e o cone MIN aparecer no ecr O medidor mostrar e manter a leit...

Страница 34: ...V CAP position to select among re sistance test diode test con tinuity ttest and capacitance test and in current position to select between AC or DC cur rent measurements Press the mode key for 1 se...

Страница 35: ...sbesondere in der V CAP Position aktiv um zwi schen Widerstandstest Dio dentest Durchgangspr fung und Kapazit tstest zu w hlen sowie in der Stromposition um zwischen Strommessun gen f r Wechselstrom u...

Страница 36: ...Flash light function The flashlight will automatically power OFF after 5 minutes of inactivity AUTO POWER OFF The auto power off feature will switch the meter off after 15 minutes To disable the auto...

Страница 37: ...ein oder auszuschalten Die Taschenlampe wird nach 5 Minuten Inaktivit t automa tisch ausgeschaltet AUTOMATISCHE ABSCHALTUNG Die Funktion zur automati schen Abschaltung schaltet das Messger t nach 15 M...

Страница 38: ...emoving the back cover or the battery or fuse covers Do not operate your meter until the battery and fuse covers are in place and fastened securely 7 1 Battery installation Turn the power off and disc...

Страница 39: ...r Sie die hintere Abdeckung oder die Batterie oder Sicherungsabdeckungen abnehmen Bedienen Sie das Messger t erst wieder wenn die Batterie und Sicherungsabdeckungen angebracht und fest gesi chert wurd...

Страница 40: ...Disconnect the test leads from the meter Remove the batterycover Gently remove the old fuse and install the new fuse into the holder Always use a fuse of the prop er size and value 0 5A 600V fast blo...

Страница 41: ...ie die Batterieab deckung Entfernen Sie vorsichtig die alte Sicherung und setzen Sie die neue Sicherung in die Hal terung ein Verwenden Sie immer eine flinke Sicherung der richtigen Gr e und mit dem r...

Страница 42: ...s energy consuming equipment to be supplied from the fixes installation Note Examples include household office and laboratory appliances Overvoltage category III Equipment of Overvoltage category III...

Страница 43: ...mA Current AC DC 500mA 600V fast acting fuse A Current AC or DC 10A 600V fast acting fuse 10A for 30 seconds max every 15 minutes Resistance Continuity Diode Test Capacitance Frequency 300V DC AC RMS...

Отзывы: