Congratulations on the purchase of your Disty 60. The safety
instructions can be found in the back of the booklet. The safety
instructions and the user manual should be read through carefully
before you use the product for the first time.
Complete set
Laser distance meter
1x
Battery
2x
Carrying case
1x
User manual
1x
Opstarten
INSERTING/REPLACING BATTERY
• Remove the battery compartment lid and attach handstrap.
• Insert the battery, observing correct polarity
• Close the battery cover.
Replace the battery when the symbol
flashes permanently in the display.
Remove the battery before any long period of non-use to avoid
the danger of corrosion.
Operation
1. Belt holder
2. LCD Display
3. ON/ Measuring button
4. Plus ( + ) /minus ( - ) button
5. Area/volume/wall area button
6. Indirect measurement button
7. Reference button/ Unit of measurement
8. OFF/Clear button
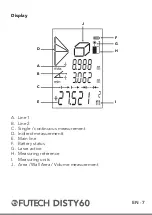
Display
A
G
D
F
J
B
H
C
I
E
A. Line 1
B. Line 2
C. Single / continuous measurement
D. Indirect measurementt
E. Main line
F. Battery status
G. Laser active
H. Measuring reference
I. Measuring units
J. Area / Wall Area / Volume measurement
Technical data
Laser type
650nm / Klasse II, <1mW
Range
0,05m - 60m (0,17ft - 198ft)
Measuring accuracy Typically
±2mm (±1,13ft)
Auto switch off laser
45 sec.
Storage temp.
-25°C tot +70°C
Operation temp.
0°C tot +40°C
Dimensions
110 x 43 x 26 mm
Weight
70g
Menu Functions
Setting
1. UNIT SETTING
The following unit can be set:
Distance
Area
Volume
1
0,000 m
0,000 m²
0,000 m³
2
0’00”1/16
0,000 ft²
0,000 ft³
3
0000 1/16 in
0,000 ft²
0,000 ft³
4
0,000 ft
0,000 ft²
0,000 ft³
In Order to change measuring units press and hold
2. BEEP
You can switch the beep on or off with the button ±. Hold the
button longer to switch off.
3. DISPLAY VERLICHTING
Automatic illumination of the display. Backlight cannot be swiched
off. Every time you switch on the meter or press any button, the
backlight switch on for 30 seconds.
4. SINGLE DISTANCE MEASURING MODE
Press the
DIST
-button once, target the laser dot, press the
DIST
-button a second time.
1
Press
DIST
Result appears on the main line
2
Press
DIST
again
Previous result moves to line 2.
3
Press
DIST
New measured result appears on the
main line
4
Press
DIST
again
Both previous results moves up to
line 1 and 2
5
Press
DIST
Last measurement appears on the
main line
5. CONTINUOUS DISTANCE MEASURING MODE
Press and hold
DIST
-button to switch to continuous measuring
mode. The laser beam will be activated and measures will appear
on the display. Actual measurement appears on the main line.
Maximum measured distance appears on line 1, minimum on line
2. Press any of buttons
DIST
or to stop continuous laser.
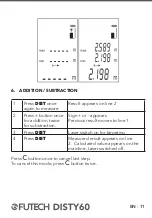
6. ADDITION / SUBTRACTION
1
Press
DIST
once
again to measure
Result appears on line 2
2
Press ± button once
for addition, twice
for substraction.
Sign + or - appears
Previous result moves to line 1.
3
Press
DIST
Laser switch on for targeting
4
Press
DIST
Measured result appears on line
2. Calculated value appears on the
mainline. Laser switched off.
Press button once to cancel last step.
To cancel this mode, press button twice.
7. AREA
1
Press
DIST
button once
The logo appears on the
display
2
DIST
- Press this button
to take the first length
measurement (height)
Measured result appears on
line 1.
3
DIST
- Press this button
to take the second length
measurement (width)
Measured result appears on line
2. Calculated volume appears in
lower (big) string. Laser switched
off.
Press button once to cancel last step.
To cancel this mode, press button twice.
8. WALL AREA CALCULATION
1
Press
button twice The
-symbol appears in the
display
2
Press the
DIST
-button
to take the first measu-
rement (height)
Measured result appears on line 1.
3
Press the
DIST
-button
to take the second
lenght measurement
(first wall lenght)
Measured result appears on line 2.
On main line appears intermediate
calculating result in square meters
4
Press the
DIST
-button
to take the third lenght
measurement (second
wall lenght)
First measured result (height) disap-
pears, second result (width) moves
to line 1. Current measurement
(length) appears in line 2. In lower
(big) string appears calculated
result in square meters.
Press the button once to cancel last step.
To cancel this mode press button twice.
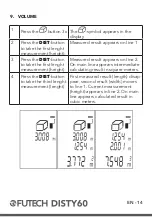
9. VOLUME
1
Press the
button 3x The
-symbol appears in the
display
2
Press the
DIST
-button
to take the first lenght
measurement (height)
Measured result appears on line 1
3
Press the
DIST
-button
to take the first lenght
measurement (height)
Measured result appears on line 2.
On main line appears intermediate
calculating result in square meters.
4
Press the
DIST
-button
to take the third lenght
measurement (lenght)
First measured result (length) disap-
pear, second result (width) moves
to line 1. Current measurement
(height) appears in line 2. On main
line appears calculated result in
cubic meters.
10. SIMPLE PYTHAGORAS
Use Pythagorean Theorem (a² + b² = c²) to measure height indi-
rectly and calculate angle.
1
Press
-button once to
switch to simple Pythago-
ras function
The
-symbol appears in the
display.
2
Press the
DIST
-button to
measure the first (long)
side of the triangle.
Measured result (Hypotenuse)
appears on line 1.
3
Press the
DIST
-button
to measure the second
(short) side of the triangle.
Previously measured result
disappear, current value
(Cathetus) appears on line 1.
Calculated angle indicated on
line 2. Calculated CATHETUS
appears on main line.
11. EXTENDED PYTHAGORAS
Use the Phytagoras Theorem (a² + b² = c²) to measure height
indirectly. Then add measured heights
1
Press
-button twice
to switch to Cathetus
addition mode using
Pythagoras.
(for addition) of (for
substraction) appears in the
display.
2
Press the
DIST
-button to
measure the first (Long)
top side of the triangle.
Measured result (Hypotenuse)
appears on line 1.
3
Press the
DIST
-button
to measure the second
(SHORT) side of the
triangle
Measured value (Cathetus)
appears on line 2.
4
Press the
DIST
-button
to measure the third
(Long) bottom side of the
triangle.
Previously measured Cathetus
moves to line 1. Current result
(Hypotenuse) appears on line
2. Calculated summary value
of CATHETUS appears on
main line.
DISTY60
EN - 1
EN - 5
EN - 9
EN - 13
EN - 4
EN - 8
EN - 12
EN - 2
EN - 6
EN - 10
EN - 14
EN - 3
EN - 7
EN - 11
EN - 15
LASER DISTANCE METER
LASER AFSTANDSMETER
TÉLÉMÈTRE LASER
Measuring conditions
Measuring range
The range is limited to 60 m.
At night or dusk and if the target is in shadow, the measuring
range is increased. Use a target plate to increase the measuring
range when measuring in light intensive environment or on non
reflecting surfaces.
Target surfaces
Measuring errors can occur when measuring toward colorless
liquids (e.g. water), transparant glass, plastic or other transparant
materials. When measuring on highly reflecting surfaces, the laser
beam can be deviated and result in irroneous measurements.
When measuring on non-reflecting or dark surfaces, measuring
time becomes longer.
Care
Do not immerse the instrument in water. Wipe off dirt with a damp,
soft cloth. Do not use aggressive cleaning agents or solutions.
Handle the instrument as you would a telescope or camera.
Safety instructions
The User Manual is part of the Safety Instructions. Carefully read
the Safety Instructions and the User Manual before using this pro-
duct. The person responsible for the instrument must ensure that
all users understand these directions and adhere to them.
3
Appuyez sur la
touche DIST.
Le laser s’active pour le ciblage.
4
Appuyez sur la
touche DIST.
Le résultat mesuré s’affiche sur la lig-
ne 2. La valeur calculée s’affiche sur la
ligne principale. Le laser s’éteint.
Appuyez une fois sur la touche pour annuler la dernière opéra-
tion. Pour annuler ce mode, appuyez deux fois sur la touche .
7. SURFACE
1
Appuyez une fois sur la
touche
DIST
.
Le symbole s’affiche à
l’écran.
2
Appuyez sur la touche
DIST
pour prendre la première me-
sure de longueur (hauteur).
La hauteur s’affiche sur la
ligne 1
3
Appuyez sur la touche
DIST
pour prendre la deuxième
mesure de longueur (largeur).
La largeur s’affiche sur la lig-
ne 2. La mesure de la surface
s’affiche en grand sur la ligne
principale. Le laser s’éteint.
Appuyez une fois sur la touche
pour annuler la dernière opération.
Pour annuler ce mode, appuyez
deux fois sur la touche .
8. CALCUL DE SURFACE MURALE
1
Appuyez deux fois sur
la touche
Le symbole
s’affiche à l’écran.
2
Appuyez sur la touche
DIST
pour prendre
la première mesure
(hauteur).
La hauteur s’affiche sur la ligne 1.
3
Appuyez sur la touche
DIST
pour prendre
la deuxième mesure
(première longueur
murale).
La longueur s’affiche sur la ligne 2.
4
Appuyez sur la touche
DIST
pour prendre
la troisième mesure
(deuxième longueur).
La première mesure (hauteur)
disparaît, la deuxième mesure (la
première longueur) passe à la ligne
1. La mesure actuelle (deuxième
longueur) s’affiche sur la ligne 2. La
superficie totale s’affiche en grand
sur la ligne inférieure.
Appuyez une fois sur la touche pour annuler la dernière opéra-
tion. Pour annuler ce mode, appuyez deux fois sur la touche .
9. VOLUME
1
Appuyez 3 fois sur la
touche
Le symbole
s’affiche à l’écran.
2
Appuyez sur la touche
DIST
pour prendre
la première mesure
(hauteur).
La hauteur s’affiche sur la ligne 1.
3
Appuyez sur la touche
DIST
pour prendre
la deuxième mesure
(largeur ).
La largeur s’affiche sur la ligne 2.
4
Appuyez sur la touche
DIST
pour prendre
la troisième mesure
(longueur)
La première mesure (hauteur)
disparaît, la deuxième mesure
(largeur) passe à la ligne 1 et la
mesure actuelle (longueur) s’affiche
sur la ligne 2. Le volume s’affiche en
grand sur la ligne inférieure.
10. FONCTION DE PYTHAGORE SIMPLE
Utilisez le théorème de Pythagore (a² + b² = c²) pour mesurer la
hauteur de façon indirecte et calculer l’angle.
1
Appuyez une fois sur
la touche
(6)
pour
passer à la fonction de
Pythagore simple.
Le symbole
s’affiche à
l’écran.
2
Appuyez sur la touche
DIST
pour mesurer l’hy-
poténuse (le plus grand
côté) du triangle.
Le résultat (hypoténuse) s’affiche
sur la ligne 1.
3
Appuyez sur la touche
DIST
pour mesurer le
petit côté du triangle.
Le résultat précédent s’efface, la
valeur actuelle (cathète) s’affiche
sur la ligne 1. L’angle calculé
s’affiche sur la ligne 2 et l’autre
cathète calculée s’affiche sur la
ligne principale.
11. FONCTION DE PYTHAGORE ETENDUE
Utilisez le théorème de Pythagore (a² + b² = c²) pour mesurer la
hauteur de façon indirecte. Vous pouvez ensuite additionner ou
soustraire les hauteurs calculées.
1
Appuyez deux fois sur la
touche pour passer au
mode addition cathètes.
Appuyez trois fois sur la
touche pour passer
au mode soustractions
cathètes.
Le symbole (addition) ou
(soustraction) s’affiche à l’écran.
2
Appuyez sur la touche
DIST
pour mesurer
l’hypoténuse (grand côté)
du triangle.
Le résultat (hypoténuse) s’affi-
che sur la ligne 1.
3
Appuyez sur la touche
DIST
pour mesurer le
central côté du triangle
Le résultat (cathète) s’affiche sur
la ligne 2.
4
Appuyez sur la touche
DIST
pour mesurer le côté
en bas du triangle.
La cathète précédemment
calculée se déplace sur la ligne
1. L’hypoténuse s’affiche sur la
ligne 2. La valeur statique de la
cathète s’affiche en grand sur la
ligne principale.
Appuyez une fois sur la touche pour annuler la dernière opéra-
tion. Pour annuler ce mode, appuyez deux fois sur la touche .
FR - 9
FR - 13
FR - 8
FR - 12
FR - 10
FR - 14
FR - 11
FR - 15
Conditions de mesure
Plage de mesure
La portée du laser est limitée à 60 m.
La nuit, au crépuscule ou si la cible est dans l’ombre, la plage de
mesure augmente. Utilisez une plaquette-cible pour étendre la
plage de mesure en cas de mesurage dans un endroit lumineu ou
si la surface cible réflète peu.
Surfaces cibles
Des erreurs de mesure peuvent survenir lorsque le laser est pointé
vers des liquides transparents (p. ex. l’eau) ou du verre, plastique
ou autres matériaux transparante. Si vous mesurez de surfaces
réfléchissantes, le rayon laser peut dévier et fournir un mesurage
éroné. Le temps de mesurage sera plus long si vous mesurez sur
des surfaces sombres ou non-réfléchissantes.
Entretien
Ne pas nettoyer l’instrument dans de l’eau. Essuyez la saleté avec
un chiffon doux légèrement humide. N’utilisez pas de produits ou
de solutions de nettoyage agressifs. Manipulez votre laser comme
un télescope ou un appareil photo.
Consignes de sécurité
Le manuel de l’utilisateur est la première partie du livret. Il forme
ainsi une partie des consignes de sécurité. Lisez attentivement le
manuel de l’utilisateur et les consignes de sécurité avant d’utiliser
votre laser. Il revient au responsable de ce laser de s’assurer que
tous les utilisateurs comprennent ces consignes et les respectent.
LASER RADIATION -DO NOT
STARE INTO THE BEAM OR VIEW
DIRECTLY WITH OPTICAL INSTRUMENT
S
Prohibited use
∙ Using the instrument without instructions
∙ Using outside the stated limits
∙ Deactivation of safety systems and removal of explanatory and
hazard labels. opening of the equipment by using tools (screw-
drivers, etc.), as far as not specifically permitted for certain cases
∙ Carrying out modification or conversion of the product
∙ Use after misappropriation
Message Codes
The following errors can be corrected
301 Distance is out of range
Keep in correct measure range
302 Reflected signal is too
weak
Measure on a better surface
303 Out of display range
Reset zero by press Power-Key
304 Pythagorean theorem
calculation error
Check value is correct
305 Low battery
Change new battery
306 Temperature too low
Warm up instrument
307 Temperature too high
Cool down instrument
308 Ambient light is too
strong
Measure in a dark background
Utilisation interdite
∙ Utilisation de l’instrument sans instructions
∙ Utilisation en dehors des limites indiquées
∙ Désactivation des systèmes de sécurité et l’élimination des
étiquettes explicatives et de danger. Ouvre l’appareil avec des
outils (tournevis, etc.), dans la mesure où ne sont pas expressé-
ment autorisée dans certains cas
∙ Réaliser modification ou conversion du produit
∙ Utilisez après son détournement
Codes de message
Les erreurs suivantes peuvent être corrigées
301 La distance est hors
portée du laser
Restez dans le portée de mesure
302 Signal reflète est trop
faible
Mesurez sur une meilleure
surface
303 Hors de le capacité du
display
Remise à zéro en appuyant sur la
touche Power
304 Erreur de calcul Pyt-
hagore
Vérifiez si la mesure est correcte
305 Batterie faible
Changez le batterie
306 Température trop basse
Réchauffez l’appareil
307 Température trop élevée Refroidisez l’appareil
308 Lumière ambiante est
trop forte
Mesurez dans un endroit plus
sombre.
Содержание DISTY60
Страница 1: ...EN 4 LASER DISTANCE METER LASER AFSTANDSMETER TÉLÉMÈTRE LASER ...
Страница 14: ......


