


Page 2
Getting Started Guide
Bonded Premium Installation
1
2
3
4
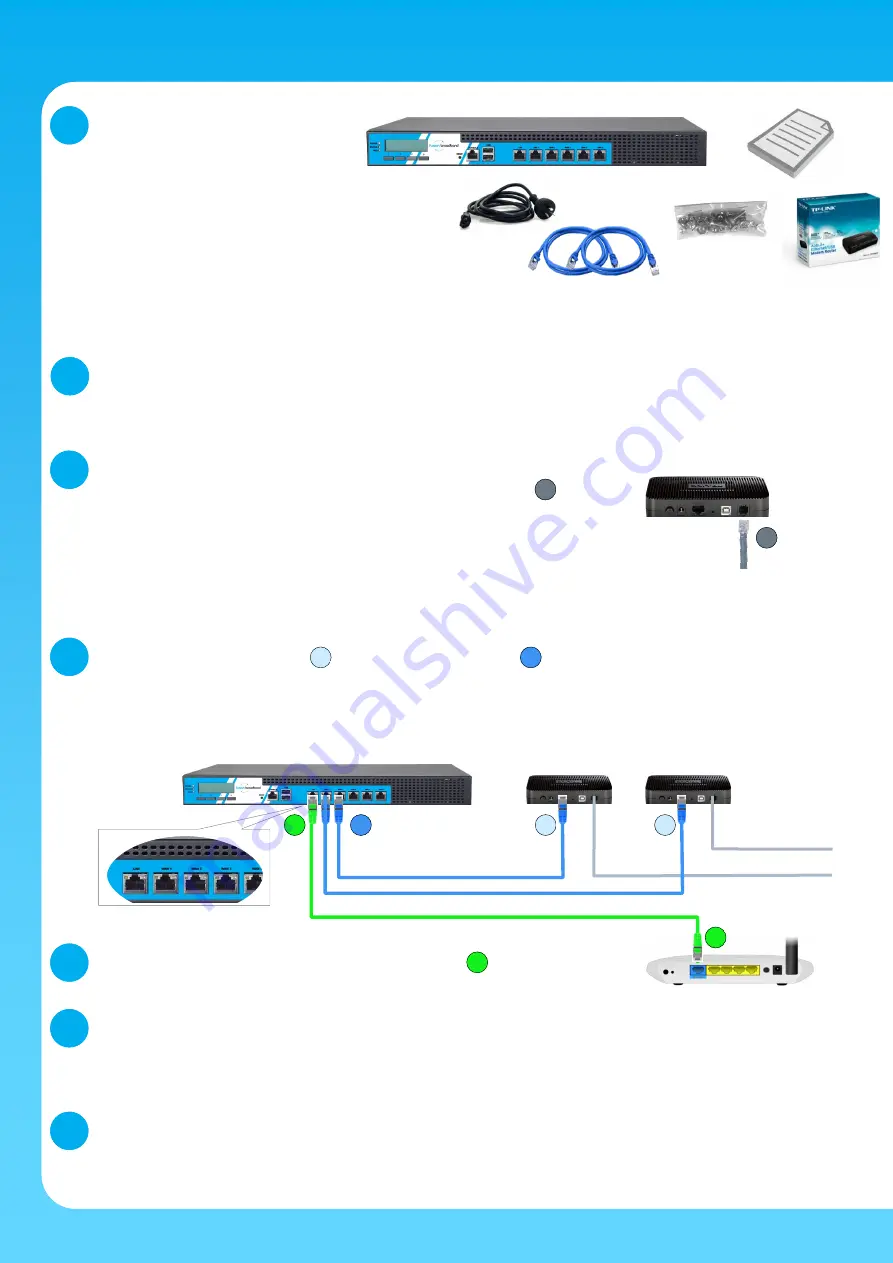
Unpack your Bonder.
Inside the shipping box you should have:
The bonding hardware device (Bonder)
A small cardboard box that contains:
A Power Cable
A bag of screws for rack mounting the Bonder
Two Ethernet cables
A Service ID Form (also available in the Admin Portal)
New TP-Link Modems (if ordered)
If you are missing any contents, please contact us by lodging a Support Ticket (see Page 3) and we will ship them as
soon as possible. If you have all the required pieces, installation should take no more than 30 minutes.
The instructions below describe what you need to do and in the correct order.
Install the Bonder
The Bonded Premium hardware is a rack-mount unit (1RU).
Locate the Bonder in a well ventilated area. If mounting in a LAN rack, use the screws provided.
Keep in mind that the system needs to be physically near your router as well as your ADSL/broadband connections.
Set up your Modems
Set up each of the broadband modems. These have three connections* on the back:
One for your ADSL (telephone) line - shown in grey here (plug this in now )
One for an Ethernet cable
One for the power cable
Note
: If you are not bonding an ADSL service, a modem may not be required.
IMPORTANT
: If you have supplied your own modems, please be sure that they have been configured into Full
Bridge Mode. The modems supplied by Fusion Broadband come pre-configured in Full Bridge Mode with Ethernet
cables; there is no need to make any changes with these modems. *Other modem brands may have more ports.
Connect the modems and Bonder together
Plug an Ethernet cable into the modem and the other end into the Bonder starting with WAN 1 according to the Fusion
Service ID Form
we issued with your Bonder.
IMPORTANT
: Each modem needs to be plugged into the correct port as shown on the
Service ID Form
.
Continue until all ADSL lines/modems are connected. Again, if your don’t require modems, plug the Ethernet cable from the
hardware supplied by your Internet Service Provider.
C
B
B
A
B
C
A
5
Connect your Router to the Bonder
Connect the WAN port on your Router to the LAN port on the Bonder.
D
D
Router - WAN Port
6
Power Up!
Plug the Modem power adapters in along with the Bonder power cable. Typically the modems will take a few minutes to come up
and run through their diagnostic tests. Once everything is running you should see several lights on your modems: Power, Ethernet,
DSL, Internet (which will usually flash on and off). It can take up to 5 minutes for the Bonder to initiate the PPP sessions (or
authenticate the ISP details) through your modems.
7
Configure your router
Use the
Service ID Form
to enter these details into your router. You will need to configure the WAN port to make a Static Connection
to the Bonder by inputting the WAN IP address, Netmask and Gateway as well as DNS details. If you have PCs connected to your
router, you may have to change the DNS settings on each PC if it is not set to automatically get it from your router.
D
(if ordered)
© 2015 Fusion Broadband Pty Ltd


