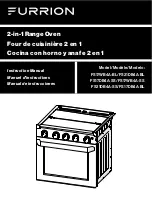
Furrion FS17DB4A-BL Скачать руководство пользователя страница 4

4

English

Explanation of Symbols

This manual has safety information and instructions to help 
you eliminate or reduce the risk of accidents and injuries. 
Always respect all safety warnings identified with these 
symbols. A signal word will identify safety messages and 
property damage messages, and will indicate the degree or 
level of hazard seriousness. 

  DANGER

Indicates an imminently hazardous situation which, if not 
avoided, will result in death or serious injury.

  WARNING

Indicates a potentially hazardous situation which, if not 
avoided, could result in death or serious injury.

  CAUTION

Indicates a potentially hazardous situation which, if not 
avoided, may result in minor or moderate personal injury, or 
property damage.

Important Safety Instructions

Warning and important safety instructions appearing in this 
guide are not meant to cover all possible conditions and 
situations that may occur. Common sense, caution, and care 
must be exercised when installing, maintaining, or operating 
the appliance.
Always contact the manufacturer about problems or 
conditions you do not understand.

Read and follow all instructions before using this appliance 
to prevent the potential risk of fire, electric shock, personal 
injury or damage to the appliance as a result of improper 
usage of the appliance. Use appliance only for its intended 
purpose as described in this guide.

If an external electrical source is utilized, the appliance must 
be electrically grounded in accordance with state or other 
codes or, in the absence of such codes, with the National 
Electrical Code, ANSI/NFPA 70. Do not attempt to adjust, 
repair, service or replace any part of your appliance unless it 
is specifically recommended in this guide. All other servicing 
should be referred to a qualified service technician.

General Safety Warnings

  WARNING


Improper installation, adjustment, service or 
maintenance can cause injury, property damage or 
death. Refer to this manual. For assistance or additional 
information, consult a qualified installer, service agency, 
manufacturer or the gas supplier.


Avoid using your appliance or any other appliance if 
you smell gas. Do not assume that the smell of gas in 
your RV is normal. Any time you detect the odor of gas, 
it is to be considered life threatening and corrected 
immediately. Extinguish any open flames including 
cigarettes and evacuate all persons from the vehicle. 
Shut off gas supply at LP gas bottle.


If the user of this appliance fails to maintain it in the 
condition in which it was shipped from the factory or if 
the appliance is not used solely for its intended purpose 
or if appliance is not maintained in accordance with the 

instructions in this manual, then the risk of a fire and/or the 
production of carbon monoxide exists which can cause 
personal injury, property damage or loss of life.

  WARNING

EXPLOSION OR FIRE


Shut off all gas appliances and pilot lights when 
refueling gasoline tanks, LP tanks or when vehicle is in 
motion.


Furrion gas operated cooking appliances are for use 
with LP gas only, and for installation in recreation 
vehicles only (e.g. travel trailers, motor homes, tent 
campers, etc.).

  WARNING

CARBON MONOXIDE POISONING


DO NOT use this appliance for warming or heating 
vehicle. You could be burned or injured, a fire could start, 
or deplete oxygen in the vehicle.


A window or air vent should be open slightly while using 
any cooking appliance. Gas flames consume oxygen 
which must be replaced to assure proper combustion.


DO NOT store or use gasoline or other flammable vapors 
and liquids in the vicinity of this or any other appliance.


DO NOT operate the appliance if it is damaged or not 
working properly.


Never attempt to repair the appliance yourself. Any repairs 
to or installation of this appliance must be performed by 
a qualified installer, service agency or the gas supplier 
and in accordance with the instructions in this manual. 
Service of your appliance by a non-approved service 
person or agency could result in failure of the integrity of 
the appliance and could lead to property damage, serious 
injury or loss of life.


Have your dealer show you where the main gas shut-off 
valve is located and how to shut it off in an emergency.


Use your appliance only for its intended use.


Children should be taught that the appliance is not a toy. 
They should not be allowed to play with the controls or 

Содержание FS17DB4A-BL

Страница 1: ...n Four de cuisini re 2 en 1 Cocina con horno y anafe 2 en 1 Instruction Manual Manuel d instructions Manual de instrucciones Model Mod le Modelo FS17WB4A BL FS21DB4A BL FS17DB4A SS FS17WB4A SS FS21DB4...

Страница 2: ...the information in this manual is not followed exactly a fire or explosion may result causing property damage personal injury or death Do not store or use gasoline or other flammable vapors and liqui...

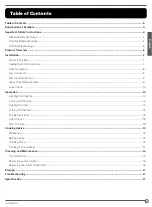
Страница 3: ...Gas Connection 8 Electrical Connection 9 Glass Cover Replacement 9 Leak Check 10 Operation 10 Lighting the Cooktop 10 Turning Off Cooktop 12 Lighting the Oven 12 Turning Off the Oven 12 The Burner Fl...

Страница 4: ...ur appliance or any other appliance if you smell gas Do not assume that the smell of gas in your RV is normal Any time you detect the odor of gas it is to be considered life threatening and corrected...

Страница 5: ...ng of cabinet doors or doors within the RV or by positive or negative air pressures affecting burners due to improper installation See Installation section The burner could extinguish resulting in gas...

Страница 6: ...air circulation inside the oven will be interrupted and cooking times will vary from normal food may be burned or undercooked DO NOT use oven as a storage area If oven pilot should extinguish after i...

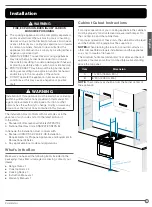
Страница 7: ...this manual The installation must conform with local codes or in the absence of such codes refer to the latest edition of In the U S A a Standard for Recreational Vehicles NFPA 1192 b National Fuel G...

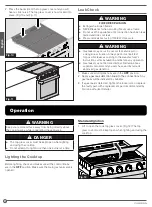
Страница 8: ...flat surface Remove the packing materials 2 Hold the baffle and pull upward to release the top glass cover assembly from the oven Fig 1 Fig 1 3 Push towards the rear of the oven and lift to remove to...

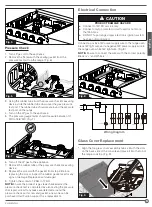
Страница 9: ...ssure check test is completed by also testing the pressure check port screw If any leaks are detected around the pressure check port screw and gasket a new one can be purchased Call Furrion support fo...

Страница 10: ...hase and install a UL approved gas detector 1 Make sure all control knobs are in the OFF position 2 Apply a gas leak detection liquid to the connections Any gas leaks will be indicated by bubbles 3 If...

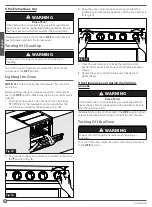
Страница 11: ...the OFF position Wait at least 5 minutes and repeat the igniting procedure If ignition still not occur use a gas lighter or a match to light the burner Refer to the Manual Ignition section Manual Igni...

Страница 12: ...nstallation section and follow the instructions as listed for the appliance Fig 18 Fig 18 2 Push and turn the oven control knob counterclockwise to the position Fig 19 Fig 19 3 Keep the oven control k...

Страница 13: ...eating Preheating the gas oven doesn t just heat the air in the oven but the walls and the door which ensures that the oven will quickly return to that temperature when the door has been opened and th...

Страница 14: ...a wire brush or metallic item for cleaning burner ports or orifices Brush may shed bristles that may lodge in the orifice or burner ports and cause a fire or explosion Clean all surfaces as soon as p...

Страница 15: ...ly to avoid breaking Grasp only the sides of the oven door Do not grasp the handle as it may swing in your hand and cause damage or injury Failure to grasp the oven door firmly and properly could resu...

Страница 16: ...characteristics Voltage 12V Wattage 15 W Type G9 Lamp Type Halogen 4 Replace the glass cover 5 Reconnect the power to the oven To reorder the Furrion oven light bulb replacement please call Furrion se...

Страница 17: ...es and then turn control to desired flame size Ensure gas supply valve is open Burner ports or slots are clogged With the burner off use a small gauge wire or needle to clean ports or slots Low gas su...

Страница 18: ...enues dans le pr sent manuel cela pr sente des risques d incendie ou d explosion susceptibles d entra ner des dommages mat riels des blessures corporelles voire la mort Ne pas ranger ni utiliser de l...

Страница 19: ...25 Raccordement de gaz 26 Branchement lectrique 27 Couvercle en verre de rechange 27 Essais de d tection des fuites 28 Utilisation 28 Allumage de la table de cuisson 28 Arr t de la table de cuisson 29...

Страница 20: ...quement aux fins pour lesquelles il a t con u ainsi que d crit dans le pr sent guide En cas d utilisation d une source d alimentation externe l appareil doit tre mis la terre conform ment aux codes de...

Страница 21: ...son d une extinction accidentelle fermez tous les boutons des br leurs puis patientez cinq 5 minutes avant de tenter nouveau d allumer le br leur NE PAS ranger de mat riaux inflammables sur dans ou pr...

Страница 22: ...les grilles des br leurs ou toute autre zone proche des br leurs sup rieurs pendant et apr s utilisation Ne pas laisser vos v tements ou tous autres mat riaux inflammables entrer en contact avec les...

Страница 23: ...ouvrir les orifices d a ration du four en cours d utilisation Le fait de recouvrir les orifices d a ration limite le d bit d air de combustion vers le br leur du four et pourrait provoquer une mauvais...

Страница 24: ...odes veuillez vous r f rer la derni re dition de Aux tats Unis a Norme nationale am ricaine pour les v hicules r cr atifs Standard for Recreational Vehicles NFPA 1192 b National Fuel Gas Code ANSI Z22...

Страница 25: ...isini re de v hicule r cr atif de 21 po A 17 po 451 mm 17 po 451 mm B 20 po 511 mm 20 po 511 mm C 16 po 410 mm 201 16 po 510 mm D 15 16 po 23 mm au max 15 16 po 23 mm au max E 1 po 38 mm au max 1 po 3...

Страница 26: ...de l appareil 2 Retirez la vis et le joint d tanch it de l orifice de contr le de pression de la ligne Ill 6 Ill 6 3 Utilisez le tube en caoutchouc de l appareil pour le contr le de la pression et fai...

Страница 27: ...i re Ill 8 REMARQUE Assurez vous de brancher les c bles en respectant les polarit s correctes Le noir correspond et le blanc Ill 8 Wiring Diagram 12V Lamp Switch 22 AWG 22 AWG Diode 12V DC Thermostate...

Страница 28: ...rr ou remplacez la pi ce d fectueuse par une pi ce de rechange recommand e par le revendeur agr Furrion Utilisation AVERTISSEMENT Veillez ce que vos bras et votre visage ne se trouvent pas directement...

Страница 29: ...lumer Ill 16 Ill 16 3 R p tez l ex cution des tapes 1 et 2 pour allumer le ou les autres br leurs selon les besoins 4 Tournez le bouton de r glage du br leur pour r gler la flamme au niveau souhait Il...

Страница 30: ...e gaz lors du ravitaillement ou en d placement Pour teindre le four tournez le bouton de r glage du four dans le sens des aiguilles d une montre pour le positionner sur OFF Flammes du br leur Veillez...

Страница 31: ...te l ext rieur Utilisez moins de liquide r duisez la temp rature puis augmentez le temps de cuisson La p te colle la po le Graissez convenablement la po le et la saupoudrer de farine ou utiliser du pa...

Страница 32: ...est froide NE PAS laver les surfaces en porcelaine ti des Laissez refroidir ces zones avant de les nettoyer Vous risquez des br lures ou la porcelaine pourrait se fissurer De la corrosion par piq res...

Страница 33: ...es des charni res Ill 24 Ill 25 et Ill 26 Tenez fermement la porte est lourde Ill 24 Ill 25 Ill 26 6 Placez la porte sur une surface plane prot g e afin qu elle n endommage pas le mat riau de la surfa...

Страница 34: ...LED puis d branchez le c ble du socle du module LED Ill 30 Ill 30 5 Branchez le connecteur de faisceaux de c bles dans le nouveau module LED 6 Refixez le module LED la console l aide des 2 vis retir e...

Страница 35: ...leur est teint nettoyez les orifices ou les fentes l aide d un fil ou d une aiguille de petite paisseur De l humidit persiste apr s nettoyage Attisez l g rement les flammes puis laissez le br leur fo...

Страница 36: ...nformaci n de este manual puede producirse un incendio o una explosi n que provoque da os materiales lesiones personales o la muerte No almacene ni utilice gasolina u otros vapores y l quidos inflamab...

Страница 37: ...el ctrica 45 Reemplazo de la tapa de vidrio 45 Verificaci n de fugas 46 Funcionamiento 46 Encendido del anafe 46 Apagado del anafe 47 Encendido del horno 47 Apagado del horno 48 La llama del quemador...

Страница 38: ...ntenimiento inadecuados pueden provocar lesiones da os materiales o la muerte Consulte este manual Para obtener asistencia o informaci n adicional consulte a un instalador cualificado a una agencia de...

Страница 39: ...rales del anafe No coloque las ollas sobre la superficie del vidrio Levante la tapa hasta la posici n completamente abierta antes de encender los quemadores Deje enfriar el anafe antes de cerrar la ta...

Страница 40: ...emaduras NO deje caer bandejas sobre la superficie esmaltada El esmalte puede agrietarse o astillarse NO deje un utensilio vac o o uno que haya hervido hasta secarse en un quemador superior caliente E...

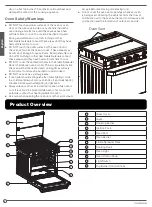
Страница 41: ...drio 2 Rejilla 3 Quemador del anafe 4 Perilla de ignici n 5 Puerta del horno 6 Quemador del horno 7 Rejilla difusora de llamas 8 Rejilla de cocci n 9 Luz del horno 10 Perilla de control del horno 11 I...

Страница 42: ...no existir una reglamentaci n espec fica consulte la ltima edici n de las siguientes normas En los Estados Unidos a Norma para veh culos recreativos NFPA 1192 b C digo Nacional de Gas Combustible ANSI...

Страница 43: ...D 15 16 23 mm m x 15 16 23 mm m x E 1 38 mm m x 1 38 mm m x F 45 16 110 mm 45 16 110 mm G 39 16 90 mm 39 16 90 mm A B D E C Gas Hose Hole F G Instalaci n del horno Cuando el armario haya sido preparad...

Страница 44: ...rueba de presi n de la cocina Fig 6 Fig 6 3 Tome el tubo de goma del dispositivo de medida de verificaci n de la presi n y desl celo para conectarlo al puerto de prueba de presi n de gas El tubo de go...

Страница 45: ...e blanco de 12 V de la cocina Fig 8 NOTA Aseg rese de conectar los cables con la polaridad correcta Negro es y Blanco es Fig 8 Wiring Diagram 12V Lamp Switch 22 AWG 22 AWG Diode 12V DC Thermostate Val...

Страница 46: ...rion Funcionamiento ADVERTENCIA Mantenga los brazos y la cara alejados de la parte directamente encima del rea de cocci n mientras use el electrodom stico PELIGRO La tapa superior de vidrio debe mante...

Страница 47: ...s quemadores seg n sea necesario 4 Gire la perilla de control del quemador para ajustar la llama al nivel deseado Fig 17 Fig 17 Si se apaga la llama ADVERTENCIA Peligro de incendio Si la llama se apag...

Страница 48: ...cuando est repostando o en viaje Para apagar el horno gire la perilla de control del horno en el sentido de las agujas del reloj hasta la posici n OFF apagado La llama del quemador Mantenga los brazos...

Страница 49: ...ien cocida por dentro pero pegajosa por fuera Utilice menos l quido baje la temperatura y aumente el tiempo de cocci n La masa se pega a la bandeja Engrase bien la bandeja y espolvor ela con un poco d...

Страница 50: ...tas superficies se enfr en antes de limpiar Podr a sufrir quemaduras o la porcelana podr a quebrarse Se producir n picaduras y decoloraci n si se permite que los derrames permanezcan durante un per od...

Страница 51: ...as Fig 24 Fig 25 y Fig 26 Sostener la puerta con firmeza porque es pesada Fig 24 Fig 25 Fig 26 6 Coloque la puerta sobre una superficie plana que est protegida para que la puerta no da e el material d...

Страница 52: ...con la luz LED rota Fig 28 Fig 28 3 Retire los dos tornillos que sujetan la luz LED con un destornillador Phillips Fig 29 Fig 29 4 Retire la unidad de LED y desconecte el cable de la base de la unidad...

Страница 53: ...ndida por la mitad Hay humedad en el quemador seque bien el quemador Los orificios o ranuras del quemador est n obstruidos Con el quemador apagado limpie los orificios o las ranuras con un alambre o u...

Страница 54: ......

Страница 55: ......

Страница 56: ...marks licensed for use by Furrion Ltd and registered in the U S and other countries 2007 2020 Furrion Ltd Furrion et le logo Furrion sont des marques d pos es par Furrion Ltd et enregistr es aux Etats...

Отзывы: