Furrion FRCBRKT-BL Скачать руководство пользователя страница 13

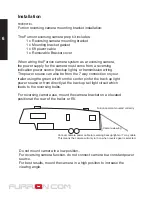
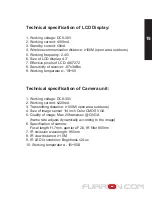
If there is no operation of the camera displayed on the LCD display within 

30 seconds of pairing.  Repeat pairing process.


Note:


If you are having trouble pairing the devices, reduce the distance 


between the camera unit and the LCD display for the pairing 


process.


To remove or replace a paired camera from the LCD display memory,


Exit the menu icons on the LCD display, then press and hold down 


the DOWN key for 5 seconds. This will erase all pairing memory stored


on the LCD display.  The pairing process must be completed again for


the system to function.

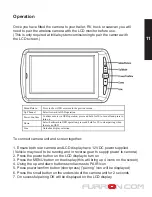
LCD Display Menu Icons:


Picture

Settings

Mirror/ rotated 

image indicator

Signal strength indicator

Rotate 

Camera 

Image

Connect 

Camera 

Software 

Information

12

Using the Up and Down arrow buttons on the monitor, select which icon

you wish to select, then press the power button to confirm selection.

Содержание FRCBRKT-BL

Страница 1: ...install wireless camera kit comes in two parts 1 Furrion mount bracket prep kit Part No FRCBRKT BL 2 Furrion Camera and Monitor Kit Part No FRC12TA BL Check if your RV or Trailer has been pre install...

Страница 2: ...Contents 1 Safety Information 2 General Information 3 Installation instructions 4 Operation 5 Trouble shooting 6 Warranty 7 Technical Specification 1...

Страница 3: ...not disassemble or attempt to repair any part of the camera system Disconnect all sources of power to the camera before installing There are no fuses or disconnects on the Furrion reversing camera un...

Страница 4: ...perform any servicing other than that specified in the operating instructions Caution To reduce the risk of fire connect the camera only to a circuit provided with a maximum branch circuit over curren...

Страница 5: ...supply circuit has circuit protection Connect rear camera to a 12 14V DC circuit only Use insulated tools when working with power supply Use correct safety equipment when working at elevated levels E...

Страница 6: ...mera unit eliminates the interferences which other analogue signal systems are subject to meaning the Furrion digital system gives you a clearer picture of what is behind you no matter where you are T...

Страница 7: ...on your trailer using the green wire from the center pin for the back up light power source or from directly at the back up tail light circuit which feeds to the reversing bulbs For reversing camera...

Страница 8: ...e Black Negative 4 Find a suitable position to mount your camera mounting bracket on the rear of your trailer or RV Make sure the mounting position is at the center line of the RV and is positioned as...

Страница 9: ...RV Mounting bracket installation Ensure the bracket is mounted securely and the gasket is watertight If the camera bracket is being mounted as a prep kit without the camera secure the wire connector...

Страница 10: ...FRC12TA BL Camera and monitor installation kit To install the camera onto a pre installed mounting bracket 1 Remove the cable cover which is held by 4 screws on the underside of the bracket 2 Locate t...

Страница 11: ...e lighter socket 12 24 V power outlet The cable must not interfere with the safe operation of the vehicle 6 Insert the small 12 24 Volt DC plug of the power cable into the right side of the monitor 7...

Страница 12: ...Press the MENU button on the display this will bring up 4 icons on the screen 4 Using the up and down buttons scroll across to PAIR icon 5 Press power confirm button short press pairing icon will be...

Страница 13: ...ory Exit the menu icons on the LCD display then press and hold down the DOWN key for 5 seconds This will erase all pairing memory stored on the LCD display The pairing process must be completed again...

Страница 14: ...ply to enable switching views When two cameras are paired to the system cameras are not required to be connected to the reversing tail lights power supply constant power source is required to be able...

Страница 15: ...unit Ensure it faces vertically intermittent weak signal Distance between camera and display is too great Delete camera from LCD display memory then re pair camera to display System testing 1 Disconne...

Страница 16: ...temperature 10 50 Technical specification of Camera unit 1 Working voltage DC8 30V 2 Working current 220mA 3 Transmitting distance 100M open area outdoors 4 Size of image sensor 1 4 inch Color CMOS VG...

Страница 17: ...del FCA48TA BL FCS43TA BL FCC ID 2ABH3FRC12TA BLC Product Digital Wireless Camera System FCS43TA BL Trade Name FURRION Model Name FRC12TA BL Serial Model FCA48TA BL FCS43TA BL FCC ID 2ABH3FRC12TA BLM...

Отзывы: